Sony DSC S70 - Cyber-shot 3.2MP Digital Camera driver and firmware
Drivers and firmware downloads for this Sony item

Related Sony DSC S70 Manual Pages
Download the free PDF manual for Sony DSC S70 and other Sony manuals at ManualOwl.com
Operating Instructions - Page 2
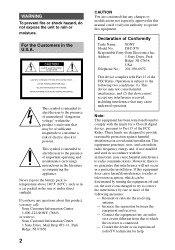
... to the presence of important operating and maintenance (servicing) instructions in the literature accompanying the appliance. Never expose ...manual could void your authority to operate this equipment.
Declaration of Conformity
Trade Name: SONY
Model No.:
DSC-S70
Responsible Party:Sony Electronics Inc.
Address:
1 Sony Drive, Park
Ridge, NJ 07656
USA
Telephone No.: 201-930-6972
This device...
Operating Instructions - Page 4
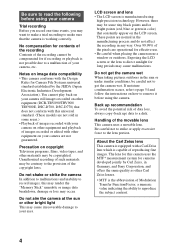
... moisture condensation occurs, refer to page 54 and follow the instructions on how to remove it before using the camera.
Back up recommendation To avoid the potential risk of data loss, always copy (back up) data to a disk.
Handling of the movable lens This camera uses a movable lens. Be careful not to strike or apply...
Operating Instructions - Page 5
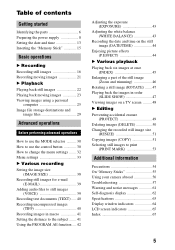
... started
Identifying the parts 6 Preparing the power supply 8 Setting the date and time 13 Inserting the "Memory Stick 15
Basic operations
B Recording
Recording still images 16 Recording moving images 21
B Playback
Playing back still images 22 Playing back moving images 23 Viewing images using a personal
computer 25 Image file storage destinations and
image files 29
Advanced operations...
Operating Instructions - Page 6
... the camera.
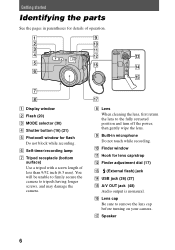
H Lens When cleaning the lens, first return the lens to the fully retracted position and turn off the power, then gently wipe the lens.
I Built-in microphone Do not touch while recording.
J Finder window
K Hook for lens cap/strap
L Finder adjustment dial (17)
M (External flash) jack
N USB jack (26) (27)
O A/V OUT jack (48) Audio output...
Operating Instructions - Page 8
...power supply
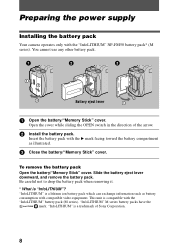
Installing the battery pack
Your camera operates only with the "InfoLITHIUM" NP-FM50 battery pack* (M series). You cannot use any other battery pack.
Battery eject lever
1 Open the battery/"Memory Stick" cover.
Open the cover while sliding the OPEN switch in the direction of the arrow.
2 Install..." M series battery packs have the
mark. "InfoLITHIUM" is a trademark of Sony Corporation.
8
Operating Instructions - Page 9
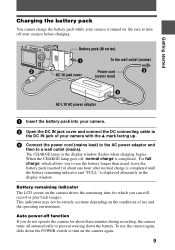
...cable to
the DC IN jack of your camera with the v mark facing up.
3 Connect the power cord (mains lead) to the AC power adaptor and
then to a wall outlet (mains). The CHARGE lamp in the display window flashes...and "FULL" is displayed alternately in the display window.
Battery remaining indicator The LCD screen on the camera shows the remaining time for which you can still record or play back images....
Operating Instructions - Page 11
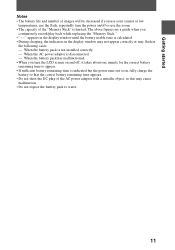
... be decreased if you use your camera at low
temperatures, use the flash, repeatedly turn the power on/off or use the zoom. • The capacity of the "Memory Stick" is limited. The above figures are a guide when you
continuously record/play back while replacing the "Memory Stick appears in the display window until the battery usable time is...
Operating Instructions - Page 25
... upgraded from: Windows 3.1, Windows 95 to Windows 98 or Windows 98 to Windows 98SE.
CPU: MMX Pentium 200 MHz or faster The USB connector must be provided as standard. ActiveMovie Player (DirectShow) must be installed (to play back moving pictures).
Recommended Macintosh environment
Macintosh computer with the Mac OS 8.5.1/8.6/9.0 standard installation However, note that the update to Mac...
Operating Instructions - Page 26
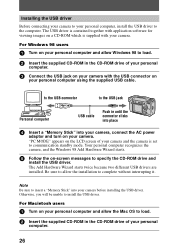
...allow Windows 98 to load.
2 Insert the supplied CD-ROM in the CD-ROM drive of your personal
computer.
3 Connect the USB jack on your camera with the USB connector on
your personal computer using the supplied USB cable.
to the USB connector
to the USB jack
Personal computer
USB cable
Push in until the connector clicks into place
4 Insert a "Memory Stick" into your camera, connect the AC power...
Operating Instructions - Page 27
... 4 (drag and drop). • Sony USB Driver • Sony USB Shim
6 When "Put these items into the Extensions folder?" appears, click
"OK."
7 Restart your personal computer.
Viewing images
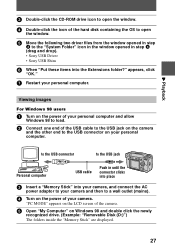
For Windows 98 users
1 Turn on the power of your personal computer and allow
Windows 98 to load.
2 Connect one end of the USB cable to the USB jack on the camera
and the other end to...
Operating Instructions - Page 28
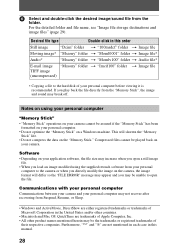
... computer. • Do not optimize the "Memory Stick" on a Windows machine. This will shorten the "Memory
Stick" life. • Do not compress the data on the "Memory Stick." Compressed files cannot be played back on
your camera.
Software • Depending on your application software, the file size may increase when you open a still image
file. • When you load...
Operating Instructions - Page 29
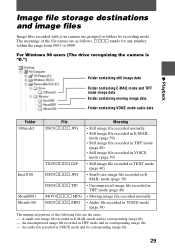
Image file storage destinations and image files
Image files recorded with your camera are grouped in folders by recording mode. The meanings of the file names are as follows. ssss stands for any number within the range from 0001 to 9999.
For Windows 98 users (The drive recognizing the camera is "D.")
B Playback
Folder containing still image data
Folder...
Operating Instructions - Page 47
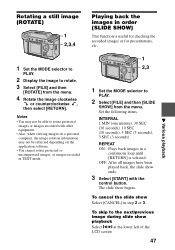
... the recorded images or for presentations, etc.
B Various playback
1 Set the MODE selector to
PLAY.
2 Display the image...recorded with other equipment. • Also, when viewing images on a personal computer, the image rotation information may not be reflected depending on the application software. • You cannot rotate protected or uncompressed images, or images recorded in TEXT mode.
1 Set...
Operating Instructions - Page 55
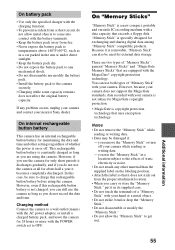
...) with the AC power adaptor, or install a charged battery pack, and leave the camera for 24 hours or more with the POWER switch set to OFF.
On "Memory Sticks"
"Memory Stick" is a new compact, portable and versatile IC recording medium with a data capacity that exceeds a floppy disk. "Memory Stick" is specially designed for exchanging and sharing digital data among "Memory Stick" compatible...
Operating Instructions - Page 58
... incorrect.
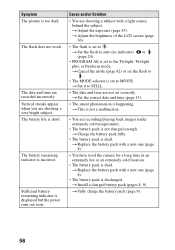
Sufficient battery remaining indicator is displayed but the power runs out soon.
Cause and/or Solution
• You are shooting a subject with a light source behind the subject. t Adjust the exposure (page 43). t Adjust the brightness of the LCD screen (page 36).
• The flash is set to . t Set the flash to auto (no indicator), or...
Operating Instructions - Page 59
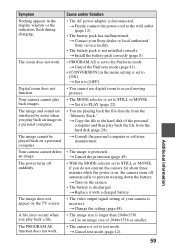
... your Sony dealer or local authorized Sony service facility.
• The battery pack is not installed correctly. t Install the battery pack correctly (page 8).
• PROGRAM AE is set to the Panfocus mode. t Cancel the Panfocus mode (page 42).
• [CONVERSION] in the menu setting is set to [ON]. t Set it to [OFF].
• You cannot use digital zoom to record moving...
Operating Instructions - Page 62
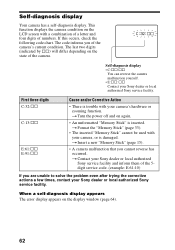
... of the camera.
Self-diagnosis display • C:ss:ss
You can reverse the camera malfunction yourself. • E:ss:ss Contact your Sony dealer or local authorized Sony service facility.
First three digits C:32:ss
C:13:ss
E:61:ss E:91:ss
Cause and/or Corrective Action
• There is trouble with your camera's hardware or zooming function. t Turn the power off...
Operating Instructions - Page 64
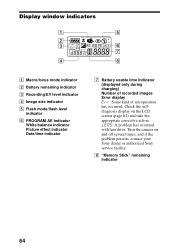
... charging) Number of recorded images Error display : Some kind of misoperation has occurred. Check the selfdiagnosis display on the LCD screen (page 62) and take the appropriate corrective action. : A problem has occurred with lens drive. Turn the camera on and off several times, and if the problem persists, contact your Sony dealer or authorized Sony service facility.
H "Memory Stick" remaining...
Operating Instructions - Page 67
... 9 installing 8 remaining battery indicator 65 BEEP 36
C Charging the battery
pack 9 Cleaning 54 Control button 30 Conversion lens 35 COPY 51
D DELETE 50 Digital zoom 18 Display window
indicators 64
E Editing
COPY 51 DELETE 50 preventing accidental erasure 49 E-MAIL 39 Enlarging a part of the still image 46
F File name 29 FLASH LEVEL 20 Focus 41 Focusing manually.........41...