Sony DSC W50 - Cyber-shot Digital Camera driver and firmware
Drivers and firmware downloads for this Sony item
Related Sony DSC W50 Manual Pages
Download the free PDF manual for Sony DSC W50 and other Sony manuals at ManualOwl.com
User Guide - Page 3
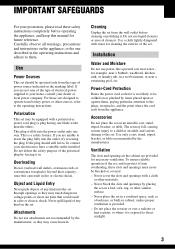
...instructions completely before operating the appliance, and keep this manual for future reference. Carefully observe all warnings, precautions and instructions on the appliance, or the one described in the operating instructions and adhere to them.
Use
Power Sources
This set... the exterior of the set.
Installation
Water and Moisture
Do not use power-line operated sets near water - for example...
User Guide - Page 6
...dealer or an experienced radio/TV technician for help.
The supplied interface cable must be used with the equipment in order to comply with the limits for a digital device pursuant to Subpart B ...set out in the EMC Directive for using connection cables shorter than 3 meters (9.8 feet).
Attention
The electromagnetic fields at the specific frequencies may influence the picture and sound of this camera...
User Guide - Page 8
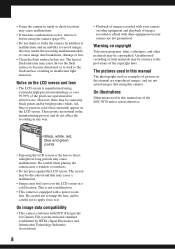
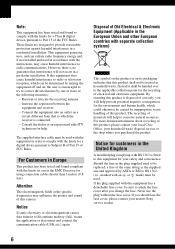
... copyrighted. Unauthorized recording of such materials may be contrary to the provisions of the copyright laws.
The pictures used in this manual
The photographs used as examples of pictures in this manual are reproduced images, and are not actual images shot using this camera.
On illustrations
Illustrations used in this manual are of the DSC-W70 unless...
User Guide - Page 12

... computer
Enjoying your Windows computer 56 Installing the software (supplied 58 Copying images to your computer 59 Viewing image files stored on a computer with your camera (using a "Memory Stick Duo 65 Using the "Cyber-shot Viewer" (supplied 66 Using your Macintosh computer 70
Printing still images
How to print still images 72 Printing images directly using a PictBridge compliant printer...
User Guide - Page 17
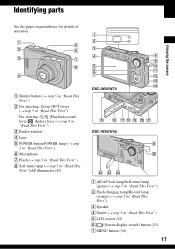
... C Finder window D Lens E POWER button/POWER lamp (t step 2 in "Read This First") F Microphone G Flash (t step 5 in "Read This First") H Self-timer lamp (t step 5 in "Read This First")/AF illuminator (49)
A B
C
D
H
I
E
J
F
K
G
L
M
N DSC-W50/W70
O P QR S T U
DSC-W30/W40
I
J
VW X A AE/AF lock lamp/Self-timer lamp
(green) (t step 5 in "Read This First") B Flash charging lamp/Record lamp...
User Guide - Page 33
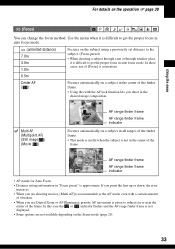
... set distance to the subject. (Focus preset)
• When shooting a subject through a net or through window ...setting information in "Focus preset" is approximate. If you point the lens up or down, the error...Digital Zoom or AF Illuminator, priority AF movement is given to subjects in or near the
center of the frame. In this case the or indicator flashes and the AF range finder frame is not displayed...
User Guide - Page 43
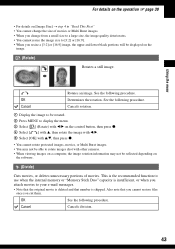
... to display the menu. 3 Select [ ] (Rotate) with b/B on the control button, then press z. 4 Select [ ] with v, then rotate the image with b/B. 5 Select [OK] with v/V, then press z.
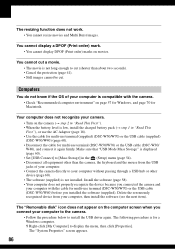
• You cannot rotate protected images, movies, or Multi Burst images. • You may not be able to rotate images shot with other cameras. • When viewing images on a computer...
User Guide - Page 54
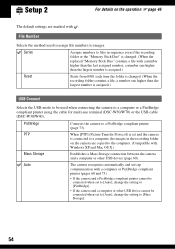
... (DSC-W50/W70) or the USB cable (DSC-W30/W40).
PictBridge
Connects the camera to a PictBridge compliant printer (page 73).
PTP
When [PTP] (Picture Transfer Protocol) is set and the camera
is connected to a computer, the images in the recording folder
on the camera are copied to the computer. (Compatible with
Windows XP and Mac OS X.)
Mass Storage
Establishes a Mass Storage connection...
User Guide - Page 56
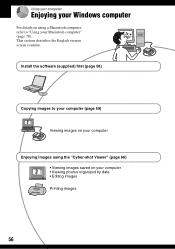
Using your computer
Enjoying your Windows computer
For details on using a Macintosh computer, refer to "Using your Macintosh computer" (page 70). This section describes the English version screen contents.
Install the software (supplied) first (page 58)
Copying images to your computer (page 59)
Viewing images on your computer
Enjoying images using the "Cyber-shot Viewer" (page 66) • Viewing ...
User Guide - Page 57
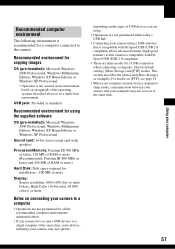
... Windows 2000 Professional, Windows Millennium Edition, Windows XP Home Edition or Windows XP Professional
Sound card: 16-bit stereo sound card with speakers
Processor/Memory: Pentium III 500 MHz or faster, 128 MB of RAM or more (Recommended: Pentium III 800 MHz or faster and 256 MB of RAM or more)
Hard Disk: Disk space required for installation-200 MB or more
Display: Screen resolution...
User Guide - Page 58
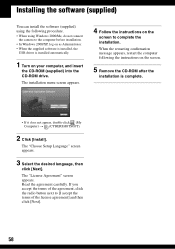
... connect
the camera to the computer before installation. • In Windows 2000/XP, log on as Administrator. • When the supplied software is installed, the
USB driver is installed automatically.
1 Turn on your computer, and insert
the CD-ROM (supplied) into the CD-ROM drive.
The installation menu screen appears.
4 Follow the instructions on the
screen to complete the installation.
When the...
User Guide - Page 59
.... • When using Windows 2000/Me, install the
supplied software before proceeding. With Windows XP, the installation is unnecessary. • The screen displays shown in this section are the examples for copying images from "Memory Stick Duo".
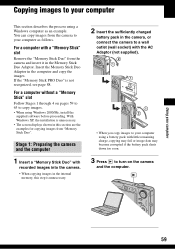
Stage 1: Preparing the camera and the computer
1 Insert a "Memory Stick Duo" with
recorded images into the camera.
• When copying images in the...
User Guide - Page 60
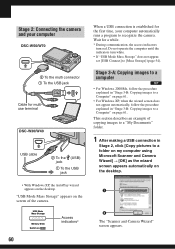
Stage 2: Connecting the camera and your computer
DSC-W50/W70
2 To the multi connector 1 To the USB jack
Cable for multiuse terminal
DSC-W30/W40
USB cable
2 To the (USB) jack
1 To the USB jack
• With Windows XP, the AutoPlay wizard appears on the desktop.
"USB Mode Mass Storage" appears on the screen of the camera.
USB Mode Mass Storage
Memory Stick Switch on MENU
Access indicators*
60...
User Guide - Page 66
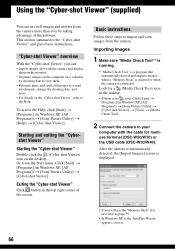
... [Start] t
[Programs] (in Windows XP, [All Programs]) t [Sony Picture Utility] t [Cyber-shot Viewer] t [Tools] t [Media Check Tool].
2 Connect the camera to your
computer with the cable for multiuse terminal (DSC-W50/W70) or the USB cable (DSC-W30/W40).
After the camera is automatically detected, the [Import Images] screen is displayed.
• If you will use the "Memory Stick" slot, first refer...
User Guide - Page 69
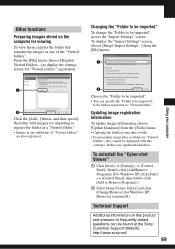
...be displayed with this software. In this case, update the database.
To uninstall the "Cyber-shot Viewer"
1 Click [Start] t [Settings] t [Control Panel]. Double-click [Add/Remove Programs]. (For Windows XP, click [Start] t [Control Panel], then double-click [Add or Remove Programs].)
2 Select [Sony Picture Utility] and click [Change/Remove] (for Windows XP, [Remove] to uninstall.)
Technical Support...
User Guide - Page 70
... sleep mode, communication between your camera and your computer may not recover at the same time.
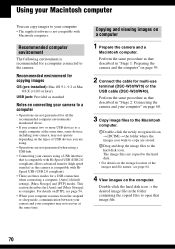
Copying and viewing images on a computer
1 Prepare the camera and a
Macintosh computer.
Perform the same procedure as that described in "Stage 1: Preparing the camera and the computer" on page 59.
2 Connect the cable for multi-use
terminal (DSC-W50/W70) or the USB cable (DSC-W30/W40).
Perform the...
User Guide - Page 86
... (DSC-W50/W70) or the USB cable (DSC-W30/ W40), and connect it again firmly. Make sure that "USB Mode Mass Storage" is displayed (page 60). • Set [USB Connect] to [Mass Storage] in the (Setup) menu (page 54). • Disconnect all equipment other than the camera, the keyboard and the mouse from the USB jacks of your computer. • Connect the camera directly to your computer...
User Guide - Page 87
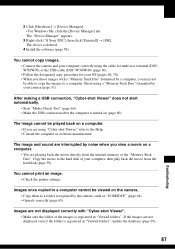
... [ Sony DSC], then click [Uninstall] t [OK]. The device is deleted.
4 Install the software (page 58).
You cannot copy images. • Connect the camera and your computer correctly using the cable for multi-use terminal (DSCW50/W70) or the USB cable (DSC-W30/W40) (page 60). • Follow the designated copy procedure for your OS (pages 60, 70). • When you shoot images with a "Memory...
User Guide - Page 103

... 99 Clock Set 55 Cloudy 35 Color 15 Color Mode 32 Compression ratio 16 Computer 56 Copying images ...... 59, 70 Macintosh 70 Recommended environment 57, 70 Software 58, 66 Viewing image files stored on a computer with your camera 65 Windows 56 Connecting Computer 60 Printer 74 TV 78 Contrast 38
Copy 52 Copying images to your
computer 59 Create REC. Folder 51 Cyber-shot Viewer...
User Guide - Page 105
... 5 in "Read This First" Screen Changing the display .....23 Indicator 19 LCD Backlight 53 Self-diagnosis display...........92 Self-timer t step 5 in "Read This First" Set the clock t step 2 in "Read This First" Setup 38, 45, 46 Camera 47 Internal Memory Tool....50 Memory Stick Tool........51 Setup 1 53 Setup 2 54 Setup 1 53 Setup 2 54 Sharpness 38 Shooting Movie t step 5 in...