Sony DSCU60 - 2.0 Megapixel Digital Camera driver and firmware
Drivers and firmware downloads for this Sony item
Related Sony DSCU60 Manual Pages
Download the free PDF manual for Sony DSCU60 and other Sony manuals at ManualOwl.com
Operating Instructions - Page 2
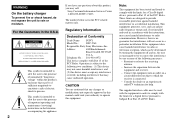
... any questions about this product, you may call:
Sony Customer Information Services Center 1-800-222-SONY (7669)
The number below is for the FCC related matters only.
Regulatory Information
Declaration of Conformity
Trade Name: SONY
Model No.:
DSC-U60
Responsible Party:Sony Electronics Inc.
Address:
680 Kinderkamack
Road, Oradell, NJ 07649
U.S.A.
Telephone No.: 201-930-6972
This device...
Operating Instructions - Page 5
...of Sony Corporation.
• "Memory Stick PRO" and
are trademarks of Sony Corporation.
• "MagicGate" and
are
trademarks of Sony Corporation.
• Microsoft and Windows are registered
trademarks of the U.S. Microsoft Corporation
in the United States and other countries.
• Macintosh, Mac OS, iBook and Power Mac are
trademarks or registered trademarks of Apple
Computer, Inc...
Operating Instructions - Page 6
...
Deleting images 46 Formatting a "Memory Stick 47
Enjoying images on your computer
Copying images to your computer - For Windows users 49
Installing the USB driver 50 Installing "Image Transfer 51 Installing "ImageMixer 52 Connecting the camera to your
computer 53 Copying images using "Image
Transfer 54 Changing "Image Transfer" settings...55 Copying images without using "Image
Transfer...
Operating Instructions - Page 23
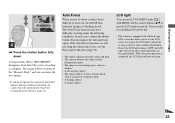
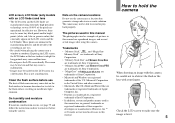
... shutter button fully down.
A beep sounds. When "RECORDING" disappears from the LCD screen, recording is complete. The image will be recorded in the "Memory Stick," and you can shoot the next image. • If you do not operate the camera for about three
minutes during recording or playback, the camera turns off automatically to prevent wearing down...
Operating Instructions - Page 32
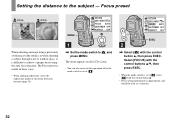
... m
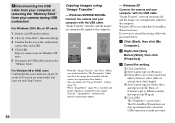
When shooting an image using a previously set distance to the subject, or when shooting a subject through a net or window glass, it is difficult to achieve a proper ... with the control button v, then press EXEC. Select [FOCUS] with the control buttons v/V, then press EXEC.
• When the mode switch is set to , select [ ] with the control button v.
• Focus setting information is ...
Operating Instructions - Page 49
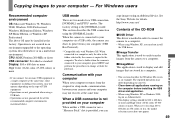
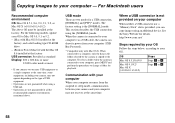
... not provided on your computer
When neither a USB connector nor a "Memory Stick" slot is provided, you can
copy images using an additional device. See the Sony Website for details. http://www.sony.net/
Contents of the CD-ROM
x USB Driver This driver is needed in order to connect the camera to a computer. • When using Windows XP, you need not install
the USB driver.
x Image Transfer This...
Operating Instructions - Page 50
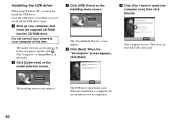
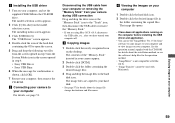
Installing the USB driver
When using Windows XP, you need not install the USB driver. Once the USB driver is installed, you need not install the USB driver again. a Start up your computer, and
insert the supplied CD-ROM into the CD-ROM drive.
Do not connect your camera to your computer at this time.
The model selection screen appears. If it does not appear, double-click (My Computer) t [ImageMixer...
Operating Instructions - Page 51
..."
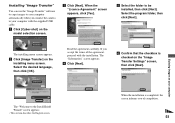
You can use the "Image Transfer" software to copy images to your computer automatically when you connect the camera to your computer with the supplied USB cable. a Click [Cyber-shot] on the
model selection screen.
c Click [Next]. When the "Licence Agreement" screen appears, click [Yes].
e Select the folder to be installed, then click [Next]. Select the program folder...
Operating Instructions - Page 52
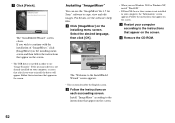
... the screen.
• The USB driver is needed in order to use "Image Transfer." If the necessary driver is not already installed on your computer, a screen that asks if you want to install the driver will appear. Follow the instructions that appear on the screen.
Installing "ImageMixer"
You can use the "ImageMixer Ver.1.5 for Sony" software to copy, view and edit images...
Operating Instructions - Page 53
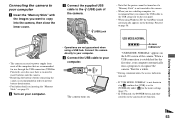
... using a USB hub. Connect the camera directly to your computer.
d Connect the USB cable to your computer.
The camera turns on.
• Note that the power cannot be turned on if a "Memory Stick" is not inserted in the camera.
• When you use a desktop computer, we recommend that you connect the USB cable to the USB connector on the rear panel.
• When using Windows XP...
Operating Instructions - Page 54
... of the image files recorded with the camera are copied into these folders.
• You can change the "Image Transfer" settings (page 55).
• When "ImageMixer" (page 52) is installed and image copying is completed using "Image Transfer," "ImageMixer" automatically launches and images appear.
54
- Windows XP
Connect the camera and your computer with the USB cable. "Image Transfer" starts up...
Operating Instructions - Page 55
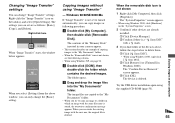
... either of the devices above,
follow the steps below to delete them. 1 Click [ Sony DSC].
• When using Windows 2000, right-click [ Sony DSC].
2 Click [Remove] (or [Uninstall] in Windows 2000). The "Confirm Device Removal" screen appears.
3 Click [OK]. The device is deleted.
Try the USB driver installation again using the supplied CD-ROM (page 50).
55
Enjoying images on your computer
Operating Instructions - Page 56

- Windows XP
Copying images using the Windows XP AutoPlay Wizard
a Make a USB connection (page 53). Click [Copy pictures to a folder on my computer using Microsoft Scanner and Camera Wizard], then click [OK].
The "Scanner and Camera Wizard" screen appears.
b Click [Next]. The images stored on the "Memory Stick" are displayed.
c Click the checkbox of images that you do not want to...
Operating Instructions - Page 57
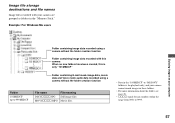
Image file storage destinations and file names
Image files recorded with your camera are grouped as folders in the "Memory Stick."
Example: For Windows Me users
Enjoying images on your computer
Folder containing image data recorded using a camera without the folder creation function
Folder containing image data recorded with this camera When no new folders have been created, this is only...
Operating Instructions - Page 58
..., update your OS to Mac OS 9.0, 9.1 or 9.2. - iMac with Mac OS 8.6 installed at the
factory, and a slot loading type CD-ROM drive - iBook or Power Mac G4 with the Mac OS 8.6 installed at the factory USB connector: Provided as standard Display: 800 × 600 dots or more
32,000-color mode or more
• If you connect two or more USB equipment to a single computer...
Operating Instructions - Page 59
... installing the USB driver and application.
• You can use the "ImageMixer Ver.1.5 for Sony" software to copy images to your computer and to view images on your computer. See the operation manual supplied with the CD-ROM for details about the installation method, or see the software's help files for the operation method.
• "ImageMixer" is not compatible with Mac OS X.
•...
Operating Instructions - Page 64

... created or processed using other devices.
• You cannot display print (DPOF) marks on movies.
Solution -
-
Deleting images
Symptom Your camera cannot delete an image.
You have deleted an image by mistake.
Cause
Solution
• The write-protect switch on the "Memory Stick" p Set it to the recording position (page 76). is set to the LOCK position...
Operating Instructions - Page 65
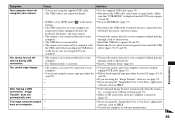
... to your computer.
• The USB driver is not installed. • The camera was connected to a computer with
the USB cable before installing the USB driver, so the device was not recognized by the computer.
p Use the supplied USB cable (page 53). p Disconnect the USB cable, and connect it again firmly. Make
sure that "USB MODE" is displayed on the LCD screen (pages 53 and 59). p Set it to...
Operating Instructions - Page 66
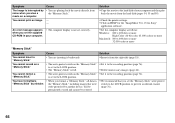
... "Memory Stick."
- -
An error message appears when you set the supplied CD-ROM in your computer.
• The computer display is not set correctly.
Solution
p Copy the movie to the hard disk of your computer and then play back the movie from the hard disk (pages 54, 55 and 59).
p Check the printer settings. p Click on HELP for the "ImageMixer Ver.1.5 for Sony"
application software.
p Set the...
Operating Instructions - Page 85
... 38 recording folder 26
Formatting a "Memory Stick 47
I
Image copying images to your computer 54, 55, 59 file names 57 image file storage destinations 57 image size 20, 21
Image Transfer 51 ImageMixer 52 Index screen 36 Inner cover 12 Installation
Image Transfer 51 ImageMixer 52 USB driver 50, 59
J
JPG 57
L
LCD screen LCD light 23 screen display...