Sony HDR-CX100/R - Palm-size Hd Camcorder driver and firmware
Drivers and firmware downloads for this Sony item
Related Sony HDR-CX100/R Manual Pages
Download the free PDF manual for Sony HDR-CX100/R and other Sony manuals at ManualOwl.com
Operating Guide - Page 3
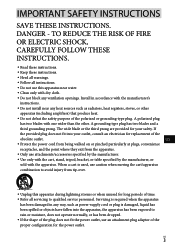
... with dry cloth.
Do not block any ventilation openings. Install in accordance with the manufacturer's
instructions.
Do not install near any heat sources such as radiators, heat registers, stoves, or...time. Refer all servicing to qualified service personnel. Servicing is required when the apparatus
has been damaged in any way, such as power-supply cord or plug is damaged...
Operating Guide - Page 7
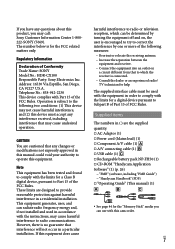
...; A/V connecting cable (1) USB cable (1) Rechargeable battery pack NP-FH50 (1) CD-ROM "Handycam Application Software" (1) (p. 26)
"PMB" (software, including "PMB Guide") "Handycam Handbook" (PDF) "Operating Guide" (This manual) (1)
See page 44 for the "Memory Stick" media you can use with this camcorder.
US
Operating Guide - Page 9
... in this manual for illustration purposes are captured using a digital still camera, and therefore may appear different from the actual images of the LCD screen.
In this Operating Guide, the internal memory of the camcorder and "Memory Stick PRO Duo" media are called "recording media."
In this Operating Guide, both "Memory Stick PRO Duo" media and "Memory Stick PRO...
Operating Guide - Page 11
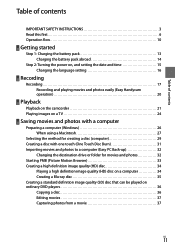
... battery pack abroad 14
Step 2: Turning the power on, and setting the date and time 15 Changing the language setting 16
Recording
Recording 17 Recording and playing movies and photos easily (Easy Handycam operation 20
Playback
Playback on the camcorder 21 Playing images on a TV 24
Saving movies and photos with a computer
Preparing a computer (Windows 26 When using a Macintosh 27
Selecting...
Operating Guide - Page 26
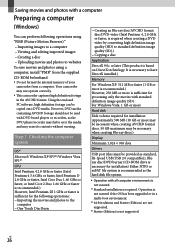
...
USB port (this must be provided as standard, Hi-Speed USB (USB 2.0 compatible)), Bluray disc/DVD burner (CD-ROM drive is necessary for installation) Either NTFS or exFAT file system is recommended as the hard disk file system.
Operation with all computer environments is
not assured.
*1 Standard installation is required. Operation is not assured if the OS has been upgraded...
Operating Guide - Page 27
...http://guide.d-imaging.sony.co.jp/mac/ ms/us/
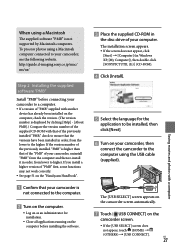
Step 2 Installing the supplied software "PMB"
Install "PMB" before connecting your camcorder to a computer. If a version of "PMB" supplied with another
device has already been installed on the computer, check the version. (The version number is displayed by clicking [Help] - [About PMB].) Compare the version number of the supplied CD-ROM with...
Operating Guide - Page 28
... the instructions to install the required software.
Restart the computer if required to complete the installation.
When the installation is completed, following icons will appear. Remove the CD-ROM from your computer.
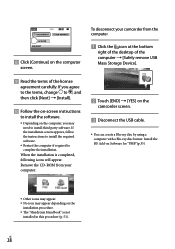
To disconnect your camcorder from the computer
Click the icon at the bottom
right of the desktop of the computer [Safely remove USB Mass Storage Device...
Operating Guide - Page 29
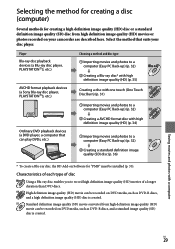
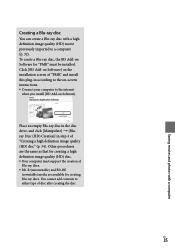
... image quality (SD) disc from high definition image quality (HD) movies or photos recorded on your camcorder are described here. Select the method that suits your disc player.
Player Blu-ray disc playback devices (a Blu-ray disc player, PLAYSTATION3, etc.)
AVCHD format playback devices (a Sony Blu-ray disc player, PLAYSTATION3, etc.)
Choosing a method and disc type
...
Operating Guide - Page 30
... page 35.
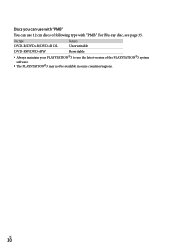
Disc type DVD-R/DVD+R/DVD+R DL
Features Unrewritable
DVD-RW/DVD+RW
Rewritable
Always maintain your PLAYSTATION3 to use the latest version of the PLAYSTATION3 system software.
The PLAYSTATION3 may not be available in some countries/regions.
US
30
Operating Guide - Page 31
... photos recorded on the internal memory only.
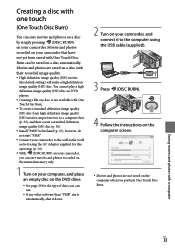
1 Turn on your computer, and place an empty disc on the DVD drive.
See page 29 for the type of discs you can use.
If any other software than "PMB" starts automatically, shut it down.
2 Turn on your camcorder, and connect it to the computer using the USB cable (supplied...
Operating Guide - Page 32
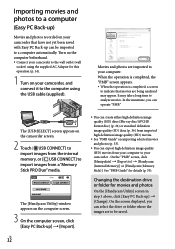
... and photos (p. 33).
You can export high definition image quality (HD) movies from your computer to your camcorder . On the "PMB" screen, click [Manipulate] [Export to] [Handycam (Internal Memory)] or [Handycam (Memory Stick)]. See "PMB Guide" for details (p. 33).
Changing the destination drive or folder for movies and photos
On the [Handycam Utility] screen...
Operating Guide - Page 34
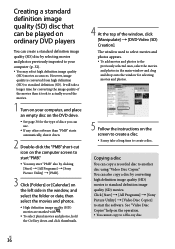
... (HD) disc on AVCHD format playback devices, such as a Sony Blu-ray disc player and a PLAYSTATION3. You cannot play the disc on ordinary DVD players (p. 29).
1 Turn on your computer, and place an empty disc on the DVD drive.
See page 30 for the type of discs you can use.
If any other software than...
Operating Guide - Page 35
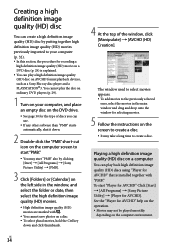
... image quality (HD) movie previously imported to a computer (p. 32). To create a Blu-ray disc, the BD Add-on Software for "PMB" must be installed. Click [BD Add-on Software] on the installation screen of "PMB," and install this plug-in according to the on-screen instructions. Connect your computer to the internet
when you install [BD Add-on Software].
Place an...
Operating Guide - Page 36
... and drop onto the window for selecting movies and photos.
5 Follow the instructions on the screen to create a disc. It may take a long time to create a disc.
Copying a disc
You can copy a recorded disc to another disc using "Video Disc Copier." You can also copy a disc by converting high definition image quality (HD) movies to standard...
Operating Guide - Page 51
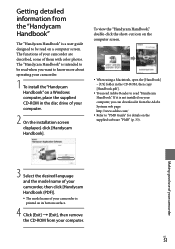
...] - [US] folder in the CD-ROM, then copy [Handbook.pdf ].
You need Adobe Reader to read "Handycam Handbook." If it is not installed on your computer, you can download it from the Adobe Systems web page: http://www.adobe.com/
Refer to "PMB Guide" for details on the supplied software "PMB" (p. 33).
Making good use of...
Operating Guide - Page 55
..., periodically clean the lens as described above.
On charging the pre-installed rechargeable battery
Your camcorder has a pre-installed rechargeable battery to retain the date, time, and other settings even when the camcorder is turned off. The preinstalled rechargeable battery is always charged while your camcorder is connected to the wall outlet (wall socket) via the...
Operating Guide - Page 62
... time....57 Recording media 43 RESET 60
S Screen indicators 59 Self-diagnosis display 53 Setting the date and time...........15 Software 27 Specifications 56 Supplied items 7
T Troubleshooting 52 Turning the power on 15 TV 24 TV CONNECT Guide 24 U USB 26, 39 Using a wall outlet (wall socket) as a power source 14 V VISUAL INDEX 21 Volume 22 W Warning indicators 53 Windows 26...
Handycam® Handbook - Page 109
... long as you are not recording the date.
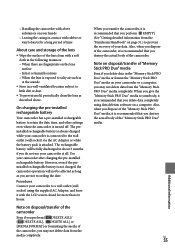
How to charge the pre-installed rechargeable battery
Connect your camcorder to a wall outlet (wall socket) using the supplied AC Adaptor, and leave it with the LCD screen closed for more than 24 hours.
Note on disposal/transfer of the "Memory Stick PRO Duo" media
Even...
Handycam® Handbook - Page 110
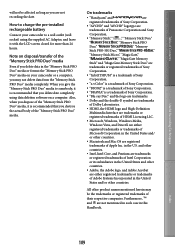
... " in the "License" folder on the CD-ROM. You will find licenses (in English) of "GPL," and "LGPL" software.
To view the PDF, Adobe Reader is needed. If it is not installed on your computer, you can download it from the Adobe Systems web page: http://www.adobe.com/
Useful Recording Techniques
Index
"C Library," "Expat," "zlib," and...
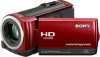
Marketing Specifications (Red Model) - Page 2
HDR-CX100/R
Palm-size HD camcorder w/ Smile Shutter technology
Specifications
General
Imaging Device: 1/5" Exmor™ CMOS sensor with ClearVid™ array
Pixel Gross: 2360K Recording Media: 8GB Embedded Flash memory
Memory Stick PRO Duo™ Media (Sold Separately) Recording and Playback Times: When using 16GB
Memory Stick PRO Duo™ Media (sold separately): High Definition: FH = up ...