Sony MVC CD1000 - Mavica 2.1MP Digital Camera driver and firmware
Drivers and firmware downloads for this Sony item
Related Sony MVC CD1000 Manual Pages
Download the free PDF manual for Sony MVC CD1000 and other Sony manuals at ManualOwl.com
Operating Instructions - Page 2
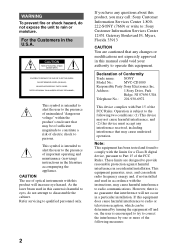
... that any changes or modifications not expressly approved in this manual could void your authority to operate this equipment.
Declaration of Conformity
Trade name:
SONY
Model No.:
MVC-CD1000
Responsible Party:Sony Electronics Inc.
Address:
1 Sony Drive, Park
Ridge, NJ 07656 USA
Telephone No.: 201-930-6972
This device complies with Part 15 of the FCC Rules. Operation is...
Operating Instructions - Page 4
... the model number. As you read through this manual, buttons and settings on the camera are shown in capital letters. e.g. Press DISPLAY. This digital still camera uses 8 cm CD-Rs as recording media. "CD-R" mentioned above is indicated as "disc" in this manual.
• We recommend that you use this camera with Mavica discs*.
• While the image is being...
Operating Instructions - Page 6
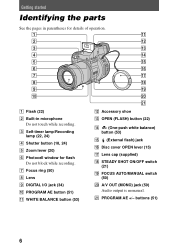
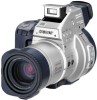
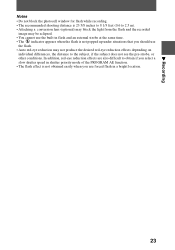
...) F Photocell window for flash
Do not block while recording. G Focus ring (50) H Lens I DIGITAL I/O jack (34) J PROGRAM AE button (51) K WHITE BALANCE button (53)
L Accessory shoe M OPEN (FLASH) button (22)
N (One-push white balance) button (53)
O (External flash) jack P Disc cover OPEN lever (15) Q Lens cap (supplied) R STEADY SHOT ON/OFF switch
(21) S FOCUS AUTO/MANUAL switch...
Operating Instructions - Page 7
q;
Getting started
1 2 3 4 5 6 7
8 9
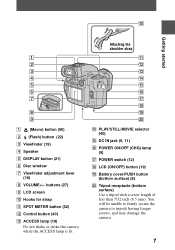
A (Macro) button (50) B (Flash) button (22) C Viewfinder (19) D Speaker E DISPLAY button (21) F Disc window G Viewfinder adjustment lever
(19) H VOLUME+/- buttons (27) I LCD screen J Hooks for strap K SPOT METER button (52) L Control button (40) M ACCESS lamp (18)
Do not shake or strike the camera while the ACCESS lamp is lit.
Attaching the shoulder strap
qa...
Operating Instructions - Page 8
Preparing the power supply
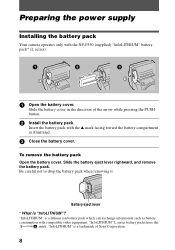
Installing the battery pack
Your camera operates only with the NP-F550 (supplied) "InfoLITHIUM" battery pack* (L series).
1
2
1 2
3
1 2
1 Open the battery cover.
Slide the battery cover in the direction of the arrow while pressing the PUSH button.
2 Install the .... "InfoLITHIUM" L series battery packs have the
mark. "InfoLITHIUM" is a trademark of Sony Corporation.
8
Operating Instructions - Page 14
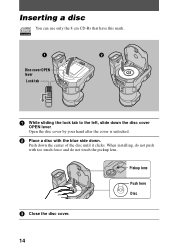
... your hand after the cover is unlocked.
2 Place a disc with the blue side down.
Push down the center of the disc until it clicks. When installing, do not push with too much force and do not touch the pickup lens.
Pickup lens
Push here Disc
3 Close the disc cover.
14
Operating Instructions - Page 23
...; Do not block the photocell window for flash while recording. • The recommended shooting distance is 23 5/8 inches to 8 1/3 feet (0.6 to 2.5 m). • Attaching a conversion lens (optional) may block the light from the flash and the recorded
image may be eclipsed. • You cannot use the built-in flash and an external strobe at the same time...
Operating Instructions - Page 28
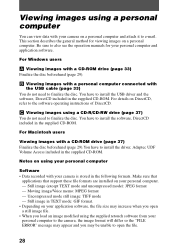
... also see the operation manuals for your personal computer and application software.
For Windows users
A Viewing images with a CD-ROM drive (page 33) Finalize the disc beforehand (page 29).
B Viewing images with a personal computer connected with the USB cable (page 33)
You do not need to finalize the disc. You have to install the USB driver and the software, DirectCD included in the...
Operating Instructions - Page 29
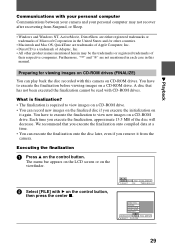
..., "™" and "®" are not mentioned in each case in this manual.
Preparing for viewing images on CD-ROM drives (FINALIZE)
You can play back the disc recorded with this camera on CD-ROM drives. You have to execute the finalization before viewing images on a CD-ROM drive. A disc that has not been executed the finalization cannot be read...
Operating Instructions - Page 32
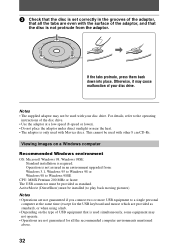
... only used with Mavica discs. This cannot be used with other 8 cm CD-Rs.
Viewing images on a Windows computer
Recommended Windows environment OS: Microsoft Windows 98, Windows 98SE
Standard installation is required. Operation is not assured in an environment upgraded from: Windows 3.1, Windows 95 to Windows 98 or Windows 98 to Windows 98SE CPU: MMX Pentium 200 MHz or faster The USB connector must...
Operating Instructions - Page 33
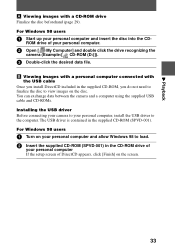
...supplied USB cable and CD-ROMs. Installing the USB driver Before connecting your camera to your personal computer, install the USB driver to the computer. The USB driver is contained in the supplied CD-ROM (SPVD-001). For Windows 98 users
1 Turn on your personal computer and allow Windows 98 to load. 2 Insert the supplied CD-ROM (SPVD-001) in the CD-ROM drive of
your personal computer If the setup...
Operating Instructions - Page 34

... camera, connect the AC power adaptor and
turn on your camera. "PC MODE" appears on the LCD screen or on the viewfinder of your camera and the camera is set to communication standby mode. Your personal computer recognizes the camera, and the Windows 98 Add Hardware Wizard starts.
5 Follow the on-screen messages to specify the CD-ROM drive and
install the USB driver...
Operating Instructions - Page 35
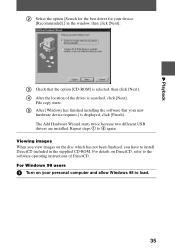
... different USB drivers are installed. Repeat steps 1 to 5 again. Viewing images When you view images on the disc which has not been finalized, you have to install DirectCD included in the supplied CD-ROM. For details on DirectCD, refer to the software operating instructions of DirectCD. For Windows 98 users
1 Turn on your personal computer and allow Windows 98 to load...
Operating Instructions - Page 36
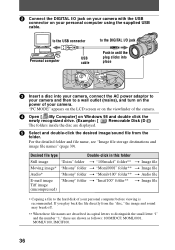
... to a wall outlet (mains), and turn on the power of your camera. "PC MODE" appears on the LCD screen or on the viewfinder of the camera.
4 Open [ My Computer] on Windows 98 and double click the
newly recognized drive. (Example: [ Removable Disk (D:)]) The folders inside the disc are displayed.
5 Select and double-click the desired image/sound file...
Operating Instructions - Page 37
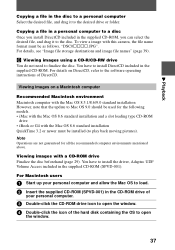
..., refer to the software operating instructions of DirectCD.
Viewing images on a Macintosh computer
Recommended Macintosh environment Macintosh computer with the Mac OS 8.5.1/8.6/9.0 standard installation However, note that the update to Mac OS 9.0 should be used for the following models. • iMac with the Mac OS 8.6 standard installation and a slot loading type CD-ROM
drive • iBook or...
Operating Instructions - Page 38
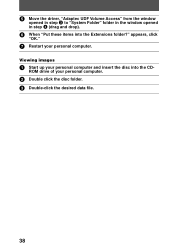
5 Move the driver, "Adaptec UDF Volume Access" from the window
opened in step 3 to "System Folder" folder in the window opened in step 4 (drag and drop).
6 When "Put these items into the Extensions folder?" appears, click
"OK."
7 Restart your personal computer.
Viewing images
1 Start up your personal computer and insert the disc into the CD-
ROM drive of...
Operating Instructions - Page 39
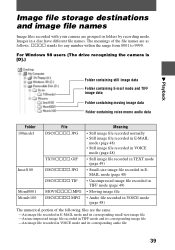
Image file storage destinations and image file names
Image files recorded with your camera are grouped in folders by recording mode. Images in a disc have different file names. The meanings of the file names are as follows. ssss stands for any number within the range from 0001 to 9999.
For Windows 98 users (The drive recognizing the...
Operating Instructions - Page 58
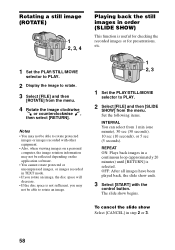
... not be able to rotate protected
images or images recorded with other equipment. • Also, when viewing images on a personal computer, the image rotation information may not be reflected depending on the application software. • You cannot rotate protected or uncompressed images, or images recorded in TEXT mode. • If you rotate an image...
Operating Instructions - Page 66
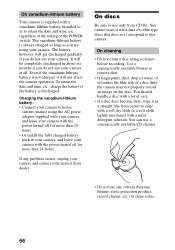
...camera, and leave your camera with the power turned off for more than 24 hours. • Or install the fully charged battery pack in your camera, and leave your camera with the power turned off for more than 24 hours.
If any problem occurs, unplug your camera and contact your nearest Sony... the blue side of a disc dirty, the camera may not properly record an image on the disc. You should handle ...
Operating Instructions - Page 69
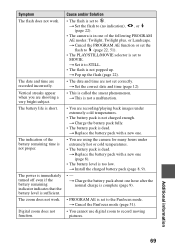
... not proper.
The power is immediately turned off even if the battery remaining indicator indicates that the battery level is sufficient. The zoom does not work. Digital zoom does not function.
Cause and/or Solution
• The flash is set to . t Set the flash to (no indication), , or (page 22).
• The camera is in one of...