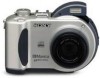
Sony MVC-CD200 - Mavica 2MP Digital Camera driver and firmware
Drivers and firmware downloads for this Sony item
Related Sony MVC-CD200 Manual Pages
Download the free PDF manual for Sony MVC-CD200 and other Sony manuals at ManualOwl.com
Operating Instructions - Page 2
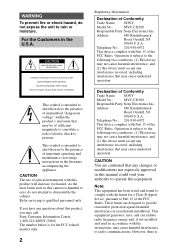
... questions about this product, you may call: Sony Customer Information Center 1-800-222-SONY (7669) The number below is for the FCC related matters only.
2
Regulatory Information
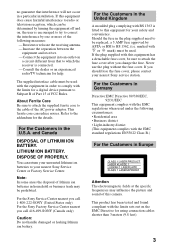
Declaration of Conformity
Trade Name: SONY
Model No.:
MVC-CD200
Responsible Party:Sony Electronics Inc.
Address:
680 Kinderkamack
Road, Oradell, NJ
07649 U.S.A.
Telephone No.: 201-930-6972
This device complies...
Operating Instructions - Page 3
...digital device pursuant to Subpart B of Part 15 of FCC Rules.
About Ferrite Core Be sure to attach the supplied ferrite core to the cable of the AC power... the fuse cover, please contact your nearest Sony service station.
For the Customers in Germany
Directive:EMC...camera.
This product has been tested and found compliant with the limits sets out on the EMC Directive for using connection cables shorter than...
Operating Instructions - Page 4
... in operation are clearly indicated in the text, for example, "MVC-CD300 only." As you read through this manual, buttons and settings on the camera are shown in capital letters. e.g. Press DISPLAY/LCD BACK LIGHT ON/OFF. This digital still camera uses 8 cm CD-Rs/ CD-RWs as recording media. "CD-R" or "CD-RW" mentioned above is indicated...
Operating Instructions - Page 6
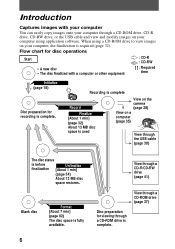
Introduction
Captures images with your computer You can easily copy images onto your computer through a CD-ROM drive, CD-R drive, CD-RW drive, or the USB cable and view and modify images on your computer using application software. When using a CD-ROM drive to view images on your computer, the finalization is required (page 32).
Flow chart for disc operations
Start
: CD-R : CD-RW
•...
Operating Instructions - Page 7
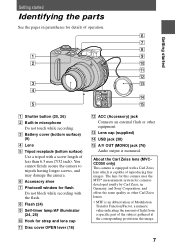
... damage the camera.
F Accessory shoe G Photocell window for flash
Do not block while recording with the flash.
H Flash (24) I Self-timer lamp/AF illuminator
(24, 25) J Hook for strap and lens cap
K Disc cover OPEN lever (16)
L ACC (Accessory) jack
Connects an external flash or other equipment.
M Lens cap (supplied)
N USB jack (38)
O A/V OUT (MONO) jack (76)
Audio output...
Operating Instructions - Page 8
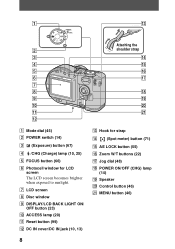
.... G LCD screen H Disc window I DISPLAY/LCD BACK LIGHT ON/ OFF button (23) J ACCESS lamp (20) K Reset button (99) L DC IN cover/DC IN jack (10, 13)
8
M Hook for strap
N (Spot meter) button (71)
O AE LOCK button (55) P Zoom W/T buttons (22) Q Jog dial (48) R POWER ON/OFF (CHG) lamp
(14) S Speaker T Control button (46) U MENU...
Operating Instructions - Page 9
...power supply
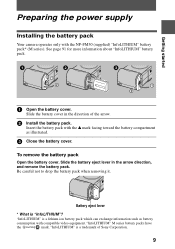
Installing the battery pack
Your camera operates only with the NP-FM50 (supplied) "InfoLITHIUM" battery pack* (M series). See page 91 for more information about "InfoLITHIUM" battery pack.
1
2
1 2
3
1 2
1 Open the battery cover.
Slide the battery cover in the direction of the arrow.
2 Install... battery packs have
the
mark. "InfoLITHIUM" is a trademark of Sony Corporation.
9
Operating Instructions - Page 11
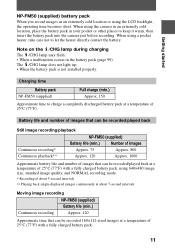
... insert the battery pack into the camera just before recording. When using a pocket heater, ...take care not to let the heater directly contact the battery.
Note on the /CHG lamp during charging The /CHG lamp may flash: • When a malfunction occurs in the battery pack (page 99). The /CHG lamp does not light up: • When the battery pack is not installed...
Operating Instructions - Page 16
... your hand after the cover is unlocked.
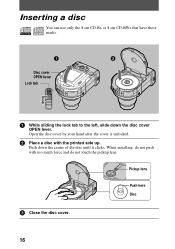
2 Place a disc with the printed side up.
Push down the center of the disc until it clicks. When installing, do not push with too much force and do not touch the pickup lens.
Pickup lens
Push here Disc
3 Close the disc cover.
16
Operating Instructions - Page 35
B Playback
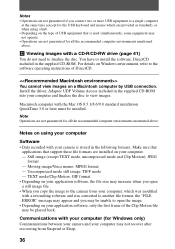
Viewing images using a computer
You can view data recorded with your camera on a computer. This section describes the general method for viewing images on a computer and installing the driver into a computer. Be sure to also see the operation manuals for your computer and application software. To view images on the CD-RW using a CD-ROM drive or CDR drive, the drive must conform to the...
Operating Instructions - Page 36
... images with a CD-R/CD-RW drive (page 41) You do not need to finalize the disc. You have to install the software, DirectCD included in the supplied CD-ROM. For details on Windows environment, refer to the software operating instructions of DirectCD.
You cannot view images on a Macintosh computer by USB connection. Install the driver, Adaptec UDF Volume Access included in...
Operating Instructions - Page 37
...each case in this manual.
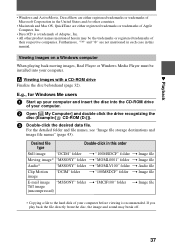
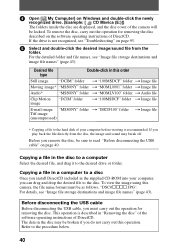
Viewing images on a Windows computer
When playing back moving images, Real Player or Windows Media Player must be installed into your computer.
A Viewing images with a CD-ROM drive Finalize the disc beforehand (page 32).
E.g., for Windows Me users
1 Start up your computer and insert the disc into the CD-ROM drive
of your computer.
2 Open [ My Computer] and double click...
Operating Instructions - Page 38
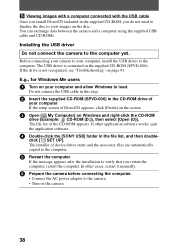
... software.
4 Double-click the [SONY USB] folder in the file list, and then double-
click [ SET UP]. The installer of device driver starts and the necessary files are automatically copied to the computer.
5 Restart the computer.
If the message appears after the installation to verify that you restart the computer, restart the computer. In other cases, restart it manually.
6 Prepare the camera...
Operating Instructions - Page 39
...the software operating instructions of DirectCD.
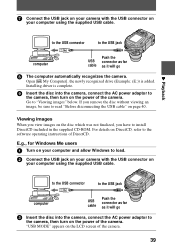
E.g., for Windows Me users
1 Turn on your computer and allow Windows to load.
2 Connect the USB jack on your camera with the USB connector on
your computer using the supplied USB cable.
to the USB connector
to the USB jack
computer
USB cable
Push the connector as far as it will go
3 Insert the disc into the camera, connect the AC power adaptor...
Operating Instructions - Page 40
4 Open [ My Computer] on Windows and double-click the newly
recognized drive. (Example: [ CD Mavica (E:)]) The folders inside the disc are displayed, and the disc cover of the camera will be locked. To remove the disc, carry out the operation for removing the disc described on the software operating instructions of DirectCD. If the drive is not recognized, see "Troubleshooting...
Operating Instructions - Page 41
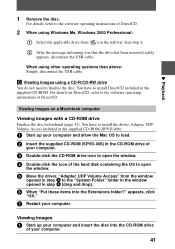
... have to install the driver, Adaptec UDF Volume Access included in the supplied CD-ROM (SPVD-006).
1 Start up your computer and allow the Mac OS to load.
2 Insert the supplied CD-ROM (SPVD-006) in the CD-ROM drive of
your computer.
3 Double-click the CD-ROM drive icon to open the window.
4 Double-click the icon of the hard disk containing the...
Operating Instructions - Page 43
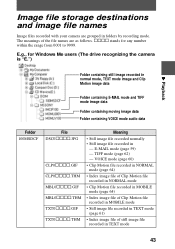
Image file storage destinations and image file names
Image files recorded with your camera are grouped in folders by recording mode. The meanings of the file names are as follows. ssss stands for any number within the range from 0001 to 9999.
E.g., for Windows Me users (The drive recognizing the camera is "E.")
B Playback
Folder containing still image recorded in...
Operating Instructions - Page 44
... its corresponding index image file
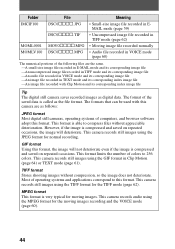
Tip The digital still camera saves recorded images as digital data. The format of the saved data is called as the file format. The formats that can be used with this camera are as follows:
JPEG format Most digital still cameras, operating systems of computers, and browser software adopt this format. This format is...
Operating Instructions - Page 97
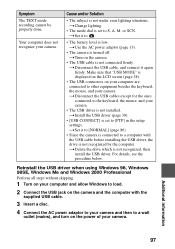
...[USB CONNECT] is set to [PTP] in the setup settings. tSet it to [NORMAL] (page 86).
• Since the camera is connected to a computer with the USB cable before installing the USB driver, the drive is not recognized by the computer. tDelete the drive which is not recognized, then install the USB driver. For details, see the procedure below.
Reinstall the USB driver when using Windows 98, Windows...
Operating Instructions - Page 98

...
3 Click [View] in [Device Manager], then click [Devices by type (E)].
4 Right-click [ CD Mavica] in [ Other devices], then click [Delete (E)].
6 After the message appears to verify that you delete the device
manager, click "OK."
7 Turn off the camera, disconnect the USB cable, and restart the
computer.
8 Install the USB driver in the supplied CD-ROM to the computer
following the procedure on page...