ZyXEL P-660RU-T1 v2 driver and firmware

Related ZyXEL P-660RU-T1 v2 Manual Pages
Download the free PDF manual for ZyXEL P-660RU-T1 v2 and other ZyXEL manuals at ManualOwl.com
Quick Start Guide - Page 2

P-660RU-Tx v2 Quick Start Guide
Overview
The P-660RU-Tx v2 is an ADSL router with both USB and Ethernet ports. See your User's Guide for background information on all features. This Quick Start Guide shows you how to:
• Connect the hardware. • Set up your Internet connection. Be sure you have your
Internet connection information from your Internet Service Provider (ISP) to set up the ...
Quick Start Guide - Page 3
... Guide
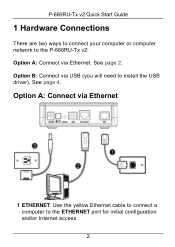
1 Hardware Connections
There are two ways to connect your computer or computer network to the P-660RU-Tx v2: Option A: Connect via Ethernet. See page 2. Option B: Connect via USB (you will need to install the USB driver). See page 4.
Option A: Connect via Ethernet
1 ETHERNET: Use the yellow Ethernet cable to connect a computer to the ETHERNET port for initial configuration and/or Internet...
Quick Start Guide - Page 4
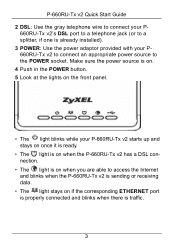
P-660RU-Tx v2 Quick Start Guide 2 DSL: Use the gray telephone wire to connect your P-
660RU-Tx v2's DSL port to a telephone jack (or to a splitter, if one is already installed). 3 POWER: Use the power adaptor provided with your P660RU-Tx v2 to connect an appropriate power source to the POWER socket. Make sure the power source is on. 4 Push in the POWER button. 5 Look...
Quick Start Guide - Page 6
P-660RU-Tx v2 Quick Start Guide
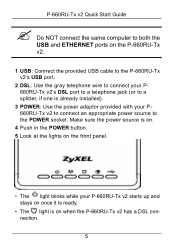
" Do NOT connect the same computer to both the USB and ETHERNET ports on the P-660RU-Tx v2.
1 USB: Connect the provided USB cable to the P-660RU-Tx v2's USB port.
2 DSL: Use the gray telephone wire to connect your P660RU-Tx v2's DSL port to a telephone jack (or to a splitter, if one is already installed).
3 POWER: Use the power adaptor provided with your P660RU-Tx...
Quick Start Guide - Page 7
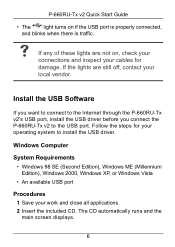
...and inspect your cables for damage. If the lights are still off, contact your local vendor.
Install the USB Software
If you want to connect to the Internet through the P-660RU-Tx v2's USB port, install the USB driver before you connect the P-660RU-Tx v2 to the USB port. Follow the steps for your operating system to install the USB driver.
Windows Computer
System Requirements • Windows 98 SE...
Quick Start Guide - Page 8
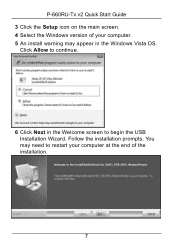
P-660RU-Tx v2 Quick Start Guide 3 Click the Setup icon on the main screen. 4 Select the Windows version of your computer. 5 An install warning may appear in the Windows Vista OS.
Click Allow to continue.
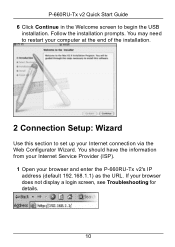
6 Click Next in the Welcome screen to begin the USB Installation Wizard. Follow the installation prompts. You may need to restart your computer at the end of the installation.
7
Quick Start Guide - Page 9
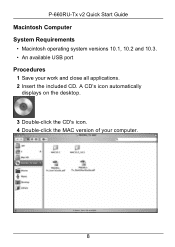
P-660RU-Tx v2 Quick Start Guide Macintosh Computer System Requirements
• Macintosh operating system versions 10.1, 10.2 and 10.3. • An available USB port Procedures 1 Save your work and close all applications. 2 Insert the included CD. A CD's icon automatically
displays on the desktop.
3 Double-click the CD's icon. 4 Double-click the MAC version of your computer.
8
Quick Start Guide - Page 10
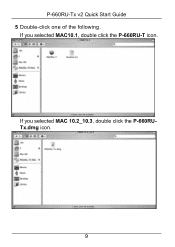
P-660RU-Tx v2 Quick Start Guide 5 Double-click one of the following.
If you selected MAC10.1, double click the P-660RU-T icon.
If you selected MAC 10.2_10.3, double click the P-660RUTx.dmg icon.
9
Quick Start Guide - Page 11
... to begin the USB
installation. Follow the installation prompts. You may need to restart your computer at the end of the installation.
2 Connection Setup: Wizard
Use this section to set up your Internet connection via the Web Configurator Wizard. You should have the information from your Internet Service Provider (ISP).
1 Open your browser and enter the P-660RU-Tx v2's IP address (default 192...
Quick Start Guide - Page 16
... Start Guide
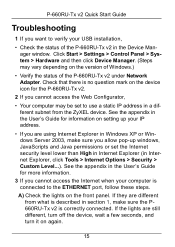
Troubleshooting
1 If you want to verify your USB installation,
• Check the status of the P-660RU-Tx v2 in the Device Manager window. Click Start > Settings > Control Panel > System > Hardware and then click Device Manager. (Steps may vary depending on the version of Windows.)
• Verify the status of the P-660RU-Tx v2 under Network Adapter. Check that there is no question...