LG LSFXC2476S driver and firmware
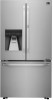
Related LG LSFXC2476S Manual Pages
Download the free PDF manual for LG LSFXC2476S and other LG manuals at ManualOwl.com
Owners Manual - Page 2
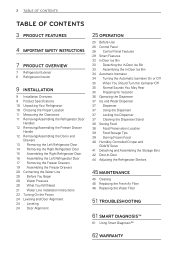
... 21 Water Line Installation Instructions 23 Turning On the Power 24 Leveling and Door Alignment 24 Leveling 24 Door Alignment
25 OPERATION
25 Before Use 26 Control Panel 26 Control Panel Features 29...38 Food Preservation Location 39 Food Storage Tips 39 Storing Frozen Food 40 Humidity Controlled Crisper and
Glide'N'Serve 41 Detaching and Assembling the Storage Bins 42 Door-In-Door 44...
Owners Manual - Page 4
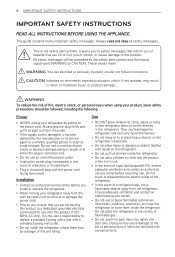
4 IMPORTANT SAFETY INSTRUCTIONS
IMPORTANT SAFETY INSTRUCTIONS
READ ALL INSTRUCTIONS BEFORE USING THE APPLIANCE.
This guide contains many important safety messages. ... power outlet. yy Unplug the power plug immediately in the
event of a blackout or thunderstorm. yy Plug in the power plug with the power cord
facing downward.
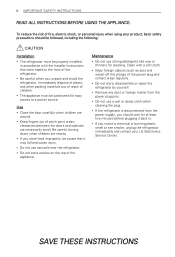
Installation
yy Contact an authorized service center before you install ...
Owners Manual - Page 6
...installed in accordance with the Installer Instructions that were taped to the front of the refrigerator.
yy Be careful when you unpack and install the refrigerator. Immediately dispose of plastic and other packing materials out of reach of children.
yy The appliance must be positioned for easy access to a power...dust and water) off the prongs of the power plug and contact areas regularly.
yy Do not...
Owners Manual - Page 9
... installation instructions first after purchasing this product or transporting it to another location.
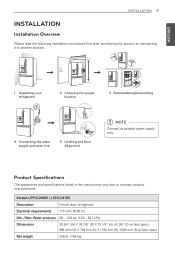
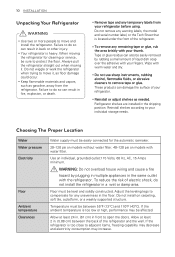
1 Unpacking your refrigerator
2 Choosing the proper location
3 Disassembling/Assembling
4 Connecting the water supply and water line
5 Leveling and Door Alignment
Note
Connect to potable water supply only.
Product Specifications
The appearance and specifications listed in this manual...
Owners Manual - Page 10
...install the refrigerator. Failure to do so can result in back or other injury.
yyYour refrigerator is heavy. When moving the refrigerator for cleaning or service... labels, the model and serial number label, or the ...installed in the shipping position. Reinstall shelves according to your individual storage...Do not install on carpeting, soft tile, a platform, or a weakly supported structure.
Temperature...
Owners Manual - Page 11
ENGLISH
INSTALLATION 11
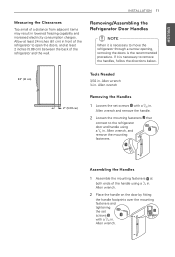
Measuring the Clearances
Too small of a distance from adjacent items may result in lowered freezing ....
24" (61 cm)
2" (5.08 cm)
Tools Needed
3/32 in. Allen wrench ¼ in. Allen wrench
Removing the Handles
1 Loosen the set screws with a 3/32 in.
Allen wrench and remove the handle.
2 Loosen the mounting fasteners that
connect to the refrigerator door and handle using a...
Owners Manual - Page 12
12 INSTALLATION
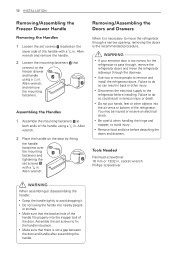
Removing/Assembling the Freezer Drawer Handle
Removing the Handles
1 Loosen the set screws located on the
lower side of the handle with a 1/8 in... wrench.
2 Place the handle on the door by fitting
the handle footprints over the mounting fasteners and tightening the set screws with a 1/8 in. Allen wrench.
Removing/Assembling the Doors and Drawers
When it is necessary to move the...
Owners Manual - Page 13
ENGLISH
INSTALLATION 13
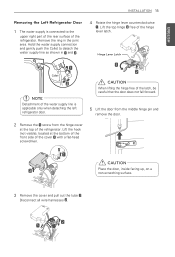
Removing the Left Refrigerator Door
1 The water supply is connected to the
upper right part of the rear surface of the refrigerator. Remove the ...
Owners Manual - Page 14
14 INSTALLATION
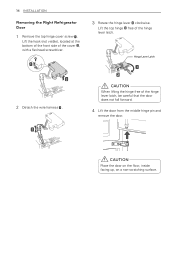
Removing the Right Refrigerator Door
1 Remove the top hinge cover screw .
Lift the hook (not visible), located at the bottom of the front side of ...
Owners Manual - Page 15
...
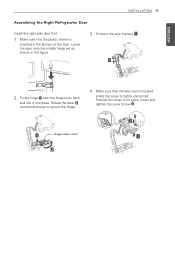
Assembling the Right Refrigerator Door
Install the right-side door first.
1 Make sure that the plastic sleeve is
inserted in the bottom of the door. Lower the door onto the middle ...
Owners Manual - Page 16
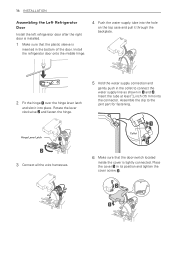
... sure that the plastic sleeve is
inserted in the bottom of the door. Install the refrigerator door onto the middle hinge.
4 Push the water supply tube into the hole
on the top case and pull it through the backplate.
2 ...
Owners Manual - Page 17
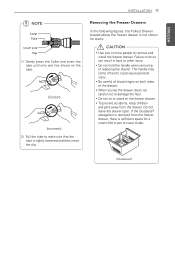
... above the freezer drawer is not shown for clarity.
Caution
yyUse two or more people to remove and install the freezer drawer. Failure to do so can result in back or other injury.
yyDo not hold the...pets away from the drawer. Do not leave the drawer open. If the Durabase® storage bin is removed from the freezer drawer, there is sufficient space for a small child or pet to crawl inside....
Owners Manual - Page 18
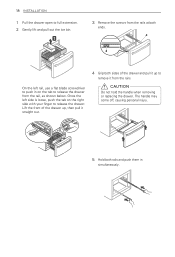
18 INSTALLATION
1 Pull the drawer open to full extension. 2 Gently lift and pull out the ice bin.
3 Remove the screws from the rails at both
ends.
On ...
Owners Manual - Page 19
ENGLISH
INSTALLATION 19
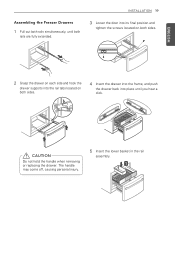
Assembling the Freezer Drawers
1 Pull out both rails simultaneously, until both
rails are fully extended.
3 Lower the door into its final position and
tighten the screws located on both sides.
2 Grasp the drawer on each side and hook the
drawer supports into the rail tabs located on both sides.
4 Insert...
Owners Manual - Page 20
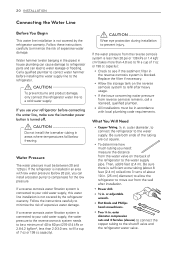
...supply, this water line installation is not covered by the refrigerator warranty. Follow the instructions carefully to minimize the risk.... Replace the filter if necessary.
yy Allow the storage tank on the reverse osmosis system to refill after ...] diameter) to allow the refrigerator to move out from the wall after installation.
yy Power drill.
yy ½ in. or adjustable wrench.
yy Flat blade and...
Owners Manual - Page 21
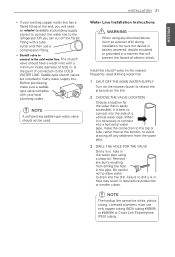
...line has a flared fitting at the end, you will need an adapter (available at plumbing supply stores) to connect the water line to ...saddle type water valve should not be used.
INSTALLATION 21
Water Line Installation Instructions
WARNING
When using any electrical device (such as a power drill) during installation, be sure the device is battery powered, double insulated or grounded in a manner that ...
Owners Manual - Page 22
...of about 10 in. diameter) to allow the refrigerator to move out from the wall after installation.
7 CONNECT THE TUBING TO THE VALVE
Place the compression nut and ferrule (sleeve) for copper...TUBING TO THE
REFRIGERATOR
WARNING
Before making the connection to the refrigerator, be sure that the refrigerator power cord is not plugged into the wall outlet.
a. Remove the plastic flexible cap from the ...
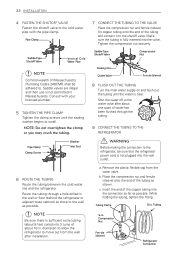
Owners Manual - Page 23
INSTALLATION 23
10 TURN THE WATER ON AT THE SHUTOFF
VALVE Tighten any connections that leak.
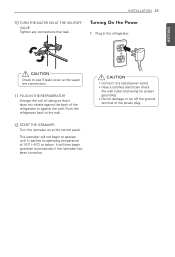
Turning On the Power
1 Plug in the refrigerator.
ENGLISH
Caution
Check to see if leaks ... wall. Push the refrigerator back to the wall.
12 START THE ICEMAKER
Turn the icemaker on at the control panel.
The icemaker will not begin to operate until it reaches its operating temperature of 15°F (-9°...
Owners Manual - Page 24
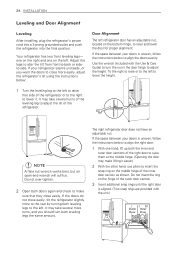
... and Door Alignment
Leveling
After installing, plug the refrigerator's power cord into a 3-prong grounded outlet and push the refrigerator into the final position.
Your ...for proper alignment.
If the space between your doors is uneven, follow the instructions below to align the doors evenly:
Use the wrench (included with the Use & Care Guide) to turn the nut in the door hinge to adjust the height. ...
Owners Manual - Page 31
...warranty disclaimers and copyright notices are available for download. LG Electronics will also provide open source code to you on CD-ROM for a charge covering the cost of performing... refrigerator can check number of door openings and power consumption.
3 Remote Control
You can control the Refrigerator Temperature, Fresh Air Filter and Ice Plus from the smart phone app.
4 Push messages.
- When the...