ASRock Beebox N3000-NUC Without OS driver and firmware
Drivers and firmware downloads for this ASRock item

Related ASRock Beebox N3000-NUC Without OS Manual Pages
Download the free PDF manual for ASRock Beebox N3000-NUC Without OS and other ASRock manuals at ManualOwl.com
User Manual - Page 2

... following safety instructions before performing any... energy hazard.
• Disconnect the power cord from the wall outlet when installing or removing main system components, such as the motherboard and power supply unit.
• Place the...components and printed circuit boards (PCBs) in their antistatic bags when
not in use. • Handle a board by its edges only; do not touch its...
User Manual - Page 4
...7
3.2 How to Remove the Wireless Module
8
3.3 How to Install the mSATA SSD
9
3.4 How to Install the 2.5-inch Hard Drive
10
3.5 How to Install the Memory Modules
(DDR3 Low Voltage (1.35V))
12
3.6 How to Install the VESA Bracket
13
3.7 Positions of the Beebox series
14
Chapter 4 Software and Utilities Operation
15
4.1 Installing Drivers
15
4.2 ASRock APP Shop
16
4.2.1 UI Overview...
User Manual - Page 5
4.2.4 Setting
21
4.3 Creating Windows® 7 Installation Disk with USB 3.0 Drivers
Packed
22
Chapter 5 UEFI SETUP UTILITY
26
5.1 Introduction
26
5.1.1 UEFI Menu Bar
26
5.1.2 Navigation Keys
27
5.2 Main Screen
28
5.3 Advanced Screen
29
5.3.1 CPU Coniguration
30
5.3.2 Chipset Coniguration
32
5.3.3 Storage Coniguration
34
5.3.4 IntelRMT Coniguration
36
5.3.5 Super IO ...
User Manual - Page 6
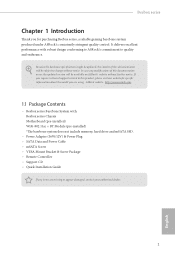
... with: Beebox series Chassis Motherboard (pre-installed) WiFi-802.11ac + BT Module (pre-installed) *he barebone system does not include memory, hard drive and mSATA SSD.
• Power Adapter (36W/12V) & Power Plug • SATA Data and Power Cable • mSATA Screw • VESA Mount Bracket & Screw Package • Remote Controller • Support CD • Quick Installation Guide
If any...
User Manual - Page 7
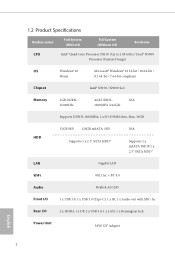
.../ N3000 SoC
Memory
2GB DDR3L1600MHz
4GB DDR3L-
N/A
1600MHz (2x2GB)
Supports DDR3L 1600MHz, 2 x SO-DIMM slots, Max. 16GB
HDD
32GB SSD 128GB mSATA SSD Supports 1 x 2.5" SATA HDD*
N/A
Supports 1 x mSATA SSD & 1 x 2.5" SATA HDD*
LAN
Gigabit LAN
WiFi
802.11ac + BT 4.0
Audio
Realtek ALC283
Front I/O
1 x USB 3.0, 1 x USB 3.0 (Type C), 1 x IR, 1 x Audio-out with MIC-In
Rear I/O
2 x HDMI...
User Manual - Page 8
... series
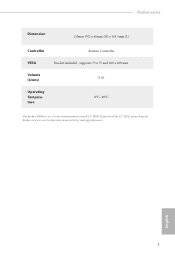
Dimension
110mm (W) x 46mm (H) x 118.5mm (L)
Controller
Remote Controller
VESA
Bracket included , supports 75 x 75 and 100 x 100 mm
Volume 0.6L
(Liters)
Operating Temperature
0°C~40°C
* For Beebox N3000 series, it is not recommended to install 2.5" HDD. If you install the 2.5" HDD, please keep the Beebox series in a vertical position to ensure better cooling performance...
User Manual - Page 9
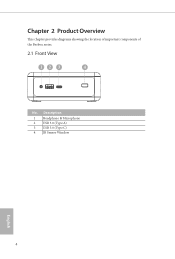
Chapter 2 Product Overview
his chapter provides diagrams showing the location of important components of the Beebox series.
2.1 Front View
12 3
4
No. Description
1 Headphone & Microphone 2 USB 3.0 (Type A) 3 USB 3.0 (Type C) 4 IR Sensor Window
English
4
User Manual - Page 10
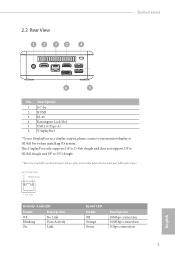
...
6
5
No. Description 1 DC-In 2 HDMI 3 RJ-45 4 Kensington Lock Slot 5 USB 3.0 (Type A) 6 *DisplayPort
*To use DisplayPort as a display output, please connect your monitor/display to HDMI Port when installing OS system. his DisplayPort only supports DP to D-Sub dongle and does not support DP to HDMI dongle and DP to DVI dongle.
* here are two LEDs on the LAN port. Please refer to the...
User Manual - Page 12
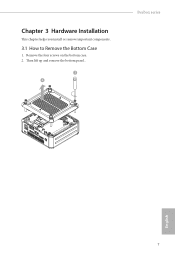
Chapter 3 Hardware Installation
his chapter helps you install or remove important components.
3.1 How to Remove the Bottom Case
1. Remove the four screws on the bottom case. 2. hen lit up and remove the bottom panel..
1 2
Beebox series
English
7
User Manual - Page 20
Beebox series
Chapter 4 Software and Utilities Operation
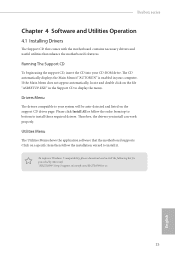
4.1 Installing Drivers
he Support CD that comes with the motherboard contains necessary drivers and useful utilities that enhance the motherboard's features.
Running The Support CD
To begin using the support CD, insert the CD into your CD-ROM drive. he CD automatically displays the Main Menu if "AUTORUN" is enabled in your computer. If the ...
User Manual - Page 21
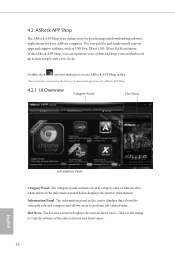
... and easily install various apps and support utilities, such as USB Key, XFast LAN, XFast RAM and more. With ASRock APP Shop, you can optimize your system and keep your motherboard up to date simply with a few clicks.
Double-click
on your desktop to access ASRock APP Shop utility.
*You need to be connected to the Internet to download apps from...
User Manual - Page 22
Beebox series
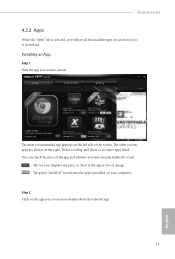
4.2.2 Apps
When the "Apps" tab is selected, you will see all the available apps on screen for you to download.
Installing an App
Step 1 Find the app you want to install.
he most recommended app ... it or not.
- he red icon displays the price or "Free" if the app is free of charge. - he green "Installed" icon means the app is installed on your computer.
Step 2 Click on the app icon ...
User Manual - Page 23
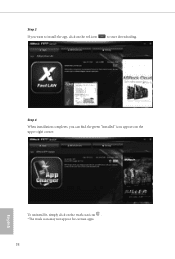
Step 3 If you want to install the app, click on the red icon
to start downloading.
Step 4
When installation completes, you can ind the green "Installed" icon appears on the upper right corner.
English
To uninstall it, simply click on the trash can icon . *he trash icon may not appear for certain apps.
18
User Manual - Page 24
Beebox series
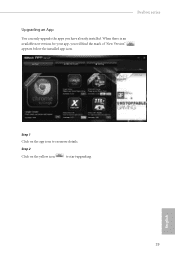
Upgrading an App
You can only upgrade the apps you have already installed. When there is an available new version for your app, you will ind the mark of "New Version" appears below the installed app icon.
Step 1 Click on the app icon to see more details.
Step 2
Click on the yellow icon
to start upgrading.
English
19
User Manual - Page 25
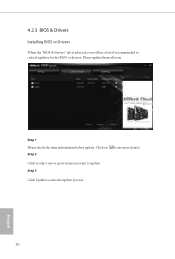
4.2.3 BIOS & Drivers
Installing BIOS or Drivers
When the "BIOS & Drivers" tab is selected, you will see a list of recommended or critical updates for the BIOS or drivers. Please update them all soon.
Step 1 Please check the item information before update. Click on Step 2
to see more details.
Click to select one or more items you want to update. Step 3
Click Update to start the update process...
User Manual - Page 27
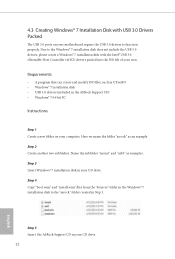
...Windows® 7 installation disk • USB 3.0 drivers (included in the ASRock Support CD) • Windows® 7 64-bit PC
Instructions
Step 1 Create a new folder on your computer. Here we name the folder "asrock" as an example. Step 2 Create another two subfolders. Name the subfolder "mount" and "usb3" as examples. Step 3 Insert Windows® 7 installation disk in your CD drive. Step 4 Copy...
User Manual - Page 29
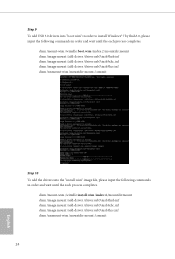
... add USB 3.0 drivers into "boot.wim" in order to install Windows® 7 by lash3.0, please input the following commands in order and wait until the each process completes.
dism /mount-wim /wimile:boot.wim /index:2 /mountdir:mount dism /image:mount /add-driver /driver:usb3\iusb3hub.inf dism /image:mount /add-driver /driver:usb3\iusb3xhc.inf dism /image:mount /add-driver /driver:usb3\iusb3hcs...
User Manual - Page 30
... Please check the followings for the versions you use:
Index : 1 Windows 7 HOMEBASIC Index : 2 Windows 7 HOMEPREMIUM Index : 3 Windows 7 PROFESSIONAL Index : 4 Windows 7 ULTIMATE Step 11 Use a program that can create and modify ISO iles, such as UltraISO, to copy the modiied "boot.wim" and "install.win" iles to the same directory in the Windows® 7 installation disk and cover the original iles...
User Manual - Page 46
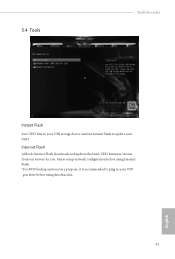
5.4 Tools
Beebox series
Instant Flash
Save UEFI iles in your USB storage device and run Instant Flash to update your UEFI.
Internet Flash
ASRock Internet Flash downloads and updates the latest UEFI irmware version from our servers for you. Please setup network coniguration before using Internet Flash. *For BIOS backup and recovery purpose, it is recommended to plug in your USB pen drive before ...
Quick Installation Guide - Page 2
... Mouse Power On" settings to "Enabled". 4. Press F10 to Save and Exit.
Support
˕౪ / Support / Assistance / Supporto / Soporte técnico Suporte
Please visit our web site at http:/www.asrock.com for: A list of tested memory, mSATA, 2.5" SATA HDD, wireless interface cards and operating systems that are supported; for information about downloading the latest driver and BIOS updates...