Acer H277HK driver and firmware
Related Acer H277HK Manual Pages
Download the free PDF manual for Acer H277HK and other Acer manuals at ManualOwl.com
User Manual - Page 4

..., or any vibrating environment which will probably cause unexpected short current or damage internal devices.
• The adapter is only used for this monitor, do not be used for other purposes.
• Your device uses one of the following power supplies: Manufacture: SHENZHEN HONOR ELECTRONIC CO., LTD.: ADS-65AL-19-3 19065G (65W) DELTA ELECTRONICS...
User Manual - Page 8
...reflections by:
• placing your display in such a way that the side faces the window or any light source
• ...display's top
front edge • Avoid adjusting your display to an awkward viewing angle. • Avoid looking at bright light sources, such as open windows, for extended periods of
time.
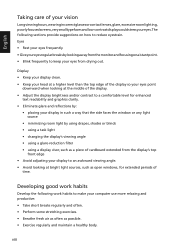
Developing good work habits
Develop the following work habits to make your computer...
User Manual - Page 11
...
3
Connecting the adapter and AC Power cord
3
Power saving
3
Display Data Channel (DDC)
4
Connector pin assignment
4
24-pin color display signal cable
4
19-pin color display signal cable
5
20-pin color display signal cable
5
Standard timing table
6
Installation
8
Users controls
9
Panel controls
9
Using the Shortcut Menu
9
Input source Selection
9
Acer eColor Management...
User Manual - Page 14
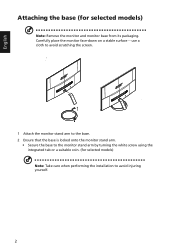
... the monitor stand arm by turning the white screw using the integrated tab or a suitable coin. (for selected models) Note: Take care when performing the installation to avoid injuring yourself.
2
User Manual - Page 15

...
English
Connecting the adapter and AC Power cord
• Check first to make sure that the power cord you use ...set should have the appropriate safety approvals for the country in which the equipment will be installed.
Power saving
The monitor will be switched to "power saving" mode by the control signal from the display controller, as indicated by the blinking blue light.
Mode On
Standby/Power...
User Manual - Page 16
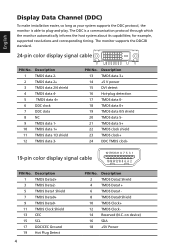
... make installation easier, so long as your system supports the DDC protocol, the monitor is able to plug-and-play. The DDC is a communication protocol through which the monitor automatically informs the host system about its capabilities; for example, supported resolutions and corresponding timing. The monitor supports the DDC2B standard.
24-pin color display signal cable
PIN...
User Manual - Page 18
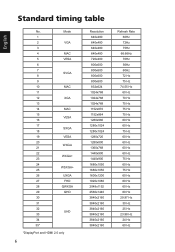
... table
No.
Mode
1
2
VGA
3
4
MAC
5
VESA
6
7 SVGA
8
9
10
MAC
11
12
XGA
13
14
MAC
15 VESA
16
17 SXGA
18
19
VESA
20 WXGA
21
22 WXGA+
23
24 WSXGA+
25
26
UXGA
27
FHD
28
QWXGA
29
QHD
30
31
32 UHD
33
34
35*
*DisplayPort and HDMI 2.0 only
6
Resolution 640x480 640x480 640x480 640x480...
User Manual - Page 19
...
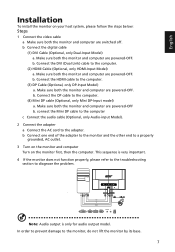
To install the monitor on your host system, please follow the steps below:
Steps
1 Connect the video cable a Make sure both the monitor and computer are switched off. b Connect the digital cable (1) DVI Cable (Optional, only Dual-Input Model) a. Make sure both the monitor and computer are powered-OFF. b. Connect the DVI (Dual Link) cable to the computer. (2) HDMI Cable (Optional, only HDMI-Input...
User Manual - Page 20

..., focus, and clock of your display. (For VGA mode only)
5 Empowering Key Press this button to open the Acer eColor Management OSD and access the scenario modes.
FreeSync:
It can allow a FreeSync supported graphics source to dynamically adjust display refresh rate based on typical content frame rates for power efficient, virtually stutter free and low-latency display update.
8
User Manual - Page 24
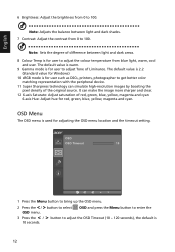
...balance between light and dark shades. 7 Contrast: Adjust the contrast from 0 to 100.
Note: Sets the degree of difference between light and dark areas.
8 Colour Temp is for user to adjust...for Windows)
10 sRGB mode is for user such as DSCs, printers, photographer to get better color matching representation with the peripheral device.
11 Super Sharpness technology can simulate high-resolution images ...
User Manual - Page 25
...settings to be set through the software on the PC.
Note: DDC/CI, short for Display Data Channel/Command Interface, which allows monitor controls to be sent via software.
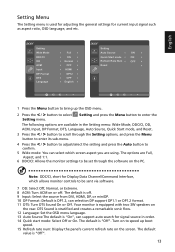
7 OD: Select Off, Normal, or Extreme. 8 ACM: Turn ACM on or off. The default is off. 9 Input: Select the source from DVI, HDMI... 12 Language: Set the OSD menu language. 13 Auto Source:The default is "On", can support auto search for...