Actiontec ScreenBeam Pro Business Edition driver and firmware
Drivers and firmware downloads for this Actiontec item

Related Actiontec ScreenBeam Pro Business Edition Manual Pages
Download the free PDF manual for Actiontec ScreenBeam Pro Business Edition and other Actiontec manuals at ManualOwl.com
Installation Guide - Page 2

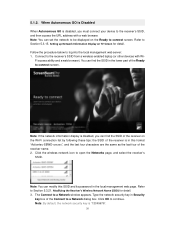
...? You can download the Intel WiDi application at actiontec.com/prowidi. The TV or projector screen is not displaying anything, and the ScreenBeam Receiver's LED light is on. What should I do? This can happen if ScreenBeam's HDMI Port power management is configured to shut off after an idling period. Once a Miracast/Intel WiDi device connects back to ScreenBeam, the display will resume normal...
User Manual - Page 2
... Intel Pro WiDi 3
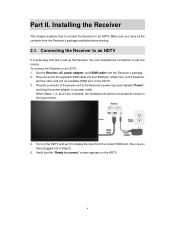
Part II. Installing the Receiver...4 2.1. Connecting the Receiver to an HDTV 4
Part III. Setting Up for the First Time 6 3.1. Connecting via Windows 8.1 6 3.2. Connecting via Intel WiDi App 9 3.2.1. Adjusting the HDTV Picture 12 3.2.2. Intel WiDi Software Version Support 14 3.3. Connecting via Miracast 15 3.4. Tips for Optimal Performance 15
Part IV. Control and Display...
User Manual - Page 3

5.3.15. Setting up Network Information Display on TV Screen 34 5.3.16. Setting up Autonomous Group Owner (AGO 35 5.3.17. Setting up Communication Channel 36 5.3.18. Setting up Group Owner Intent 37 5.3.19. Setting up P2P Network Parameters 38 5.3.20. Setting up Wireless Network Parameters 39 5.3.21. Modifying the Receiver's Wireless Network Name (SSID 40 5.3.22. Rebooting the Receiver 41 ...
User Manual - Page 4
... to install, connect to, operate, configure, and upgrade the Receiver, and also describe a few different possible scenarios about locating faults.
1.1. Contents in the Box
Contents in the Receiver's package are listed below: ScreenBeam Pro Wireless Display Receiver (SBWD100B) - Business Edition (1) HDMI Cable (1) HDMI-to-VGA Adapter & 3.5mm audio cable (1) AC Power Adapter (1) Installation Guide
1
User Manual - Page 5
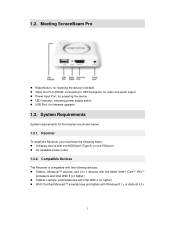
1.2. Meeting ScreenBeam Pro
Reset Button, for resetting the device to default Video Out Port (HDMI), connecting to HDTV/projector for video and audio output Power Input Port, for powering the device LED Indicator, indicating power supply status USB Port, for firmware upgrade
1.3. System Requirements
System requirements for the receiver are shown below:
1.3.1. Receiver
To install the Receiver, you ...
User Manual - Page 6
... to update your system drivers and Intel WiDi application to the latest versions provided by Intel. You can find the latest version by visiting Intel's wireless display support website http://www.intel.com/p/en_US/support/highlights/wireless/wireless-display/
• Graphic Driver: 15.36.14.x • Wi-Fi Driver: 17.14.0.x • Intel WiDi Application: 5.1.x Intel's Download Center https...
User Manual - Page 7
...
It is quite easy and fast to set up the Receiver. You can complete the connection in just one minute. To connect the Receiver to an HDTV: 1. Get the Receiver, AC power adapter, and HDMI cable from the Receiver's package. 2. Plug one end of the supplied HDMI cable into the HDMI port (Video Out) on the Receiver,
and the...
User Manual - Page 9
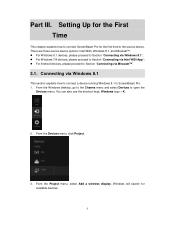
... III. Setting Up for the First Time
This chapter explains how to connect ScreenBeam Pro for the first time to the source device. There are three source device options: Intel WiDi, Windows 8.1, and Miracast™.
For Windows 8.1 devices, please proceed to Section "Connecting via Windows 8.1"; For Windows 7/8 devices, please proceed to Section "Connecting via Intel WiDi App"; For Android devices...
User Manual - Page 10
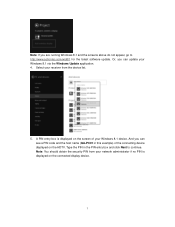
... the screens above do not appear, go to http://www.actiontec.com/widi81 for the latest software update. Or, you can update your Windows 8.1 via the Windows Update application. 4. Select your receiver from the device list.
5. A PIN entry box is displayed on the screen of your Windows 8.1 device. And you can see a PIN code and the host name (QA-PC01 in...
User Manual - Page 13
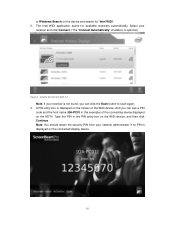
...receiver is not found, you can click the Scan button to scan again. 3. A PIN entry box is displayed on the screen of the WiDi device. And you can see a PIN
code and...device displayed on the HDTV. Type the PIN in the PIN entry box on the WiDi device, and then click Continue. Note: You should obtain the security PIN from your network administrator if no PIN is displayed on the connected display device...
User Manual - Page 17
... "-" (minus).
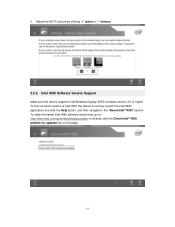
3.2.2. Intel WiDi Software Version Support
Make sure the device supports Intel Wireless Display (WiDi) software version 3.5 or higher. To find out which version of Intel WiDi the device is running, launch the Intel WiDi application and click the Help button, and then navigate to the "About Intel® WiDi" section. To obtain the latest Intel WiDi software and drivers, go to: http...
User Manual - Page 18
... game console, to ScreenBeam Pro. For the best performance, the Miracast™ device should be running the latest software. 1. On a Miracast™-enabled Android device, locate and open the Wireless Display
Application (check for the application under "Settings"). Note: The name of the Wireless Display application depends on the device type and model. Refer to the device's user manual for more...
User Manual - Page 20
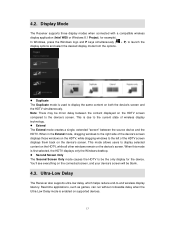
... HDTV displays only the Windows desktop.
Second Screen Only The Second Screen Only mode causes the HDTV to be the only display for the device. You'll see everything on the connected screen, and your device's screen will be blank.
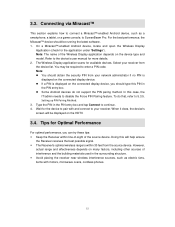
4.3. Ultra-Low Delay
The Receiver also supports ultra-low delay, which helps reduce end-to-end wireless display latency...
User Manual - Page 22
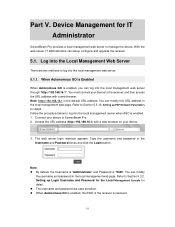
... local management web page. Refer to Section 5.3.19. Setting up P2P Network Parameters for detail. Follow the procedure below to log into the local management server when AGO is enabled. 1. Connect your device to ScreenBeam Pro. 2. Access the URL address (http://192.168.16.1) with a web browser on your device.
3. The web server login interface appears. Type...
User Manual - Page 23
... the URL address with a web browser. Note: You can set the network to be displayed on the Ready to connect screen. Refer to Section 5.3.15. Setting up Network Information Display on TV Screen for detail. Follow the procedure below to log into the local management web server: 1. Connect to the receiver's SSID from a wireless-enabled laptop (or other devices with Wi...
User Manual - Page 32
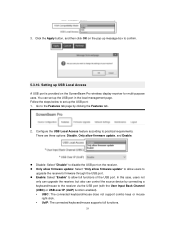
... the ScreenBeam Pro wireless display receiver for multi-purpose uses. You can set up the USB port in the local management page. Follow the steps below to set up the USB port: 1. Go to the Features tab page by clicking the Features tab.
2. Configure the USB Local Access feature according to practical requirements. There are three options: Disable, Only allow firmware update, and...
User Manual - Page 35
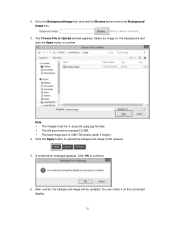
... the Background Image line, and click the Browse button next to the Background Image box.
3. The Choose File to Upload window appears. Select an image for the background and click the Open button to confirm.
Note: The images must be in ....to the receiver. 5. A confirmation message appears. Click OK to continue.
6. After a while, the background image will be updated. You can check it on the connected...
User Manual - Page 36
... Image
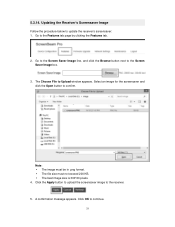
Follow the procedure below to update the receiver's screensaver: 1. Go to the Features tab page by clicking the Features tab.
2. Go to the Screen Saver Image line, and click the Browse button next to the Screen Saver Image box.
3. The Choose File to Upload window appears. Select an image for the...
User Manual - Page 46
...
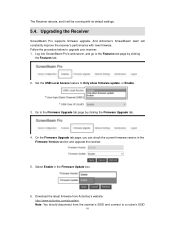
ScreenBeam Pro supports firmware upgrade. And Actiontec's ScreenBeam team will constantly improve the receiver's performance with new firmware. Follow the procedure below to upgrade your receiver: 1. Log into ScreenBeam Pro's web server, and go to the Features tab page by clicking
the Features tab.
2. Set the USB Local Access feature to Only allow firmware update, or Enable.
3. Go to the Firmware...
User Manual - Page 47
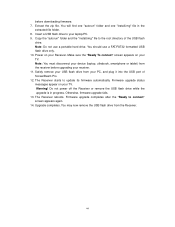
... your PC, and plug it into the USB port of ScreenBeam Pro. 12. The Receiver starts to update its firmware automatically. Firmware upgrade status messages appear on your TV. Warning! Do not power off the Receiver or remove the USB flash drive while the upgrade is in progress. Otherwise, firmware upgrade fails. 13. The Receiver reboots. Firmware upgrade completes after the "Ready to connect" screen...