Asus A7V266-E AA driver and firmware
Related Asus A7V266-E AA Manual Pages
Download the free PDF manual for Asus A7V266-E AA and other Asus manuals at ManualOwl.com
A7V266-E User Manual - Page 2
... ANY TIME WITHOUT NOTICE, AND SHOULD NOT BE CONSTRUED AS A COMMITMENT BY ASUS. ASUS ASSUMES NO RESPONSIBILITY OR LIABILITY FOR ANY ERRORS OR INACCURACIES THAT MAY APPEAR IN THIS MANUAL, INCLUDING THE PRODUCTS AND SOFTWARE DESCRIBED IN IT.
Copyright © 2001 ASUSTeK COMPUTER INC. All Rights Reserved.
Product Name: ASUS A7V266-E Manual Revision: 1.00 E883 Release Date: October 2001...
A7V266-E User Manual - Page 5

... 62 4.4.2 I/O Device Configuration 65 4.4.3 PCI Configuration 67
4.5 Power Menu 69 4.5.1 Power Up Control 71 4.5.2 Hardware Monitor 73
4.6 Boot Menu 74 4.7 Exit Menu 76 5. SOFTWARE SETUP 79 5.1 Install Operating System 79 5.2 Start Windows 79 5.3 A7V266-E Motherboard Support CD 80
5.3.1 Installation Menu 80 5.4 Using the Promise Chip for RAID 0 or 1 82 6. SOFTWARE REFFERENCE 91...
A7V266-E User Manual - Page 10
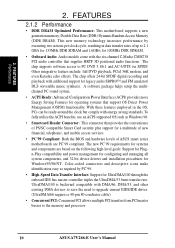
... bus master controller triples the UltraDMA/33 burst transfer rate. UltraDMA/100 is backward compatible with DMA/66, DMA/33, and other existing DMA devices to save the need to upgrade current EIDE/IDE drives. (UltraDMA/66 requires a 40-pin 80-conductor cable).
• Concurrent PCI: Concurrent PCI allows multiple PCI transfers from PCI master busses to the memory and processor.
10
ASUS A7V266...
A7V266-E User Manual - Page 28
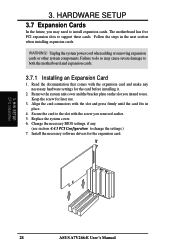
... with the slot and press firmly until the card fits in place.
4. Secure the card to the slot with the screw you removed earlier. 5. Replace the system cover. 6. Change the necessary BIOS settings, if any.
(see section 4.4.3 PCI Configuration to change the settings.) 7. Install the necessary software drivers for the expansion card.
3. H/W SETUP CPU Installation
28
ASUS A7V266-E User's Manual
A7V266-E User Manual - Page 35
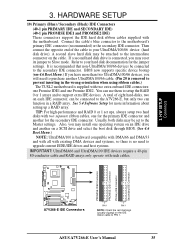
... to setup the RAID 0 or 1 arrays and to support extra IDE devices. A total of eight hard-disks, two on each IDE connector, can be connected to the A7V266-E, but only two can function in a RAID array. See 5.4 Software Setup for more information about setting up a RAID array.
TIP: For high-performance and RAID 0 or 1 set ups, always setup two hard disks with two separate ribbon cables...
A7V266-E User Manual - Page 45
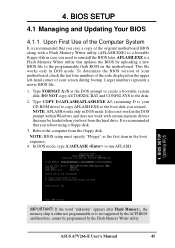
... within Windows and does not work with certain memory drivers that may be loaded when you boot from the hard drive. It is recommended that you reboot using a floppy disk.
3. Reboot the computer from the floppy disk.
NOTE: BIOS setup must specify "Floppy" as the first item in the boot sequence. 4. In DOS mode, type A:\AFLASH to run AFLASH.
4. BIOS SETUP Updating BIOS
IMPORTANT...
A7V266-E User Manual - Page 49
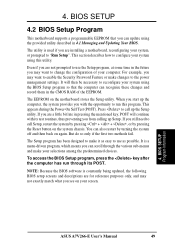
... among the predetermined choices.
To access the BIOS Setup program, press the key after the computer has run through its POST.
NOTE: Because the BIOS software is constantly being updated, the following BIOS setup screens and descriptions are for reference purposes only, and may not exactly match what you see on your screen.
4. BIOS SETUP Program Information
ASUS A7V266-E User's Manual
49
A7V266-E User Manual - Page 69
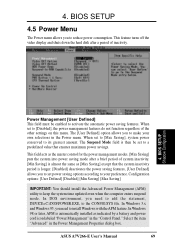
... statement, DEVICE=C:\DOS\POWER.EXE, to the CONFIG.SYS file. In Windows 3.x and Windows 95, you need to install Windows with the APM feature. In Windows 98 or later, APM is automatically installed as indicated by a battery and power cord icon labeled "Power Management" in the "Control Panel." Select the item "Advanced" in the Power Management Properties dialog box.
ASUS A7V266-E User's Manual
69
A7V266-E User Manual - Page 79
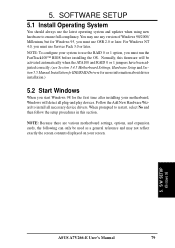
...to install all necessary device drivers. When prompted to restart, select No and then follow the setup procedures in this section.
NOTE: Because there are various motherboard settings, options, and expansion cards, the following can only be used as a general reference and may not reflect exactly the screen contents displayed on your screen.
5. S/W SETUP Windows 98
ASUS A7V266-E User's Manual
79
A7V266-E User Manual - Page 80
... that your CD-ROM drive is drive D:).
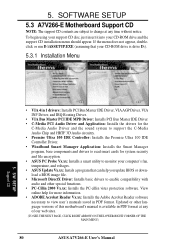
5.3.1 Installation Menu
5. S/W SETUP Support CD
• VIA 4 in 1 drivers: Installs PCI Bus Master IDE Driver, VIAAGP Driver, VIA INF Driver, and IRQ Routing Driver.
• VIA Bus Master PCI IDE MPD Driver: Installs PCI Bus Master IDE Driver • C-Media PCI Audio Driver and Application: Installs the drivers for the
C-Media Audio Driver and the sound...
A7V266-E User Manual - Page 81

...
motherboard, such as product name, BIOS version, and CPU. • Browse Support CD: Allows you to view the contents of the CD. • ReadMe: Allows you to view the support CD file list and contact information. • Exit: Exits the CD installation menu.
( RETURN TO THE MAIN MENU, CLICK LEFT ARROW ON THE LOWER-RIGHT CORNER )
5. S/W SETUP Support CD
ASUS A7V266...
A7V266-E User Manual - Page 82
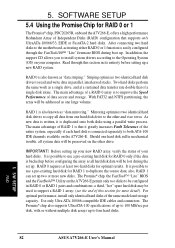
... for more detail). For optimal performance, install only identical hard disks of the same model and storage capacity. Use only Ultra ATA-100/66 compatible IDE cables and connectors. The Promise® chip also supports UltraATA-100 specifications of up to 100 MB/sec per disk, with or without multiple disk arrays up to four hard disks.
5. S/W SETUP RAID
82
ASUS A7V266-E User's Manual
A7V266-E User Manual - Page 83
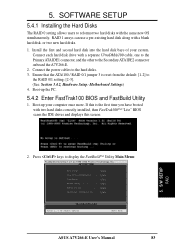
... the other to the Secondary ATA IDE2 connector onboard the A7V266-E.
2. Connect the power cables to the hard disks. 3. Ensure that the ATA/100 / RAID 0/1 jumper 3 is reset from the default: [1-2] to
the RAID 0/1 setting: [2-3]. (See: Section 3.4.2, Hardware Setup: Motherboard Settings) 4. Boot-up the PC.
5.4.2 Enter FastTrak100 BIOS and FastBuild Utility
1. Boot-up your computer once more. If this...
A7V266-E User Manual - Page 89
5. SOFTWARE SETUP
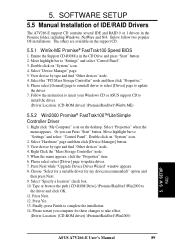
5.5 Manual Installation of IDE/RAID Drivers
The A7V266-E support CD contains several IDE and RAID 0 or 1 drivers in the Promise folder, including Windows, NetWare and Nt4. Below follow two popular OS installations. The others are available on the support CD.
5.5.1 Win9x-ME Promise® FastTrak100 Speed BIOS
1. Ensure the Support CD-ROM is in the CD Drive and press "Start" ...
A7V266-E User Manual - Page 91
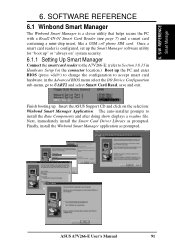
..., save and exit.
Finish booting up. Insert the ASUS Support CD and click on the selection: Winbond Smart Manager Application. The auto-installer prompts to install the Base Components and after doing show displays a readme file. Next, immediately install the Smart Card Driver Library as prompted. Finally, install the Winbond Smart Manager application as prompted.
ASUS A7V266-E User's Manual
91
A7V266-E User Manual - Page 92

...: Do not install system components or Winbond applications unless you install a smart card reader, (see page 7). Smart card system software components support various types of smart card applications; all system components are compatible with Windows 98, ME and 2000. However, the Windbond Smart Manager application is readily compatible only with Windows 98 and ME.
92
ASUS A7V266-E User's Manual
A7V266-E User Manual - Page 93
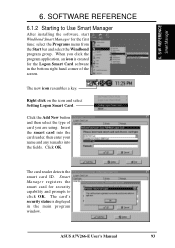
... type of card you are using. Insert the smart card into the card reader, then enter your name and any remarks into the fields. Click OK.
The card reader detects the smart card ID. Smart Manager registers the smart card for security capability and prompts to click OK. The card's security status is displayed in the main program window.
ASUS A7V266-E User's Manual
93
A7V266-E User Manual - Page 100
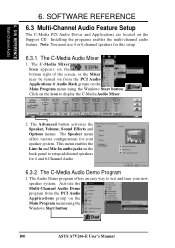
... on the back panel to setup additional speakers for 4 and 6-Channel Audio.
6.3.2 The C-Media Audio Demo Program
1. The Audio Demo program offers an easy way to test and tune your new speaker system. Activate the Multi-Channel Audio Demo program from the PCI Audio Applications group on the Main Program menu using the Windows Start button:
100
ASUS A7V266-E User's Manual
A7V266-E User Manual - Page 102
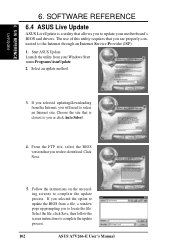
..., select the BIOS version that you wish to download. Click Next.
5. Follow the instructions on the succeeding screens to complete the update process. If you selected the option to update the BIOS from a file, a window pops up prompting you to locate the file. Select the file, click Save, then follow the screen instructions to complete the update process.
102
ASUS A7V266-E User's Manual
A7V266-E User Manual - Page 107
... the environmental setting procedure.
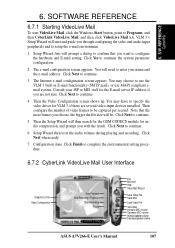
6.7.2 CyberLink VideoLive Mail User Interface
Snapshot to File Video Configuration
Start Playback Stop Recording / Playback
Start Recording Pause
Exit Minimize Help Video Mail Wizard
Save Video File Send Mail
Load Video File
Send Mail Increase MIC volume Decrease MIC volume Increase speaker volume Decrease speaker volume
ASUS A7V266-E User's Manual
107