Asus P5GC driver and firmware

Related Asus P5GC Manual Pages
Download the free PDF manual for Asus P5GC and other Asus manuals at ManualOwl.com
User Manual - Page 31
... BIOS BIOS
BIOS 程式
BIOS 程式。
1.2MB
BIOS
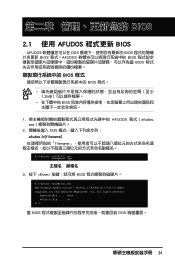
1 AFUDOS 程式(afudos. exe
2 DOS afudos /o[filename filename
A:\>afudos /oOLDBIOS1.rom
3. 按下 afudos /oOLDBIOS1.rom AMI Firmware Update Utility - Version 1.19(ASUS V2.07(03.11.24BB)) Copyright (C) 2002 American Megatrends, Inc. All rights reserved.
Reading flash...
User Manual - Page 32
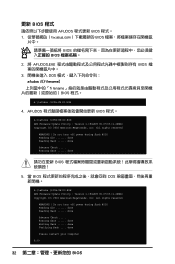
...afudos /iP5B-VM DO.ROM AMI Firmware Update Utility - Version 1.19(ASUS V2.07(03.11.24BB)) Copyright (C) 2002 American Megatrends, Inc. All rights reserved.
WARNING!! Do not turn off power during flash BIOS Reading file ....... done Reading flash ...... done
Advance Check ...... Erasing flash ...... done Writing flash ...... done Verifying flash .... done
Please restart your computer
A:\>
32 BIOS
User Manual - Page 4
...Powering off the computer 3-2
3.2.1 Using the OS shut down function 3-2 3.2.2 Using the dual function power switch 3-2
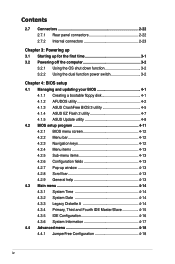
Chapter 4: BIOS setup 4.1 Managing and updating your BIOS 4-1
4.1.1 Creating a bootable floppy disk 4-1 4.1.2 AFUDOS utility 4-2 4.1.3 ASUS CrashFree BIOS 3 utility 4-5 4.1.4 ASUS EZ Flash 2 utility 4-7 4.1.5 ASUS Update utility 4-8 4.2 BIOS setup program 4-11 4.2.1 BIOS...
User Manual - Page 5

... Tools menu 4-36 ASUS EZ Flash 2 4-36 4.8 Exit menu 4-37
Chapter 5: Software support 5.1 Installing an operating system 5-1 5.2 Support CD information 5-1
5.2.1 Running the support CD 5-1 5.2.2 Drivers menu 5-2 5.2.3 Utilities menu 5-3 5.2.4 Make Disk menu 5-5 5.2.5 Manual menu 5-6 5.2.6 ASUS Contact information 5-6 5.2.7 Other information 5-7
Appendix: CPU features A.1 Enhanced Intel...
User Manual - Page 8

... tells how to change system settings through the BIOS Setup menus. Detailed descriptions of the BIOS parameters are also provided. • Chapter 5: Software support This chapter describes the contents of the support CD that comes with the motherboard package. • Appendix: CPU features The Appendix describes the CPU features that the motherboard supports.
Where to find more information...
User Manual - Page 17

... automatically detects peripherals are plugged into the audio I/O jacks. ALC662 also supports Windows® Vista Premium. See pages 2-23 for details.
Serial ATA 3.0 Gb/s technology This motherboard supports the next-generation hard drives based on the Serial ATA (SATA) 3Gb/s storage specification, delivering enhanced scalability and doubling the bus bandwidth for high-speed data retrieval and...
User Manual - Page 29

... forefinger to a 100º angle (A), then push the PnP cap from the load
B
plate window to remove (B).
Load plate
5. Position the CPU over
the socket, making sure
that the gold triangle is
on the bottom-left corner
of the socket. The socket
alignment key should fit into the CPU notch.
Alignment key
Gold triangle mark
ASUS P5GC
A 2-
User Manual - Page 35

... memory modules, the system may only recognize less than 2 GB because the address space is reserved for other critical functions. This limitation appears on Windows® XP 32-bit operation system which does not support Physical Address Extension (PAE).
• If you install Windows® XP 32-bit operation system, a total memory of less than 2 GB is recommended.
ASUS P5GC...
User Manual - Page 40
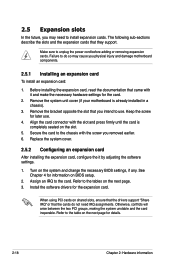
... the it by adjusting the software settings.
1. Turn on the system and change the necessary BIOS settings, if any. See Chapter 4 for information on BIOS setup.
2. Assign an IRQ to the card. Refer to the tables on the next page. 3. Install the software drivers for the expansion card.
When using PCI cards on shared slots, ensure that the drivers support "Share IRQ" or that the...
User Manual - Page 48

... SATA hard disk drive connections.
Serial ATA hard disk drive connection
Connector
SATA1/SATA2 SATA3/SATA4
Color
Red Black
Setting
Master Slave
Use
Boot disk Data disk
4. Optical drive audio connector (4-pin CD)
This connector is for the 4-pin audio cable that connects to the audio connector at the back of the optical drive.
CD (black)
P5GC
Right Audio Channel Ground Ground Left Audio...
User Manual - Page 59

... System (BIOS) setup.
1. ASUS EZ Flash 2 (Updates the BIOS using a floppy disk or USB flash disk.) 2. ASUS AFUDOS (Updates the BIOS in DOS mode using a bootable floppy
disk.) 3. ASUS CrashFree BIOS 3 (Updates the BIOS using a bootable floppy, USB
Flash disk, or the motherboard support CD when the BIOS file fails or gets corrupted.) 4. ASUS Update (Updates the BIOS in Windows® environment...
User Manual - Page 61

...The utility copies the current BIOS file to the floppy disk.
A:\>afudos /oOLDBIOS1.rom AMI Firmware Update Utility - Version 1.19(ASUS V2.29(07.03.02BA)) Copyright (C) 2003 American Megatrends, Inc. All rights reserved.
Reading flash ..... done Write to file...... ok A:\>
The utility returns to the DOS prompt after copying the current BIOS file.
Updating the BIOS file To update the BIOS file using...
User Manual - Page 66

... motherboard package.
ASUS Update requires an Internet connection either through a network or an Internet Service Provider (ISP).
Installing ASUS Update To install ASUS Update:
1. Place the support CD in the optical drive. The Drivers menu appears. 2. Click the Utilities tab, then click Install ASUS Update VX.XX.XX. See page
5-3 for the Utilities screen menu. 3. The ASUS Update utility is copied...
User Manual - Page 68
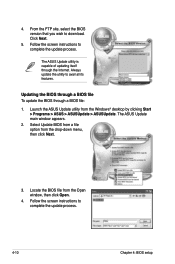
... the BIOS version that you wish to download. Click Next.
5. Follow the screen instructions to complete the update process.
The ASUS Update utility is capable of updating itself through the Internet. Always update the utility to avail all its features.
Updating the BIOS through a BIOS file To update the BIOS through a BIOS file:
1. Launch the ASUS Update utility from the Windows® desktop by...
User Manual - Page 69
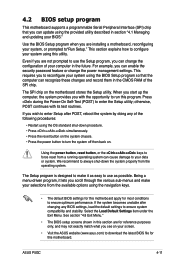
... example, you can enable the security password feature or change the power management settings. This requires you to reconfigure your system using the BIOS Setup program so that the computer can recognize these changes and record them in the CMOS RAM of the SPI chip.
The SPI chip on the motherboard stores the Setup utility. When you start up the...
User Manual - Page 99

... time without notice. Visit the ASUS website (www.asus.com) for updates.
5.2.1 Running the support CD
Place the support CD to the optical drive. The CD automatically displays the Drivers menu if Autorun is enabled in your computer.
Click an icon to display support CD/motherboard information
Click an item to install
If Autorun is NOT enabled in your computer, browse the contents of the...
User Manual - Page 100

... to activate the devices.
ASUS InstALL - Drivers Installation Wizard Installs the ASUS InstALL - Drivers Installation Wizard.
Intel Chipset Inf Update Program Installs the Intel Chipset Inf Update Program.
Realtek Audio Driver Install the Realtek Audio Driver.
Realtek RTL8111B/C 10/100/1000M LAN Driver Installs the Realtek RTL8111B/C 10/100/1000M LAN Driver.
5-
Chapter 5: Software support
User Manual - Page 101
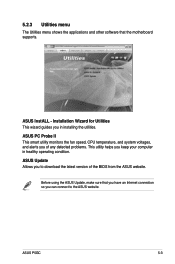
... other software that the motherboard supports.
ASUS InstALL - Installation Wizard for Utilities This wizard guides you in installing the utilities.
ASUS PC Probe II This smart utility monitors the fan speed, CPU temperature, and system voltages, and alerts you of any detected problems. This utility helps you keep your computer in healthy operating condition.
ASUS Update Allows you to download the...
User Manual - Page 102

...so you can enjoy watching TV and movies, capturing videos, or playing games in your computer. Visit the Microsoft® website (www.microsoft.com) for updates.
Symantec Norton Internet Security
Installs Symantec Norton Internet Security application.
WinDVD Copy5 Trial
Installs the WinDVD Copy5 trial version.
Corel Snapfire Plus SE
Installs Corel Snapfire Plus SE.
5-
Chapter 5: Software support
User Manual - Page 109

... CPU Configuration,
then press . 3. Set the Intel(R) SpeedStep Technology item to [Enabled],
then press . 4. Press to save your changes and exit the BIOS setup. 5. After the computer restarts, right click on a blank space on the desktop, then
select Properties from the pop-up menu. 6. When the Display Properties window
appears, click the Screen Saver tab. 7. Click the Power button...