Epson L500V - PhotoPC Digital Camera driver and firmware
Drivers and firmware downloads for this Epson item

Related Epson L500V Manual Pages
Download the free PDF manual for Epson L500V and other Epson manuals at ManualOwl.com
Camera Basics - Page 3

... Started
9
Charging the Battery
10
Installing the Memory Card
11
Installing the Battery
12
Turning Your Camera On and Off
13
Setting the Language, Date, and Time
14
Installing the Software
15
Taking and Viewing Photos
17
Taking Photos in Automatic Mode
18
Taking Photos in Manual Mode
20
Camera Settings
22
Continuous Shooting
23
Recording Videos
25
Taking Photos With Fun...
Camera Basics - Page 6

... the features of your camera ◗ A USB driver that lets you transfer photos to your computer in Windows 98SE. (If you have a newer version of Windows or a Macintosh, you don't need to install the USB driver.) ◗ Apple® QuickTime™ for playing videos on your computer ◗ Adobe® Reader to view the Reference Guide
See page 15 for instructions on installing the software.
6
Camera Basics - Page 8

...the camera's features, including troubleshooting tips. To open the guide, double-click the icon on your computer desktop. See page 15 for instructions on installing the Reference Guide. ◗ For instructions on using the P.I.F. software, open the Help menu and select User's Guide. ◗ If you still have questions after checking the information listed above, contact Epson Technical Support as...
Camera Basics - Page 9

...; Install the memory card (page 11) ◗ Install the battery (page 12) ◗ Turn on the camera (page 13) ◗ Set the current date and time (page 14) ◗ Install the software on your computer (page 15).
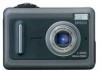
Make sure you have all the items shown below:
Camera
Lithium ion battery
Battery charger
Charger power cable
SD memory card
Software CD-ROM
USB cable (for connecting to a printer...
Camera Basics - Page 11

Installing the Memory Card
Caution: Turn off your camera before installing or removing the memory card. Make sure you insert the card in the correct orientation, or you may damage the camera and card.
1 Make sure the camera is turned off. 2 Turn the camera on its left side. 3 Slide the battery cover until it
pops up.
4 Position the card as shown Notch and slide...
Camera Basics - Page 12

...'t store photos and some of its buttons won't operate without a memory card correctly installed.
1 Make sure the camera is turned
off, then slide the battery cover until it pops up.
2 Push in the memory card to
release it. The card pops out.
3 Pull out the memory card, then
press down on the battery cover and slide it back into...
Camera Basics - Page 15

... features, install the software on your computer from the camera's CD-ROM.
Windows
1 Insert the CD-ROM in your CD-ROM or DVD
drive. The Installer starts automatically. If it doesn't start, select My Computer and double-click Epson.
2 Read the license
agreement, then click Agree. You see this screen:
3 Click Install, then
follow the on-screen instructions.
If you don't have Adobe Reader or...
Camera Basics - Page 16

... the CD-ROM in your CD-ROM or DVD
drive.
2 Double-click the Epson CD-ROM icon if
necessary, then double-click the Epson icon.
3 Read the license
agreement, then click Agree. You see this screen:
4 Click Install.
If you don't have Adobe Reader, click Custom instead of Install. Select Adobe Reader and click Install.
5 Enter your administrator name and password if...
Camera Basics - Page 18

... are captured at a resolution and quality setting of (2560 × 1920 pixels). To change these settings, use manual mode (see page 20).
Note: You can also use the macro and/or self-timer features in automatic mode. For instructions, see the Reference Guide on your computer. See page 15 for instructions on installing the Reference Guide and software.
1 Turn the Mode...
Camera Basics - Page 20

... start, make sure the batteries are installed and the camera is turned on, as described on page 12.
1 Turn the Mode dial to manual.
2 If you want to adjust the resolution or other settings,
press the MENU button. See page 22 for a list of available settings or see the Reference Guide.
3 Make sure you are at least...
Camera Basics - Page 25

Recording Videos
You can record videos with sound. The length of the video is limited only by the amount of storage available on your memory card.
1 Turn the Mode dial to video.
2 Press the MENU button. You see the Movie Menu.
3 Move the joystick to r to change the Resolution
setting.
4 Move the joystick to u or d to select a resolution
setting, then...
Camera Basics - Page 26

... camera and over 100 more frames are copied to your computer when you install the camera software. You can use the PRINT Image Framer Tool to copy the frames from your computer to your memory card. See the Reference Guide for details. You can also modify the frames or create original frames using PIF Designer. See page 15 for instructions on installing the software...
Camera Basics - Page 35

... of supported printers.
Before you start, make sure your printer is set up and has ink installed. Load Epson Premium Glossy Photo Paper, Premium Semigloss Photo Paper, or PictureMate Photo Paper (with PictureMate only) in 4 × 6 inch, A4, or Letter size (if available). Follow your printer instructions.
Printing the Photo Displayed on the Screen
1 Connect the camera to the printer as described...
Camera Basics - Page 46

...
Not enough free space on the memory card. This frame cannot be used with this camera. This image cannot be displayed. Printer error.
This image cannot be printed.
Could not print. Retry? A communication error has occurred.
Make room by deleting photos or downloading them to your computer and deleting them. See page 30 for instructions.
The file size of the...
Camera Basics - Page 47

...provides technical assistance 24 hours a day through the electronic support services and automated telephone services listed below.
Service Access
World Wide Web
From the Internet, you can reach Epson Support at http://support.epson.com. At this site, you can download drivers and other files, look at product documentation, access troubleshooting information, and receive technical advice through...
Camera Basics - Page 59

... third party parts, components or peripheral devices added to the Epson product after its shipment from Epson nor does the warranty cover supplies and consumables such as lamps, prints, batteries, cables or storage media. Epson is not responsible for warranty service should the Epson label or logo or the rating label or serial number be removed or should the...
Camera Basics - Page 63

... SD memory card, see Memory
cards Settings
camera, 22 to 23 print, 40 Slide show, 29 Software description, 6 installing, 15 to 16 Sound, 19, 21 Specifications, 49 to 50
T
Technical support, 47 to 48 Time and date setting, 14 Transporting camera, 55 Troubleshooting, 41 to 48 Turning the camera on/off, 13
U
USB cable, 9, 34 port on printer, 34
V
Videos playing back, 28 to 29 recording, 25...
Reference Guide - Page 55

...memory card from the camera and copy photos using a card reader. Caution: Make sure the camera's power is turned off before you connect it to your computer. Note: ❏ You can conserve battery power by using the optional AC adapter while the camera is connected to your
computer. See page 25 for instructions. ❏ If your computer uses Windows® 98SE, you need to install driver software...
Reference Guide - Page 77

... time correctly. set correctly?
List of Error Messages
Error message
Description
This memory card is write-protected.
The memory card is locked. Release the write-protect lever on the side of the card.
Memory card error. Check the memory card.
Unspecified memory card problem. See "Installing and Removing Memory Cards" on page 20 to remove the memory card. Copy your photos to a computer, if...
Reference Guide - Page 80

... provides technical assistance 24 hours a day through the electronic support services and automated telephone services listed below.
Service
World Wide Web
Automated Telephone Services
Access
From the Internet, you can reach Epson Support at http://support.epson.com. At this site, you can download drivers and other files, look at product documentation, access troubleshooting information, and...