Epson Livingstation LS57P1 driver and firmware
Drivers and firmware downloads for this Epson item

Related Epson Livingstation LS57P1 Manual Pages
Download the free PDF manual for Epson Livingstation LS57P1 and other Epson manuals at ManualOwl.com
Quick Start - Page 1
... using EPSON's Photo on DemandTM system for viewing, printing, and storing your digital photos in a flash.
Make sure you have these items: • TV • Set-top shelf with screws • Remote control with 2 AA batteries • Package of paper (20 sheets)
• Ink cassette • CD-R/RW drive with USB cable and power cable • Documentation kit
Write down the TV's serial number...
Quick Start - Page 3
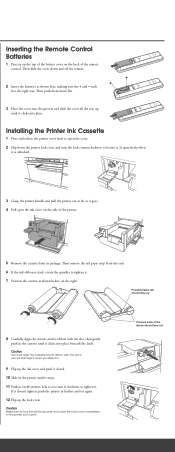
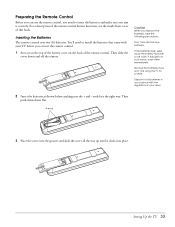
...1 Press in on the top of the battery cover on the back of the remote control. Then slide the cover down and off the remote.
+ +
2 Insert the batteries as shown here, making sure the + and ...the way up until it clicks into place.
Installing the Printer Ink Cassette
1 Press and release the printer cover latch to open the cover. 2 Flip down the printer lock cover and turn the lock counterclockwise to ...
Quick Start - Page 6
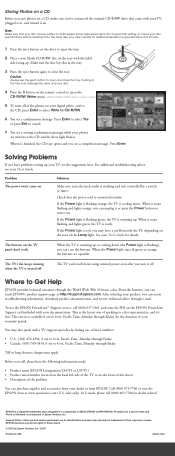
... the drive light flashes. When it's finished, the CD tray opens and you see a completion message. Press Enter.
Solving Problems
If you have problems setting up your TV, see the suggestions here. For additional troubleshooting advice, see your User's Guide.
Problem The power won't come on.
Solution
Make sure your electrical outlet is working and isn't controlled...
User Manual - Page 2
... of the copyright laws when using digital cameras, scanners, and printers.
Trademarks
EPSON is a registered trademark and Livingstation is a trademark of SEIKO EPSON CORPORATION.
EPSON PrivateLine, EPSON Connection, and EPSON Store are service marks of Epson America, Inc.
Pixelworks, DNX, and the DNX Pixelworks logo are trademarks of Pixelworks, Inc.
Portions of this software are based in part on...
User Manual - Page 3
... Contents
Setting Up the TV
Setting Up and Controlling Channels
Selecting a Location 7 Important Safety Instructions 7 Outdoor Antenna Installation and Grounding 10 Placement for Optimum Viewing 11 Suggested Supports or Stands 11
Installing the Set-Top Shelf 12 Securing the TV 13 Connecting the Cables 14
Antenna or Direct Cable TV Connection 15 Cable Box Connections 16 Digital TV (HDTV...
User Manual - Page 5
... Sound Problems 117 TV Reception or Operation Problems 118 Remote Control Problems 118 Problems Viewing Photos from Cards or Discs 119 Printing Problems 119
Clearing a Paper Jam From the Back of the Printer 120 Problems Saving Photos to a CD-R/RW 124 Where to Get Help 124
Telephone Support Services 124
General 125 Screen and Display 125 Electrical 125...
User Manual - Page 7
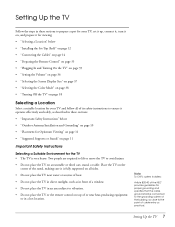
... viewing: • "Selecting a Location" below • "Installing the Set-Top Shelf " on page 12 • "Connecting the Cables" on page 14 • "Preparing the Remote Control" on page 33 • "Plugging In and Turning On the TV" on page 35 • "Setting the Volume" on page 36 • "Selecting the Screen Display Size" on page 37 • "Selecting...
User Manual - Page 8
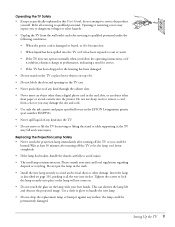
...;C). • If you place the TV in a permanent installation near a wall, secure the TV to the wall
using screws and steel wire connected to the two screw holes on the top rear of the TV. Plugging the TV Into a Power Source • Use only the type of power source indicated on the TV. If you are not sure...
User Manual - Page 9
... damage the slot and card.
• Use only the ink cassette and paper specified for use in the EPSON Livingstation printer (part number ELSPP50).
• Never spill liquid of any kind into the TV.
• Do not move or lift the TV by moving or lifting the stand or table supporting it; the TV may fall and cause...
User Manual - Page 10
...
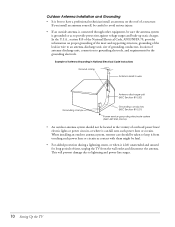
Grounding conductors (NEC Section 810-21)
Power service grounding electrode system (NEC ART 250, Part H)
• An outdoor antenna system should not be located in the vicinity of overhead power lines/ electric lights or power circuits, or where it can fall onto such power lines or circuits. When installing an outdoor antenna system, extreme care should...
User Manual - Page 12
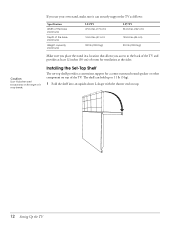
... support the TV as follows:
Specification
Width of the base (minimum)
Depth of the base (minimum)
Weight capacity (minimum)
LS47P1
47 inches (119 cm)
16 inches (41 cm) 331 lb (159.0 kg)
LS57P1
...its hinge or it may break.
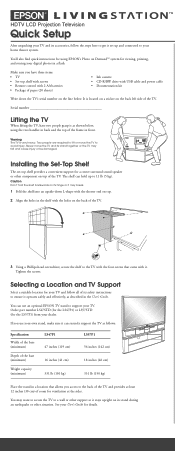
Installing the Set-Top Shelf
The set-top shelf provides a convenient support for a center surround sound speaker or other component on top of the TV. The shelf can hold up to...
User Manual - Page 33
.... For a description of the remote control button functions, see the inside front cover of this book.
Inserting the Batteries
The remote control uses two AA batteries. You'll need to install the batteries that came with your TV before you can use the remote control.
1 Press in on the...Place the cover into the grooves and slide the cover all the way up until it clicks into place.
Setting Up the TV 33
User Manual - Page 34

... for your TV's remote control, try the following:
• The remote control's batteries may be low on power; replace them.
• Dim the ambient lighting and/or turn off any fluorescent lights.
• Close any window coverings and/or move the TV out of direct sunlight.
• Turn off other equipment that emits infrared energy.
34 Setting Up the...
User Manual - Page 67
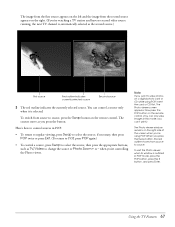
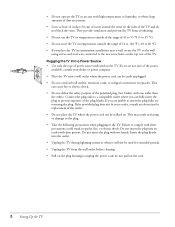
... on the right. (If you're watching a TV station and have no second video source running, the next TV channel is automatically selected as the second source.)
First...digital photo card or CD while using POP, insert the card or CD first. The Photo viewer screen appears. Now press the POP button on the remote control. (You can only view images in this mode; you can't print.)
The Photo viewer window...
User Manual - Page 68
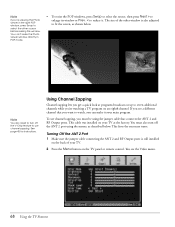
... also turn off the ANT 2 port using the menus, as described below. This frees the necessary tuner.
Turning Off the ANT 2 Port
1 Make sure the jumper cable connecting the ANT 2 and RF Output ports is still installed on the back of your TV.
2 Press the Menu button on the TV panel or remote control. You see the Video menu...
User Manual - Page 69
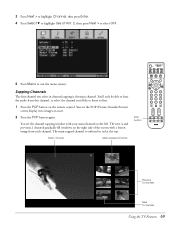
... be able to hear the audio from this channel, so select the channel you'd like to listen to first.
1 Press the POP button on the remote control. You see the POP (Picture-Outside-Picture) screen display (two images at once).
2 Press the POP button again.
You see the channel zapping window with your main channel...
User Manual - Page 85
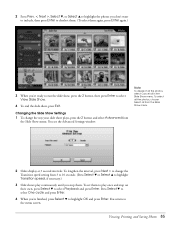
... the 2 button and select Advanced from
the Slide Show menu. You see the Advanced Settings window:
Note
To deselect all the photos, select Cancel all in the Slide Show menu. To... photos, choose Select all from the Slide Show menu.
2 Slides display at 3 second intervals. To lengthen the interval, press Next > to change the Transition speed setting from 3 to 10 seconds. (Press Select d or Select u to...
User Manual - Page 86
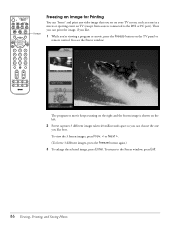
... on TV (except from sources connected to the DVI or PC port). Then you can print the image, if you like.
1 While you're viewing a program or movie, press the Freeze button on the TV panel or remote control. You see the Freeze window:
The... press the Freeze button again.) 3 To enlarge the selected image, press Enter. To return to the Freeze window, press Exit.
86 Viewing, Printing, and Saving Photos
User Manual - Page 99
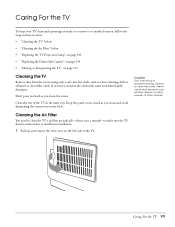
... the steps in these sections: • "Cleaning the TV" below • "Cleaning the Air Filter" below • "Replacing the TV Projection Lamp" on page 101 • "Replacing the Printer Ink Cassette" on page 105 • "Moving or Transporting the TV" on page 111
Cleaning the TV
Remove dust from the screen using only a soft, lint...
User Manual - Page 102
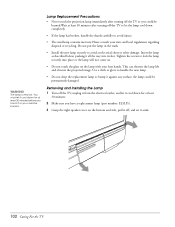
...TV or you could be burned.Wait at least 30 minutes after turning off the TV... to let the lamp cool down completely.
• If the lamp has broken, handle the shards carefully to avoid injury.
• The used lamp contains mercury. Please consult your state and local regulations regarding disposal or recycling. Do not put the lamp in the trash.
• Install...Installing the Lamp
1 Turn off the TV...