Foxconn AT-5570 driver and firmware
Related Foxconn AT-5570 Manual Pages
Download the free PDF manual for Foxconn AT-5570 and other Foxconn manuals at ManualOwl.com
User manual - Page 2

... respective owners.
Version: User's Manual V1.0 for ...power
adapter may damage your device. ■ Make sure all the peripherals are properly connected before using NanoPC. ■ This product should only be used in an environment with ambient temperatures
between 0°C and 40°C. ■ Always shut down the computer before installing or uninstalling the peripheral which
does not support...
User manual - Page 3
... extension cable to NanoPC USB Flash Disk in the package.
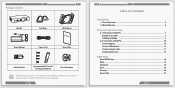
TABLE OF CONTENTS
Introduction 1-1 Front Side View...2 1-2 Back Side View...4
Placement and connecting 2-1 Placement of NanoPC 7 Erected on the desk 7 Installing to Display 7 2-2 Connection of NanoPC 10 Connect display...10 Connect USB devices 11 Connect network cable 11 Connect power cord 12
BIOS Setup Enter BIOS Setup...14 Main...
User manual - Page 4
Install OS 4-1 Install Windows 7/8 24 4-2 Install Drivers...28
Utility Fox WINFLASH...30 1. Local Update...30 2. About & Help...32
Introduction
■ Front Side View ■ Back Side View
User manual - Page 5
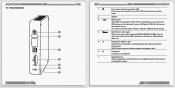
... printer, USB flash drives and
hard disk drives, etc.
You need to install the USB 3.0 driver in NanoPC USB Disk before using it.
4
Multi-Function card reader
This memory card reader supports SD/SDHC/MS/MS Pro/MMC memory
cards used in devices like digital cameras, mobile phones, Media players
and so on.
5
Microphone / SPDIF in port
Connects to a microphone or playback devices with optical...
User manual - Page 7
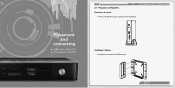
Placement and
connecting
■ Placement of NanoPC ■ Connection of NanoPC
2-1 Placement of NanoPC
PLACEMENT AND CONNECTING
Erected on the desk
1. Place your NanoPC into the groove of the Seat Base.
Installing to Display 1. Assemble one side of the VESA mount.
7
User manual - Page 8
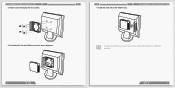
PLACEMENT AND CONNECTING
2. Fasten it onto the display with four screws.
3. Fit the NanoPC into the VESA mount in the correct alignment.
8
4. Install the other side of the VESA mount.
PLACEMENT AND CONNECTING
To fasten the VESA mount, your display must comply with VESA75 or VESA100 standard.
9
User manual - Page 9
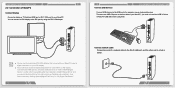
... USB disk before using them.
■ Please use the customized DVI-VGA Adapter that comes with your NanoPC to get a higher resolution on your VGA display.
■ You could have access to display adjustment for some HDTV or HD display connected via HDMI port by using the scaling function in "AMD VISION Engine Center", a utility, which is available after the installation of AMD Chipset Driver...
User manual - Page 11
... more memory or I/O cards installed. It means, if your system loading is heavy, set to optimal default may sometimes come out an unstable system. What you need now is to adjust BIOS setting one by one, trial and error, to find out the best setting for your current system. You also can save or discard the changes and exit BIOS setup...
User manual - Page 12

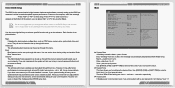
BIOS SETUP
no password is set or you enter system with administrator password, this item will display "Administrator".
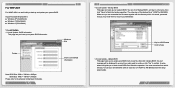
Advanced
Aptio Setup Utility - C opyright (C) 2012 American Megatrends, Inc. Main AAddvvaanncceedd Boot Security Save & Exit
SATA Mode Deep Sleep Support
USB 2.0 Port S3 Wakeup LAN / USB 3.0 Port S3 Wakeup Restore on AC Power Loss Supporting C6 power state Integrated GPU UMA ...
User manual - Page 14
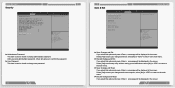
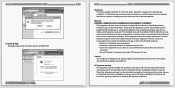
BIOS SETUP Security
Aptio Setup Utility - C opyright (C) 2012 American Megatrends, Inc. Main Advanced Boot Security Save & Exit
Password Description
Set Administrator Password
If ONLY the Administrator's paeeword is set,
then this only limits access to Setup and is
only asked for when entering Setup.
If ONLY the user's password is set, then this
is a power on password and must be entered ...
User manual - Page 15
... defaults. Select and press , it will not load. By this default, BIOS have set the optimal performance parameters of system to improve the performances of system components. But if the optimal performance parameters to be set cannot be supported by your hardware devices (for example, too many expansion cards were installed), the system might fail to work. ►...
User manual - Page 16
... set to "Disabled" in the BIOS setup.
4-1 Install Windows 7/8
1. Connect the Windows 7/8 Install USB Disk (or USB DVD-ROM drive) to one USB port of NanoPC. 2. Press power on button to turn on your computer. 3. Put the Windows 7/8 Install CD into the USB DVD-ROM drive if you use the USB DVD-ROM drive. 4. Computer will choose the boot device by BIOS default and start loading the files for installing...
User manual - Page 17
... ensure that all Windows features work correctly, Windows might create additional partitions for system files. So you will see a 100MB partition reserved by system after you create a partition. Select the 70GB partition and click "Next" to continue.
10. The setup program will then start to install Windows 7/8 on your hard disk. During the installation, your computer will restart...
User manual - Page 18
... the installation is complete, setup will prepare your computer for it's first use. You can then follow the steps to select system settings, create an account, set a password...etc, until the whole process is completed.
4-2 Install Drivers
1. When the Windows 7/8 is completely installed, you have to install the necessary drivers before using the NanoPC. Connect the NanoPC USB Flash Disk to your...
User manual - Page 19
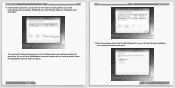
... may need them to recover your BIOS later.
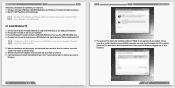
Key in a BIOS name Click to Save
1-3 Local Update - Update BIOS This page helps you to update your BIOS from a local file. After click "Update BIOS", An alert message will be displayed to ensure if you really want to continue, click "Yes" to confirm. A setup wizard will guide you to load a local BIOS file to finish the...
User manual - Page 20
... the dealer or an experienced radio/ TV technician for help.
Caution: Any changes or modifications not expressly approved by the grantee of this device could void the user's authority to operate the equipment.
RF exposure warning: This equipment must be installed and operated in accordance with provided instructions and the antenna(s) used for this...