Gigabyte GA-8I848P775-G driver and firmware
Drivers and firmware downloads for this Gigabyte item

Related Gigabyte GA-8I848P775-G Manual Pages
Download the free PDF manual for Gigabyte GA-8I848P775-G and other Gigabyte manuals at ManualOwl.com
Manual - Page 3
...:
„ For quick installation, please refer to the "Hardware Installation Guide" included with the product.
„ For detailed product information and specifications, please carefully read the "Product User Manual".
„ For detailed information related to Gigabyte's unique features, please go to "Technology Guide" section on Gigabyte's website to read or download the information you need...
Manual - Page 5
Chapter 3 Drivers Installation 49 3-1 Install Chipset Drivers 49 3-2 SoftwareApplication 50 3-3 Software Information 50 3-4 Hardware Information 51 3-5 Contact Us ...51
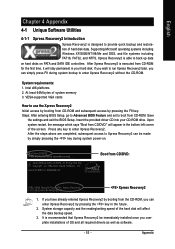
Chapter 4 Appendix 53 4-1 Unique Software Utilities 53
4-1-1 Xpress Recovery2 Introduction 53 4-1-2 Flash BIOS Method Introduction 55 4-1-3 2 / 4 / 6 / 8 Channel Audio Function Introduction 64 4-1-4 Jack-Sensing and UAJ ...
Manual - Page 16
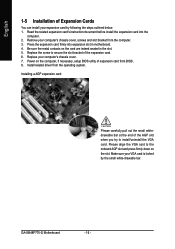
... from the computer. 3. Press the expansion card firmly into expansion slot in motherboard. 4. Be sure the metal contacts on the card are indeed seated in the slot. 5. Replace the screw to secure the slot bracket of the expansion card. 6. Replace your computer's chassis cover. 7. Power on the computer, if necessary, setup BIOS utility of expansion card from BIOS. 8. Install related driver from the...
Manual - Page 17
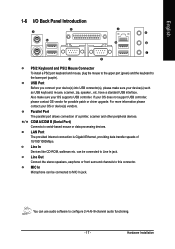
... OS supports USB controller. If your OS does not support USB controller, please contact OS vendor for possible patch or driver upgrade. For more information please contact your OS or device(s) vendors.
Parallel Port The parallel port allows connection of a printer, scanner and other peripheral devices.
/ COM A/COM B (Serial Port) Connects to serial-based mouse or data processing devices.
LAN Port...
Manual - Page 21
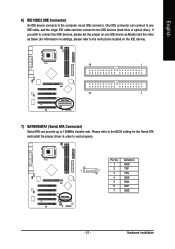
... optical drive). If you wish to connect two IDE devices, please set the jumper on one IDE device as Master and the other as Slave (for information on settings, please refer to the instructions located on the IDE device).
39
1
40
2
7) SATA0/SATA1 (Serial ATA Connector) Serial ATA can provide up to 150MB/s transfer rate. Please refer to the BIOS setting for the Serial ATA and install...
Manual - Page 29
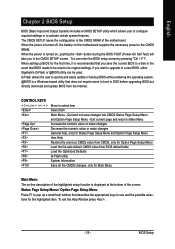
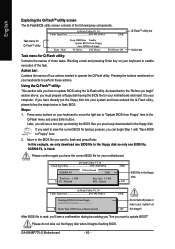
... its original settings. If you wish to upgrade to a new BIOS, either Gigabyte's Q-Flash or @BIOS utility can be used. Q-Flash allows the user to quickly and easily update or backup BIOS without entering the operating system. @BIOS is a Windows-based utility that does not require users to boot to DOS before upgrading BIOS but directly download and update BIOS from the Internet.
CONTROL KEYS Enter...
Manual - Page 34
... Help
F7: Optimized Defaults
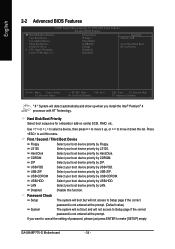
" # " System will detect automatically and show up when you install the Intel® Pentium® 4 processor with HT Technology.
Hard Disk Boot Priority Select boot sequence for onboard(or add-on cards) SCSI, RAID, etc.
Use < > or < > to select a device, then press to move it up, or to move it down the list...
Manual - Page 35
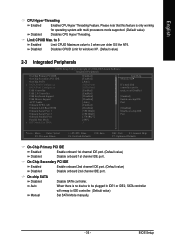
... for windows XP. (Default value)
2-3 Integrated Peripherals
CMOS Setup Utility-Copyright (C) 1984-2005 Award Software Integrated Peripherals
On-Chip Primary PCI IDE On-Chip Secondary PCI IDE On-Chip SATA x SATA Port0 Configure as SATA Port1 Configure as USB Controller
USB 2.0 Controller USB Keyboard Support USB Mouse Support AC97 Audio Onboard H/W LAN Onboard LAN Boot ROM
Onboard Serial Port...
Manual - Page 49
...
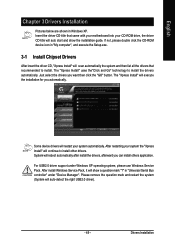
Pictures below are shown in Windows XP. Insert the driver CD-title that came with your motherboard into your CD-ROM drive, the driver CD-title will auto start and show the installation guide. If not, please double click the CD-ROM device icon in "My computer", and execute the Setup.exe.
3-1 Install Chipset Drivers
After insert the driver CD, "Xpress Install" will scan automatically the system and...
Manual - Page 50
English
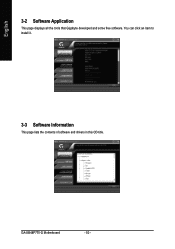
3-2 Software Application
This page displays all the tools that Gigabyte developed and some free software. You can click an item to install it.
3-3 Software Information
This page lists the contents of software and drivers in this CD-title.
GA-8I848P775-G Motherboard
- 50 -
Manual - Page 51
English
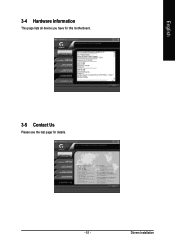
3-4 Hardware Information
This page lists all device you have for this motherboard.
3-5 Contact Us
Please see the last page for details.
- 51 -
Drivers Installation
Manual - Page 53
... bytes of system memory 3. VESA-supported VGA cards
How to use the Xpress Recovery2 Initial access by booting from CD-ROM and subsequent access by pressing the F9 key: Steps: After entering BIOS Setup, go to Advanced BIOS Feature and set to boot from CD-ROM. Save
the settings and exit the BIOS Setup. Insert the provided driver CD into your CD-ROM drive. Upon system...
Manual - Page 54
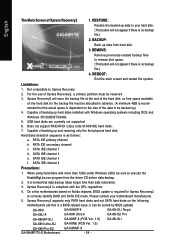
...identify RAID and SATA IDE mode. Please contact your motherboard manufacturer.
5. Xpress Recovery2 supports only PATA hard disks and not SATA hard disks on the following
motherboards (As this is a BIOS-related issue, it can be solved by BIOS update)
GA-K8U GA-K8U-9 GA-K8NXP-SLI GA-K8N Ultra-SLI GA-K8N Pro-SLI GA-8I848P775-G Motherboard
GA-K8NXP-9 GA-K8N Ultra-9 GA-K8NF-9 (PCB Ver. 1.0) GA-K8NE...
Manual - Page 55
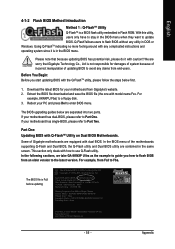
... BIOS menu.
The BIOS upgrading guides below are separated into two parts. If your motherboard has dual-BIOS, please refer to Part One. If your motherboard has single-BIOS, please refer to Part Two.
Part One: Updating BIOS with Q-FlashTM Utility on Dual BIOS Motherboards.
Some of Gigabyte motherboards are equipped with dual BIOS. In the BIOS menu of the motherboards supporting Q-Flash and Dual BIOS...
Manual - Page 57

... Settings to CMOS
Q-Flash Utility Load Main BIOS from Floppy Load Backup BIOS from Floppy
Save Main BIOS to Floppy Save Backup BIOS to Floppy
Enter : Run
:Move
ESC:Reset
F10:Power Off
BIOS file in the floppy disk.
After pressing Enter, you'll then see the progress of reading the BIOS file from the floppy disk.
Dual BIOS Utility
Boot From Main Bios Main ROM...
Manual - Page 58

... Main Processor : Intel Pentium(R) 4 1.6GHz (133x12) Memory Testing : 131072K OK
Memory Frequency 266 MHz in Single Channel Primary Master : FUJITSU MPE3170AT ED-03-08 Primary Slave : None Secondary Master : CREATIVEDVD-RM DVD1242E BC101 Secondary Slave : None
Press DEL to enter SETUP / Dual BIOS / Q-Flash / F9 For
Xpress Recovery 09/23/2003-i875P-6A79BG03C-00
GA-8I848P775-G Motherboard
- 58...
Manual - Page 59
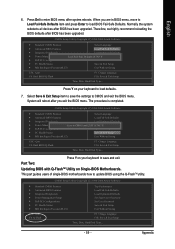
... recommend reloading the BIOS defaults after BIOS has been upgraded.
CMOS Setup Utility-Copyright (C) 1984-2004 Award Software
Standard CMOS Features
Select Language
Advanced BIOS Features
Load Fail-Safe Defaults
Integrated Peripherals
Load Optimized Defaults
Power Management Setup
Load Fail-Safe Defaults (YS/eNt )S?uYpervisor Password
PnP/PCI Configurations
Set User Password
PC Health...
Manual - Page 60
... BIOS to Floppy EnteDr o: nR'tunTurn Off P:oMwoevr eor ReseEt SyCs:tRemeset
F10:Power Off
Do not turn off power or reset your system at this stage!!
After BIOS file is read, you'll see a confirmation dialog box asking you "Are you sure to update BIOS?" Please do not take out the floppy disk when it begins flashing BIOS.
GA-8I848P775-G Motherboard...
Manual - Page 62
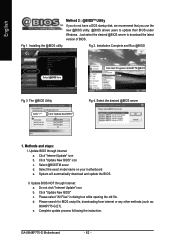
... startup disk, we recommend that you use the new @BIOS utility. @BIOS allows users to update their BIOS under Windows. Just select the desired @BIOS server to download the latest version of BIOS.
Fig 1. Installing the @BIOS utility
Fig 2. Installation Complete and Run @BIOS
Select @BIOS item
Click Sart/ Programs/ GIGABYTE/@BIOS
Fig 3. The @BIOS Utility
Click " "
Click "Update New BIOS"
Fig...
Manual - Page 64
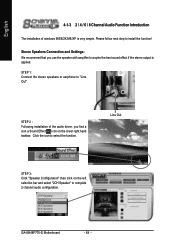
... or earphone to "Line Out".
STEP 2 : Following installation of the audio driver, you find a icon a Sound Effect icon on the lower right hand taskbar. Click the icon to select the function.
Line Out
STEP 3: Click "Speaker Configuration" then click on the left selection bar and select "2CH Speaker" to complete 2 channel audio configuration.
GA-8I848P775-G Motherboard
- 64 -