Gigabyte GA-8I945PLGE-RH driver and firmware
Drivers and firmware downloads for this Gigabyte item


Related Gigabyte GA-8I945PLGE-RH Manual Pages
Download the free PDF manual for Gigabyte GA-8I945PLGE-RH and other Gigabyte manuals at ManualOwl.com
Manual - Page 3
...:
„ For quick installation, please refer to the "Hardware Installation Guide" included with the product.
„ For detailed product information and specifications, please carefully read the "Product User Manual".
„ For detailed information related to Gigabyte's unique features, please go to "Technology Guide" section on Gigabyte's website to read or download the information you need...
Manual - Page 5

Chapter 3 Install Drivers 49 3-1 Install Chipset Drivers 49 3-2 SoftwareApplications 50 3-3 Driver CD Information 50 3-4 Hardware Information 51 3-5 Contact Us ...51
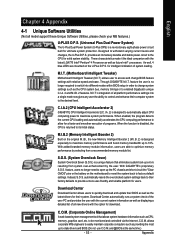
Chapter 4 Appendix 53 4-1 Unique Software Utilities 53
4-1-1 EasyTune 5 Introduction 54 4-1-2 Xpress Recovery2 Introduction 55 4-1-3 Flash BIOS Method Introduction 57 4-1-4 2- / 4- / 6- / 8- Channel Audio Function ...
Manual - Page 11
...
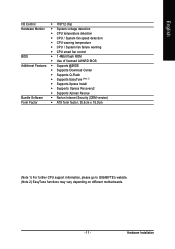
Š CPU smart fan control
BIOS
Š 1 4Mbit flash ROM
Š Use of licensed AWARD BIOS
Additional Features Š Supports @BIOS
Š Supports Download Center
Š Supports Q-Flash
Š Supports EasyTune (Note 2)
Š Supports Xpress Install
Š Supports Xpress Recovery2
Š Supports Xpress Rescue
Bundle Software Š Norton Internet Security (OEM version)
Form...
Manual - Page 16

... Replace the screw to secure the slot bracket of the expansion card. 6. Replace your computer's chassis cover. 7. Power on the computer, if necessary, setup BIOS utility of expansion card from BIOS. 8. Install related driver from the operating system. Installing a PCI Express x 16 expansion card:
Please align the VGA card to the onboard PCI Express x 16 slot and press firmly down on the slot. Make...
Manual - Page 17
... sure your OS supports USB controller. If your OS does not support USB controller, please contact OS vendor for possible patch or driver upgrade. For more information please contact your OS or device(s) vendors.
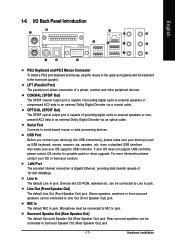
LAN Port The provided Internet connection is Gigabit Ethernet, providing data transfer speeds of 10/100/1000Mbps.
Line In The default Line In jack. Devices like CD-ROM, walkman etc. can...
Manual - Page 21
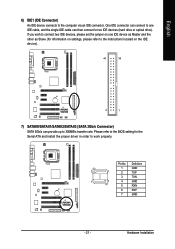
... Master and the other as Slave (for information on settings, please refer to the instructions located on the IDE device).
40
39
2
1
7) SATAII0/SATAII1/SATAII2/SATAII3 (SATA 3Gb/s Connector) SATA 3Gb/s can provide up to 300MB/s transfer rate. Please refer to the BIOS setting for the Serial ATA and install the proper driver in order to work properly.
Pin No. Definition...
Manual - Page 22
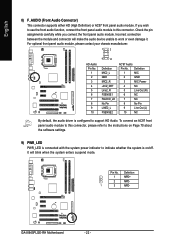
... Audio. To connect an AC97 front panel audio module to this connector, please refer to the instructions on Page 70 about the software settings.
9) PWR_LED PWR_LED is connected with the system power indicator to indicate whether the system is on/off. It will blink when the system enters suspend mode.
Pin No. Definition
1
MPD+
2
MPD-
1
3
MPD-
GA-8I945PLGE-RH Motherboard...
Manual - Page 29
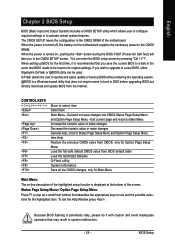
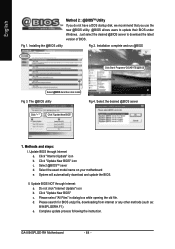
... its original settings. If you wish to upgrade to a new BIOS, either Gigabyte's Q-Flash or @BIOS utility can be used. Q-Flash allows the user to quickly and easily update or backup BIOS without entering the operating system. @BIOS is a Windows-based utility that does not require users to boot to DOS before upgrading BIOS but directly download and update BIOS from the Internet.
CONTROL KEYS Enter...
Manual - Page 49
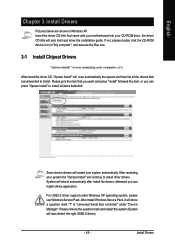
...continue to install other drivers. System will reboot automatically after install the drivers, afterward you can install others application.
For USB2.0 driver support under Windows XP operating system, please use Windows Service Pack. After install Windows Service Pack, it will show a question mark "?" in "Universal Serial Bus controller" under "Device Manager". Please remove the question mark and...
Manual - Page 50
English
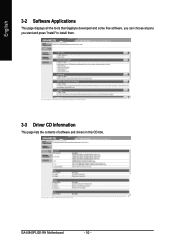
3-2 Software Applications
This page displays all the tools that Gigabyte developed and some free software, you can choose anyone you want and press "install" to install them.
3-3 Driver CD Information
This page lists the contents of software and drivers in this CD-title.
GA-8I945PLGE-RH Motherboard
- 50 -
Manual - Page 53
... within BIOS setup in order to change system settings such as the CPU system bus, memory timings or to enabled Gigabyte's unique C.I.A. 2 and M.I.B. 2 features. M.I.T.'s integration of all platform performance settings into a single mode now gives any user the ability to control and enhance their computer system to the desired level.
C.I.A.2 (CPU Intelligent Accelerator 2)
GIGABYTE CPU Intelligent...
Manual - Page 55
... bytes of system memory 3. VESA-supported VGA cards
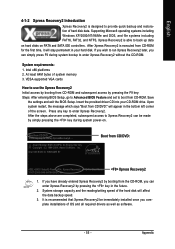
How to use the Xpress Recovery2 Initial access by booting from CD-ROM and subsequent access by pressing the F9 key: Steps: After entering BIOS Setup, go to Advanced BIOS Feature and set to boot from CD-ROM. Save
the settings and exit the BIOS Setup. Insert the provided driver CD into your CD-ROM drive. Upon system...
Manual - Page 56
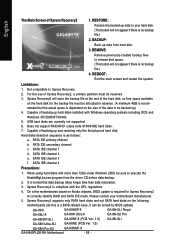
... Recovery2 supports only PATA hard disks and not SATA hard disks on the following
motherboards (As this is a BIOS-related issue, it can be solved by BIOS update)
GA-K8U
GA-K8NXP-9
GA-K8U-9
GA-K8N Ultra-9
GA-K8NXP-SLI
GA-K8NF-9 (PCB Ver. 1.0)
GA-K8N Ultra-SLI
GA-K8NE (PCB Ver. 1.0)
GA-K8N Pro-SLI
GA-K8NMF-9
GA-8I945PLGE-RH Motherboard
- 56 -
GA-8N-SLI Royal GA-8N-SLI Pro GA-8N-SLI
Manual - Page 57
... BIOS menu.
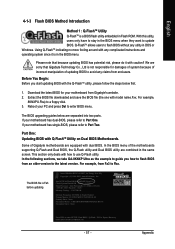
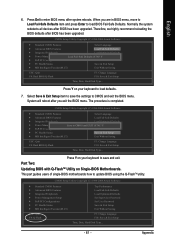
The BIOS upgrading guides below are separated into two parts. If your motherboard has dual-BIOS, please refer to Part One. If your motherboard has single-BIOS, please refer to Part Two.
Part One: Updating BIOS with Q-FlashTM Utility on Dual BIOS Motherboards.
Some of Gigabyte motherboards are equipped with dual BIOS. In the BIOS menu of the motherboards supporting Q-Flash and Dual BIOS...
Manual - Page 61
... recommend reloading the BIOS defaults after BIOS has been upgraded.
CMOS Setup Utility-Copyright (C) 1984-2004 Award Software
Standard CMOS Features
Select Language
Advanced BIOS Features
Load Fail-Safe Defaults
Integrated Peripherals
Load Optimized Defaults
Power Management Setup
Load Fail-Safe Defaults (YS/eNt )S?uYpervisor Password
PnP/PCI Configurations
Set User Password
PC Health...
Manual - Page 64
... download and update the BIOS.
II. Update BIOS NOT through Internet: a. Do not click "Internet Update" icon b. Click "Update New BIOS" c. Please select "All Files" in dialog box while opening the old file. d. Please search for BIOS unzip file, downloading from internet or any other methods (such as: 8I945PLGERH.F1). e. Complete update process following the instruction.
GA-8I945PLGE-RH Motherboard...
Manual - Page 66
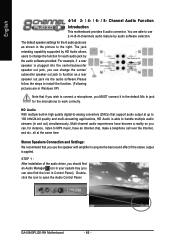
... Settings: We recommend that you use the speaker with amplifier to acquire the best sound effect if the stereo output is applied.
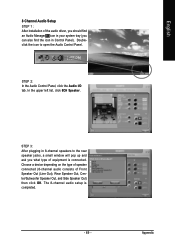
STEP 1 : After installation of the audio driver, you should find an Audio Manager icon in your system tray (you can also find the icon in Control Panel). Doubleclick the icon to open the Audio Control Panel.
GA-8I945PLGE-RH Motherboard...
Manual - Page 67
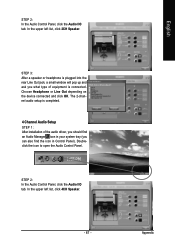
... window will pop up and ask you what type of equipment is connected. Choose Headphone or Line Out depending on the device connected and click OK. The 2-channel audio setup is completed.
4 Channel Audio Setup STEP 1 : After installation of the audio driver, you should find an Audio Manager icon in your system tray (you can also find the icon in Control...
Manual - Page 68
... to the rear speaker jacks, a small window will pop up and ask you what type of equipment is connected. Choose a device depending on the type of speaker connected (6-channel audio consists of Front Speaker Out (Line Out), Rear Speaker Out, and Center/Subwoofer Speaker Out) then click OK. The 6-channel audio setup is completed.
GA-8I945PLGE-RH Motherboard
- 68 -
Manual - Page 69
English
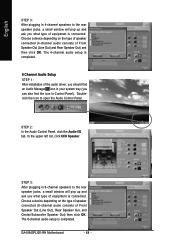
8 Channel Audio Setup STEP 1 : After installation of the audio driver, you should find an Audio Manager icon in your system tray (you can also find the icon in Control Panel). Doubleclick the icon to open the Audio Control Panel.
STEP 2: In the Audio Control Panel, click the Audio I/O tab. In the upper left list, click 8CH Speaker.
STEP 3: After plugging in 8-channel...