Gigabyte MD80-TM0 driver and firmware
Related Gigabyte MD80-TM0 Manual Pages
Download the free PDF manual for Gigabyte MD80-TM0 and other Gigabyte manuals at ManualOwl.com
Manual - Page 2

...11
Network...11 Network Security ...12
Users ...13 Services ...14 IPMI ...15 Time Setting ...17 Sessions ...18 LDAP ...19 Updates ...20 Utilities ...21 Server Information ...22 Power Control ...22 Voltages ...23 Thermal ...24 Fans ...24 Temperature ...25 System Event Log ...26 Event Management ...27 Platform Event ...27 Trap Settings ...28 Email Settings ...29 Serial Over LAN ...30 Remote Console...
Manual - Page 6
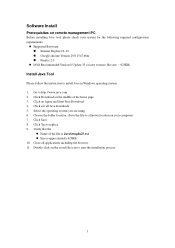
... configuration requirements:
Supported Browsers: Internet Explorer 8~12 Google chrome Version 29.0.1547.66m Firefox 2.0
JAVA Recommended Version 8 Update 25 or later version (file size: ~ 623KB)
Install Java Tool
Please follow the instruction to install Java in Windows operating system. 1. Go to http://www.java.com 2. Click Download on the middle of the...
Manual - Page 9

Using the Web UI
The BMC firmware features an embedded web server, enabling users to connect to the BMC using an Internet browser (Microsoft® Internet Explorer™). The web server shall support 4 concurrent connections Web-based GUI is supported on the following browsers: Microsoft Windows: • Internet Explorer 8 ~ 12 • Mozilla® Firefox® 2.0 or later Linux...
Manual - Page 13
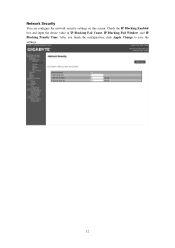
Network Security
You can configure the network security settings on this screen. Check the IP Blocking Enabled box and input the desire value of IP Blocking Fail Count, IP Blocking Fail Window, and IP Blocking Penalty Time. After you finish the configuration, click Apply Change to save the settings.
12
Manual - Page 20
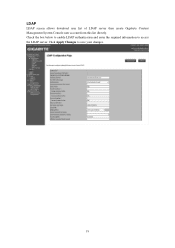
LDAP
LDAP screen allows download user list of LDAP server then create Gigabyte Content Management System Console user account from this list directly. Check the box below to enable LDAP authentication and enter the required information to access the LDAP server. Click Apply Changes to save your changes.
19
Manual - Page 21
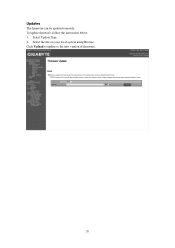
Updates
The firmware can be updated remotely. To update firmware, follow the instruction below: 1. Select Update Type. 2. Select the file on your local system using Browse. Click Upload to update to the new version of firmware.
20
Manual - Page 8
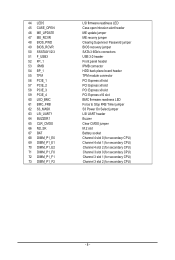
... ME recovry jumper Clearing Supervisor Password jumper BIOS recovery jumper SATA 3 6Gb/s connectors USB 3.0 header Front panel header IPMB connector HDD back plane board header TPM module connector PCI Express x8 slot PCI Express x8 slot PCI Express x8 slot PCI Express x16 slot BMC firmware readiness LED Force to Stop FRB Timer jumper S3 Power On Select jumper LSI UART header...
Manual - Page 12
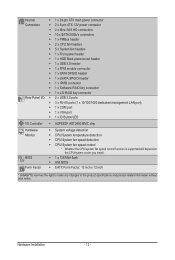
... TPM module connector ŠŠ 1 x SATA SPGIO header ŠŠ 1 x sSATA SPGIO header ŠŠ 1 x IPMB connector ŠŠ 1 x Software RAID key connector ŠŠ 1 x LSI RAID key connector ŠŠ 2 x USB 3.0 ports ŠŠ 3 x RJ-45 ports (1 x 10/100/1000 dedicated management LAN port) ŠŠ 1 x COM port ŠŠ 1 x VGA port ŠŠ 1 x ID Button/LED...
Manual - Page 16

... below to correctly install the CPU cooler on the motherboard. (Actual installation process may differ depending the CPU cooler to be used. Refer to the user's manual for your CPU cooler.)
Step 1:
Step 2:
Apply an even and thin layer of thermal grease on the Place the cooler atop the CPU, aligning the four
surface of the installed CPU.
mounting screws...
Manual - Page 31
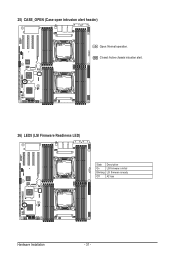
25) CASE_OPEN (Case open intrusion alert header)
Open: Normal operation. Closed: Active chassis intrustion alert.
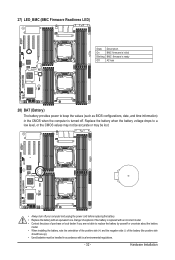
26) LED5 (LSI Firmware Readiness LED)
State Description
On
LSI firmware is initial
Blinking LSI firmware is ready
Off
AC loss
Hardware Installation
- 31 -
Manual - Page 32
...firmware is initial
Blinking BMC firmware is ready
Off
AC loss
28) BAT (Battery)
The battery provides power to keep the values (such as BIOS configurations, date, and time information) in the CMOS when the computer...to replace the battery by yourself or uncertain about the battery
model. • When installing the battery, note the orientation of the positive side (+) and the negative side (-)...
Manual - Page 37
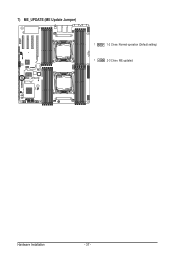
7) ME_UPDATE (ME Update Jumper)
ME_UPDATE
1
1-2 Close: Normal operation (Default setting)
1
2-3 Close: ME updated.
Hardware Installation
- 37 -
Manual - Page 41
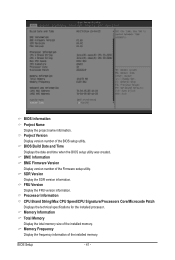
... the BIOS setup utility was created. BMC Information BMC Firmware Version Display version number of the Firmware setup utility. SDR Version Display the SDR version information. FRU Version Display the FRU version information. Processor Information CPU Brand String/Max CPU Speed/CPU Signature/Processors Core/Microcode Patch Displays the technical specifications for the installed processor. Memory...
Manual - Page 63
... 0/1Version
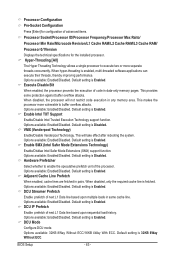
Displays the technical specifications for the installed processor. Hyper-Threading [All]
The Hyper Threading Technology allows a single processor to execute two or more separate threads concurrently. When hyper-threading is enabled, multi-threaded software applications can execute their threads, thereby improving performance. Options available: Enabled/Disabled. Default setting is...
Manual - Page 108
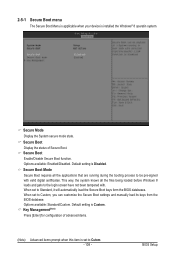
...-signed with valid digital certificates. This way, the system knows all the files being loaded before Windows 8 loads and gets to the login screen have not been tampered with. When set to Standard, it will automatically load the Secure Boot keys form the BIOS databases. When set to Custom, you can customize the Secure Boot settings and manually load its keys...
Manual - Page 119
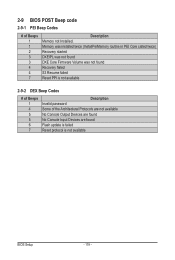
... not found DXE Core Firmware Volume was not found Recovery failed S3 Resume failed Reset PPI is not available
2-9-2 DEX Beep Codes
# of Beeps 1 4 5 5 6 7
Description Invalid password Some of the Architectural Protocols are not available No Console Output Devices are found No Console Input Devices are found Flash update is failed Reset protocol is not available
BIOS Setup
- 119 -
Manual - Page 1
... TECHNOLOGY CO., LTD.
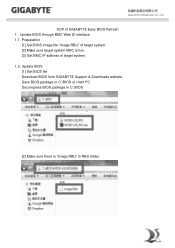
SOP of GIGABYTE Easy BIOS Refresh 1. Update BIOS through BMC Web UI interface 1.1. Preparation
[1] Get BIOS image file "image.RBU" of target system. [2] Make sure target system BMC is live. [3] Get BMC IP address of target system. 1.2. Update BIOS [1] Get BIOS file Download BIOS from GIGABYTE Support & Downloads website. Save BIOS package in C:\BIOS of client PC. Decompress...
Manual - Page 2
GIGA -BYTE TECHNOLOGY CO., LTD.
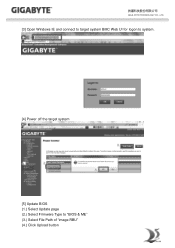
[3] Open Windows IE and connect to target system BMC Web UI for logon to system.
[4] Power off the target system
[5] Update BIOS (1.) Select Update page (2.) Select Firmware Type to "BIOS & ME" (3.) Select File Path of "image.RBU" (4.) Click Upload button
Manual - Page 6
... CO., LTD.
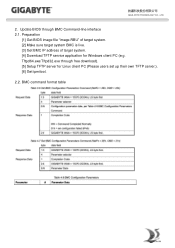
2. Update BIOS through BMC Command-line interface 2.1. Preparation
[1] Get BIOS image file "image.RBU" of target system. [2] Make sure target system BMC is live. [3] Get BMC IP address of target system. [4] Download TFTP service application for Windows client PC (e.g. Tftpd64.exe/Tftpd32.exe through free download). [5] Setup TFTP server for Linux client PC (Please users set up their...
Manual - Page 8
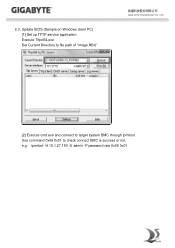
2.3. Update BIOS (Sample on Windows client PC) [1] Set up TFTP service application Execute Tftpd64.exe Set Current Directory to file path of "image.RBU"
GIGA -BYTE TECHNOLOGY CO., LTD.
[2] Execute cmd.exe and connect to target system BMC through ipmitool. Use command 0x06 0x01 to check connect BMC is success or not. e.g. ipmitool -H 10.1.27.150 -U admin -P password raw 0x06 0x01