HP Model 744rt - VME Workstation driver and firmware
Drivers and firmware downloads for this Hewlett-Packard item
Related HP Model 744rt Manual Pages
Download the free PDF manual for HP Model 744rt and other HP manuals at ManualOwl.com
Installing the A4980A EISA-to-PCI Backplane Upgrade - Page 1
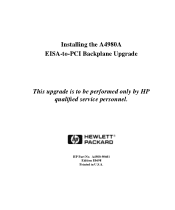
Installing the A4980A EISA-to-PCI Backplane Upgrade
This upgrade is to be performed only by HP qualified service personnel.
HP Part No. A4980-90601 Edition E0698
Printed in U.S.A.
Installing the A4980A EISA-to-PCI Backplane Upgrade - Page 2
... AND FITNESS FOR A PARTICULAR PURPOSE. Hewlett-Packard shall not be liable for errors contained herein or for incidental or consequential damages in connection with the furnishing, performance..., or disclosure by government is subject to restrictions as set forth in subdivision (c) (1) (ii) of the Rights in Technical Data and Computer Software Clause at DFARS 252.227.7013. Hewlett-Packard Co.,...
Installing the A4980A EISA-to-PCI Backplane Upgrade - Page 3
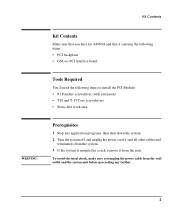
...-PCI interface board
Tools Required
You'll need the following items to install the PCI Module: • #1 Pozidriv screwdriver (with extension) • T10 and T-15 Torx screwdrivers • Static-free work area.
WARNING:
Prerequisites
1 Stop any application programs, then shut down the system. 2 Turn the system off, and unplug the power cord(s) and all other cables...
Installing the A4980A EISA-to-PCI Backplane Upgrade - Page 4
...to mechanical and electrostatic shock. To prevent such damage from occurring, observe the following precautions during the installation procedure.
• Stand on a static-free mat
• Wear a static-grounding wrist strap...from your body to ground. Attach the static-grounding wrist strap by following the instructions on the package that contains the strap. Be sure to attach one end of the strap...
Installing the A4980A EISA-to-PCI Backplane Upgrade - Page 5
Installation
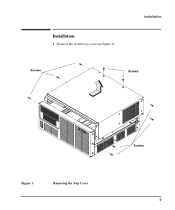
1 Remove the system top cover (see Figure 1).
Installation
Screws
Screws
Figure 1
Removing the Top Cover
Screws 5
Installing the A4980A EISA-to-PCI Backplane Upgrade - Page 6
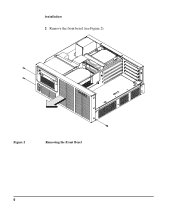
Installation 2 Remove the front bezel (see Figure 2).
Figure 2
Removing the Front Bezel
6
Installing the A4980A EISA-to-PCI Backplane Upgrade - Page 7
Installation
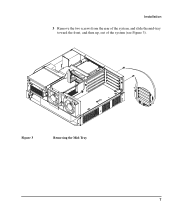
3 Remove the two screws from the rear of the system, and slide the mid-tray toward the front, and then up, out of the system (see Figure 3).
Figure 3
Removing the Mid-Tray
7
Installing the A4980A EISA-to-PCI Backplane Upgrade - Page 8
Installation
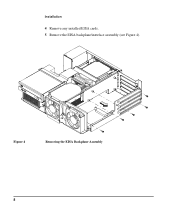
4 Remove any installed EISA cards. 5 Remove the EISA backplane/interface assembly (see Figure 4).
Figure 4
Removing the EISA Backplane Assembly
8
Installing the A4980A EISA-to-PCI Backplane Upgrade - Page 9
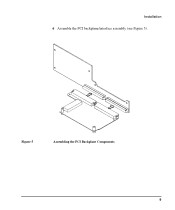
Installation 6 Assemble the PCI backplane/interface assembly (see Figure 5).
Figure 5
Assembling the PCI Backplane Components
9
Installing the A4980A EISA-to-PCI Backplane Upgrade - Page 10
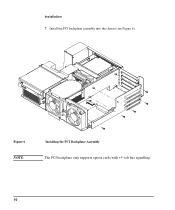
Installation 7 Install the PCI backplane assembly into the chassis (see Figure 6).
Figure 6 NOTE:
Installing the PCI Backplane Assembly The PCI backplane only supports option cards with +5 volt bus signalling.
10
Installing the A4980A EISA-to-PCI Backplane Upgrade - Page 11

Installation
Figure 7
Installing a PCI Card
8 Replace the mid-tray into the system, and secure it with the two screws. 9 Replace the front bezel and the bezel screws. 10 Install PCI cards and secure them with the screws used for the EISA cards
(see Figure 7). 11 Replace the top cover and cover screws
11
Installing the A4980A EISA-to-PCI Backplane Upgrade - Page 12
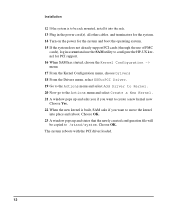
... is to be rack mounted, install it into the rack. 13 Plug in the power cord(s), all other cables, and terminators for the system. 14 Turn on the power for the system and boot the operating system. 15 If the system does not already support PCI cards (through the use of PMC
cards), log in as root and...