JVC DLA-X90RKT driver and firmware

Related JVC DLA-X90RKT Manual Pages
Download the free PDF manual for JVC DLA-X90RKT and other JVC manuals at ManualOwl.com
Instructions - Page 2
...approved by JVC could void the user's authority to operate the equipment.
NOTE:
This equipment has been tested and found to comply with the limits for Class B digital devices, pursuant ... radio/ TV technician for help.
About the installation place
Do not install the projector in a place that cannot support its weight securely. If the installation place is not sturdy enough, the projector could fall...
Instructions - Page 3
... the power supply cord or plug is damaged. b) If liquid has been spilled, or objects have fallen on
the product. c) If the product has been exposed to rain or water. d) If the product does not operate normally by
following the operating instructions. Adjust only
those controls that are covered by the Operation
Manual, as...
Instructions - Page 4
...VCR's, and DVD players, you should turn off the power of this product... the equipment and software for proper display. Please stop using... the nearest
authorized JVC service center.
- When...display screens with still images of high brightness or high contrast, such as found in video games and computer...device.
*DO NOT allow any unqualified person to install the unit. Be sure to ask your dealer to install...
Instructions - Page 13
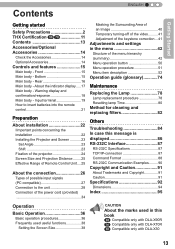
... 16 Main body - About the indicator display..... 17 Main body - Warning display and confirmation/response 18 Main body - Input terminal 19 How to insert batteries into the remote control 21
Preparation
About installation 22
IImportant points concerning the installation 22 Installing the Projector and Screen 23
Set Angle 23 Shift 23 Fixation of the projector 24 Screen Size and Projection...
Instructions - Page 18
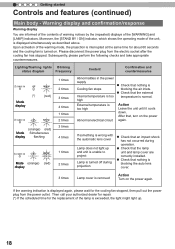
... countermeasures.
Lighting/flashing lights Blinking
status diagram
Frequency
STANDBY/ON
LAMP
WARNING
Mode display
(*) (red)
STANDBY/ON
LAMP
WARNING
(orange) (red)
Mode Simultaneous
display
flashing...installed.
● Check that nothing is blocking the auto lens cover.
3 times
Lamp cover is removed
Action Turn on the power again.
If the warning indication is displayed...
Instructions - Page 19
ENGLISH
Controls and features (continued)
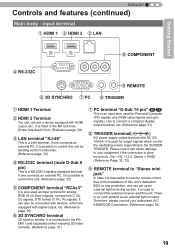
Main body - Input terminal
① HDMI 1 ② HDMI 2 ③ LAN
Getting Started
⑤ COMPONENT
④ RS-232C
⑨ REMOTE
⑥ 3D SYNCHRO ⑦ PC ⑧ TRIGGER
① HDMI 1 Terminal
② HDMI 2 Terminal
You can connect a device equipped with HDMI output, etc. It is fitted to the M3 lock hole. Screw hole depth 3mm. (Reference ...
Instructions - Page 22
... for operating: 20% ~ 80% (non-condensing) . Storage temperature tolerance: -10º to +60º. • If the installation of the unit is done in a room with soot and/or smoke over a longer period, even small amounts of these substances will affect the device.This unit cools its optical components, which produce a great amount of...
Instructions - Page 23
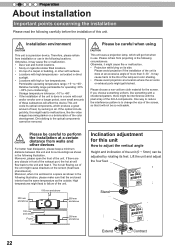
...installation (Continued)
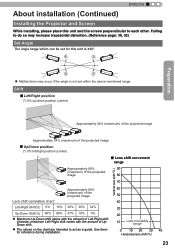
Installing the Projector and Screen
While installing, please place this unit and the screen perpendicular to each other. Failing to do so may increase trapezoidal distortion. (Reference page: 36, 52)
Set Angle
The angle range which can be set...on the chart are intended to act as a guide. Use them for reference during installation.
60
50
40
30
20
10
Lens movability ...
Instructions - Page 24
2
Preparation
About installation (Continued)
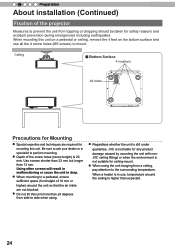
Fixation of the projector
Measures to prevent the unit from toppling or dropping should be taken for safety ... than ±5 degrees from side to side when using.
● Regardless whether the unit is still under
guarantee, JVC is not liable for any product
damage caused by mounting the unit with nonJVC ceiling fittings or when the environment is not...
Instructions - Page 25
...ENGLISH
About installation (Continued)
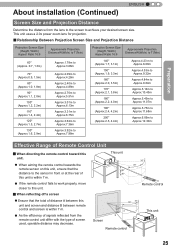
Screen Size and Projection Distance
Determine the distance from the lens to the screen to achieve your desired screen size. This unit uses a 2.0x power zoom ...Approx.12.30m
Effective Range of Remote Control Unit
■ When directing the remote control toward this unit.
● When aiming the remote control towards the remote sensor on this unit, ensure...
Instructions - Page 37
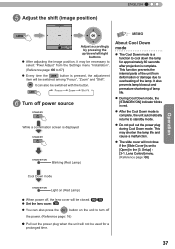
... slide cover will not close if the [Slide Cover] is set to [Open] in the [3. Setup] [3-1. Lens Control] menu. (Reference page: 66)
Cool Down mode
STAND BY/ON
Light on (Red Lamp)
● When power off, the lens cover will be closed. 90 70 ● Set the lens cover. X307
● You can also press...
Instructions - Page 41
...HDMI 2
3D FORMAT
3D SETTING
COMP. PC
LENS. CONTROL
LENS MEMORY
ANAMO.
C
HIDE
LIGHT
D
MENU
BACK
PICTURE MODE
FILM
CINEMA
ANIME
NATURAL STAGE
3D
THX
USER
C.M.D.
HIDE
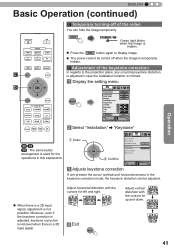
Green light blinks when the image is
hidden.
● Press the HIDE button again to display image.
● The power...
① Selec
Installation
Lens Control
Pixel Adjust
Installation Style
Front
Keystone
...
Instructions - Page 47
... settings in the menu (continued)
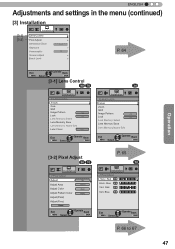
[3] Installation
Installation
[3-1] [3-2]
Lens Control Pixel Adjust
Installation Style
Front
Keystone
Anamorphic
Off
Screen Adjust
Black Level
P. 64
Operation
Exit
MENU
Select
Operate Back
BACK
[3-1] Lens Control
90 70
Installation
Lens Control
Focus
Zoom
Shift
Image Pattern
On
Lock
Off
Lens Memory Select
Lens Memory Save
Lens Memory...
Instructions - Page 51
...
OK
3 3,4 2,5
MENU
BACK
1
6
STAND BY
ON
HDMI 1
INPUT HDMI 2
3D FORMAT
3D SETTING
COMP. PC
LENS. CONTROL
LENS MEMORY
ANAMO.
HIDE
LIGHT
3,4 2,5 3
1
MENU
BACK
6
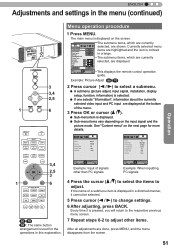
PICTURE... displayed.
This displays the remote control operation guide.
Example: Picture Adjust 90 70
2 Press cursor ( / ) to select a submenu.
● A submenu (picture adjust, input signal, installation, display setup,...
Instructions - Page 53
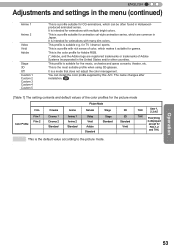
... in Japan. It is intended for animations with many dim colors.
This profile is suitable e.g. for TV / drama / sports.
This is a profile with rich sense of color, which makes it suitable for... does not adjust the color management.
You can install the color profile supplied by this JVC. The name changes after installation. 90
[Table 1] The setting contents and default values of the color profiles for...
Instructions - Page 63
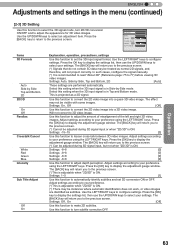
... be adjusted during 3D signal input, but not when "2D/3D" is ON.
Settings: -8~8
[0]
Settings: -8~8
[0]
Settings: -8~8
[0]
Settings: -8~8
[0]
Use this function to adjust depth perception. Adjust settings according to your preference
using the LEFT/RIGHT keys. Press the [OK] key to display the adjustment gauge window.
The [BACK] key will return you to the previous screen.
(*)This is...
Instructions - Page 64
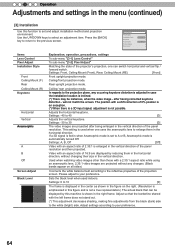
...Off
Screen Adjust Black Level
Items Lens Control Pixel Adjust Installation Style
Front Ceiling Mount (F) Rear Ceiling Mount (R) Keystone
Horizontal Vertical Anamorphic
A B Off
Screen Adjust Black Level
Explanation, operation, precautions, settings
To sub-menu "[3-1] Lens Control"
To sub-menu "[3-2] Pixel Adjust"
Matching the state of the projector's projection, one can switch horizontal and...
Instructions - Page 65
...
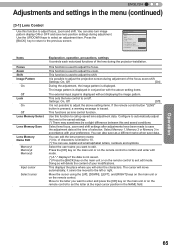
Auto
Items
Focus Zoom Shift Image Pattern
On
Off Lock
On Off Lens Memory Select
Lens Memory Save
Lens Memory Name Edit
Memory1 Memory2 Memory3
Input cursor Select cursor
Explanation, operation, precautions, settings It controls each motorized functions of the lens during the projector-installation.
This function is used to adjust the focus.
This function is used...
Instructions - Page 68
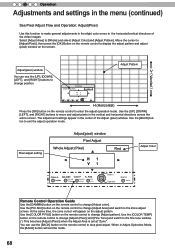
...] button to exit the adjust operation mode.
Pixel adjust setting
Adjust(pixel) window
Pixel Adjust
Whole Adjust (Pixel)
Red
H 1 V 1
Color A. ADJUST. Color P. A. Area
GAMMA
COLOR. TEMP
COLOR. P.FILE.
PIC. ADJ.
Select Operate
BACK
BACK
Adjust Color
Remote Control Operation Guide
Use the [GAMMA] button on the remote control to change [Adjust color]. Use the [PIC ADJ] button...
Instructions - Page 73
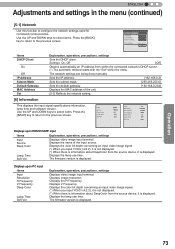
... starts with the "Set" within the menu.
The network settings are being done manually.
Sets the IP address.
[192.168.0.2]
Sets the subnet mask.
[255.255.255.0]
Sets the default gateway.
[192.168.0.254]
Displays the MAC address of the unit.
[5-1] Reflects the network setting.
[6] Information
This displays the input signal specifications information, lamp time and software version. Use the...