JVC DRMV100B - DVDr/ VCR Combo driver and firmware
Drivers and firmware downloads for this JVC item
Related JVC DRMV100B Manual Pages
Download the free PDF manual for JVC DRMV100B and other JVC manuals at ManualOwl.com
other - Page 1
... EPROM chip is updated with information.
c Please wait until "Hello" stops flashing before you attempt to use the remote control or front panel buttons. It takes 25-30 seconds until the set can be operated when a disc is on the tray.
My DR-MV100B is showing a distorted picture.
Your DR-MV100B has a progressive scan feature. This...
Instructions - Page 2
... NO USER-SERVICEABLE PARTS INSIDE REFER SERVICING TO QUALIFIED SERVICE
PERSONNEL.
This lightning flash with arrowhead ...manual carefully and retain it for future reference. Should the unit require maintenance, contact an authorized service center.
Performing controls... OPTICAL INSTRUMENTS.
CAUTION:
Do not block any ventilation openings. Install in accordance with the manufacturer's instructions....
Instructions - Page 3
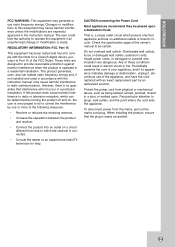
...digital device, pursuant to Part 15 of the FCC Rules. These limits are designed to provide reasonable protection against harmful interference when the product is operated in a residential installation. This product generates, uses, and can radiate radio frequency energy and, if not installed and used in accordance with the instruction manual...by an authorized servicer.
Protect the power cord from ...
Instructions - Page 4
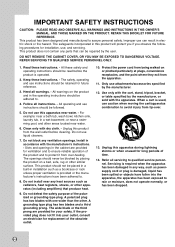
... ALL WARNINGS AND INSTRUCTIONS IN THIS OWNER'S MANUAL. AND THOSE MARKED...product will protect you if you observe the following procedures for installation, use, and servicing. This product does not contain any parts that can be ...consult an electrician for replacement of the obsolete outlet.
10. Protect the power cord from being walked on or pinched particularly at plugs, convenience receptacles,...
Instructions - Page 8
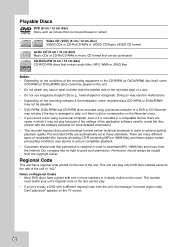
...12 cm disc) VIDEO CDs or CD-Rs/CD-RWs in VIDEO CD/Super VIDEO CD format
Audio CD (8 cm / 12 cm disc) Music CDs or CD-Rs/CD-RWs in music CD...Recorder's lens. • If you record a disc using a personal computer, even if it is recorded in a compatible format, there are
cases in which it may not play because of the settings of the application software used to create the disc. (Check with the software...
Instructions - Page 10
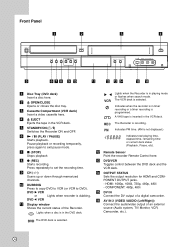
...recorder Remote Control here.
m DVD/VCR Toggles control between the DVD deck and the VCR deck.
n OUTPUT STATUS Sets the output resolution for HDMI and COMPONENT OUTPUT jacks. - HDMI: 1080p, 1080i, 720p, 480p, 480i - COMPONENT: 480p, 480i
o DV IN Connect the DV output of a digital camcorder.
p AV IN 2 (VIDEO /AUDIO (Left/Right)) Connect the audio/video output of an external source (Audio system, TV...
Instructions - Page 11
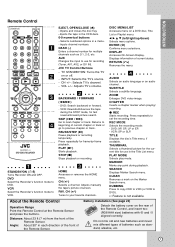
... (+/-) Selects a channel. Adjusts manually the tape's picture onscreen. FAV. CH (+/-) Tunes to your favorite channels.
MARKER Marks any point during playback.
SEARCH Displays Marker Search menu.
CLEAR Removes a mark on the Marker Search menu.
DUBBING Press to copy DVD to VCR (or VCR to DVD).
*: Feature is not available.
About the Remote Control
Battery installation (See page 24...
Instructions - Page 20

...]: Select when a 16:9 wide TV is connected.
Power Save Mode
Set Power Save Mode to [ON] to place your Recorder into an economic power save mode. Nothing is displayed in the display window when the unit is turned off.
Factory Set
You can reset the Recorder to its original factory settings. 1. Select the [Factory Set] option.
2. Press B to select [SET] then press ENTER. 3. Select...
Instructions - Page 22
... disc has a variety of audio output options. Set the Recorder's Audio Output according to the type of audio system you use.
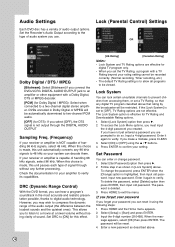
Lock (Parental Control) Settings
OR
Dolby Digital / DTS / MPEG
[Bitstream]: Select [Bitstream] if you connect the DVD+VCR's DIGITAL AUDIO OUTPUT jack to an amplifier or other equipment with a Dolby Digital, DTS or MPEG decoder.
[PCM] (for Dolby Digital / MPEG): Select when...
Instructions - Page 23
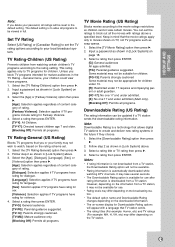
... under admitted. [X]: No one 17 and under admitted (Adult only). [Blocking Off]: Permits all programs.
Downloadable Rating (US Rating)
The rating information can be updated if a TV station sends the downloadable rating information.
Note: Downloadable Rating is a technology that allows digital TV stations to create and deliver new rating systems in the future if they choose.
1. Select...
Instructions - Page 26
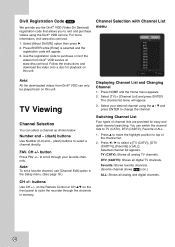
...set a favorite channel, use [Channel Edit] option in the Setup menu. (See page 16.)
CH +/- buttons
Use CH +/- on the Remote Control or CH v/V on the front panel to cycle the recorder through the channels in memory.
Displaying... a [TV (CATV)], [DTV (CADTV)], [Favorite] or [ALL]. Selected channel list appears. TV (CATV): Shows all analog TV channels.
DTV (CADTV): Shows all digital TV channels.
...
Instructions - Page 28
..., the remote control code is set to C automatically. In this case, you should reset the remote control code described above.
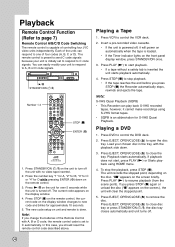
Playing a Tape
1. Press VCR to control the VCR deck.
2. Insert a pre-recorded video cassette. • If the unit is powered off, it will power on automatically when the tape is loaded. • If the Timer indicator lights on the front panel display window, press...
Instructions - Page 37
..., or business intermission) that may arise from malfunction of this recorder (not recording/editing as intended).
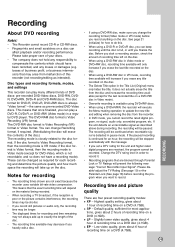
Disc types and recording formats, modes, and settings
This recorder can play many different kinds of DVD discs: pre-recorded DVD-Video discs, DVD-RW, DVDR, DVD+RW, DVD+R and DVD-RAM discs. The disc format for DVD-R, DVD+R, DVD+RW discs...
Instructions - Page 38
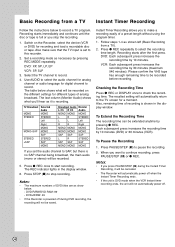
... Recorder, select the device (VCR or DVD) for recording and load a recordable disc or tape. Also make sure that the TV input is set to this recorder.
2. Set a recording mode as necessary by pressing REC MODE repeatedly.
DVD: XP, SP, LP, EP
VCR: SP, SLP
3. Select the TV channel to record.
4. Use AUDIO to select the audio channel for analog channel or audio language for digital channel to record...
Instructions - Page 42
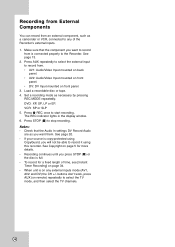
... mounted on front panel.
3. Load a recordable disc or tape. 4. Set a recording mode as necessary by pressing
REC MODE repeatedly. DVD: XP, SP, LP or EP. VCR: SP or SLP 5. Press z REC once to start recording. The REC indicator lights in the display window. 6. Press STOP (x) to stop recording. Notes: • Check that the Audio In settings DV Record Audio are as you want...
Instructions - Page 46
... markers to the Original later, these are not automatically copied over into the Playlist title.
You can add up ...then press B.
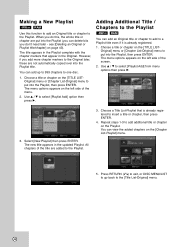
Adding Additional Title / Chapters to the Playlist
-RWVR RAM
You can add an Original title or chapter to add to a Playlist... Select [New Playlist] then press ENTER. The new title appears in the updated Playlist. All chapters of the title are added to the Playlist.
3. Choose...
Instructions - Page 47

...side of the menu.
2. Select [Edit] > [Delete Part] option then press ENTER. [Edit] menu appears on the TV screen.
Example: Edit (Delete Part) (DVD-VR)
1. Use b / B / v / V to choose a chapter...ENTER, the new, updated menu is displayed.
5. Repeat steps 1 - 4 to continue to delete from the menu.
6. Press RETURN (O) repeatedly to exit the menu. Notes: • When DVD+RW recording, the deleted title's...
Instructions - Page 49
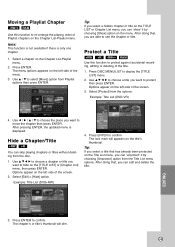
... a Title
+RW +R -RWVR RAM Use this function to protect against accidental recording, editing or deleting of the title.
1. Press DISC MENU/LIST to display the [TITLE LIST] menu.
2.... to choose the place you want to move the chapter then press ENTER. After pressing ENTER, the updated menu is displayed.
Hide a Chapter/Title
+RW +R
You can skip playing chapters or titles without deleting from the disc...
Instructions - Page 51
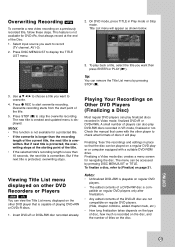
... VR mode, finalized or not. Check the manual that came with the other player to check what formats of discs it will play.
Finalizing 'fixes' the recordings and editings in place so that the disc can be played on a regular DVD player or computer equipped with a suitable DVD-ROM drive. Finalizing a Video mode disc creates a menu screen...
Instructions - Page 54
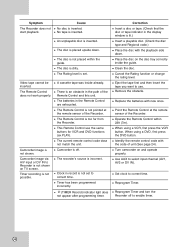
... current remote control code dose not match the unit. Camcorder is off.
The recorder's source is incorrect.
Clock in record is not set to correct time. Timer has been programmed incorrectly.
(TIMER Record) indicator light does not appear after programming timer.
Correction Insert a disc or tape. (Check that the disc or tape indicator in the display window is...