MSI 661FM2 driver and firmware


Related MSI 661FM2 Manual Pages
Download the free PDF manual for MSI 661FM2 and other MSI manuals at ManualOwl.com
User Guide - Page 2

... for a class B digital device, pursuant to part 15 of the FCC rules. These limits are designed to provide reasonable protection against harmful interference when the equipment is operated in a commercial environment. This equipment generates, uses and can radiate radio frequency energy and, if not installed and used in accordance with the instruction manual, may cause...
User Guide - Page 3

... are registered trademarks of the Kensington Technology Group. PCMCIA and CardBus are registered trademarks of the Personal Computer Memory Card International Association.
Revision History
Revision V1.0
V1.1 V1.2
Revision History First release for PCB 1.x with chipsets SiS661FX & SiS964 Special version for Medion Update marketing name and add RAID content
Date May 2004
June 2004 July 2004
iii
User Guide - Page 5

... 2-4 Installing the CPU Fan 2-5 Memory 2-7 Introduction to DDR SDRAM 2-7 DDR Module Combination 2-8 Installing DDR Modules 2-8 Power Supply 2-9 ATX 20-Pin Power Connector: CONN1 2-9 ATX 12V Power Connector: JPW1 2-9 Back Panel 2-10 Mouse Connector 2-10 Keyboard Connector 2-11 USB Connectors 2-11 Serial Port Connector 2-12 VGA Connector 2-12 IEEE 1394 Port (Optional 2-12 RJ-45 LAN...
User Guide - Page 7

Power Management Setup 3-17 PNP/PCI Configurations 3-21 PC Health Status 3-23 Frequency/Voltage Control 3-24 Load Fail-Safe/Optimized Defaults 3-25 Set Supervisor/User Password 3-26 Chapter 4. Introduction to SiS964 SATA RAID 4-1 Introduction 4-2
System Requirement 4-2 RAID Basics 4-2 Performance hints and recommend setting 4-2 RAID 0 (Striping array 4-3 RAID 1 (Mirror array 4-3 JBOD ...
User Guide - Page 8

Appendix: Using 4- or 6-Channel Audio A-1 Installing the Audio Driver A-2 Installation for Windows 98SE/ME/2000/XP A-2 Using 4- or 6-Channel Audio Function A-4 Using the Back Panel A-4 Testing the Connected Speakers A-9 Testing Each Speaker A-9 Playing KaraOK A-11 Playing KaraOK A-11
viii
User Guide - Page 10

... up to 2GB memory size without ECC. h Supports DDR266/333/400. (For the updated supporting memory modules, please visit http://www.msi.com.tw/ program/products/mainboard/mbd/pro_mbd_trp_list.php )
Slots h One 8x/4x AGP (Accelerated Graphics Port) universal slot. h Three PCI 2.2 32-bit Master PCI Bus slots.
On-Board IDE h Dual IDE controllers integrated in SiS® 964. h Support Bus Master, Ultra...
User Guide - Page 13

Hardware Setup
Chapter 2. Hardware Setup
Hardware Setup
This chapter tells you how to install the CPU, memory modules, and expansion cards, as well as how to setup the jumpers on the mainboard. It also provides the instructions on connecting the peripheral devices, such as the mouse, keyboard, etc. While doing the installation, be careful in holding the components and follow the installation ...
User Guide - Page 15

... and install them before turning on the computer. (For the latest information about CPU, please visit http://www. msi.com.tw/program/products/mainboard/mbd/pro_mbd_cpu_support.php )
CPU Core Speed Derivation Procedure
If CPU Clock Core/Bus ratio
then CPU core speed
=
100MHz
=
17
=
Host Clock x Core/Bus ratio
=
100MHz x 17
=
1.7 GHz
Memory Speed/CPU FSB Support Matrix
Memory
FSB...
User Guide - Page 16

MS-7060 Micro ATX Mainboard
CPU Installation Procedures for Socket 478
1. Please turn off the power and unplug the power cord before installing the CPU.
2. Pull the lever sideways away from the socket. Make sure to raise the lever up to a 90-degree angle.
3. Look for the gold arrow. The ...
User Guide - Page 17
Hardware Setup
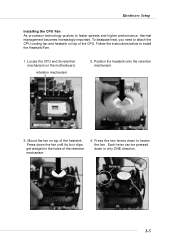
Installing the CPU Fan
As processor technology pushes to faster speeds and higher performance, thermal management becomes increasingly important. To dissipate heat, you need to attach the CPU cooling fan and heatsink on top of the CPU. Follow the instructions below to install the Heatsink/Fan:
1. Locate the CPU and its retention mechanism on the motherboard.
retention mechanism
...
User Guide - Page 19

Hardware Setup
Memory
The mainboard provides two 184-pin unbuffered DDR266/DDR333/DDR400 DDR SDRAM, and supports the memory size up to 2GB without ECC. To operate properly, at least one DIMM module must be installed. (For the updated supporting memory modules, please visit http://www.msi.com.tw/ program/products/mainboard/mbd/pro_mbd_trp_list.php )
DDR DIMM Slots (DDR 1~2)
Introduction...
User Guide - Page 20

...Memory modules can be installed in any combination as follows:
Slot
DDR 1 (Bank 0 & 1) DDR 2 (Bank 2 & 3)
Memory Module S/D S/D
Maximum System Memory Supported
S: Single Side
D: Double Side
Total Memory 64MB~1GB 64MB~1GB 64MB~2GB
Installing...the memory module is deeply inserted in the socket. 3. The plastic clip at each side of the DIMM slot will automatically close.
Volt
Notch
MSI Reminds...
User Guide - Page 21

Hardware Setup
Power Supply
The mainboard supports ATX power supply for the power system. Before inserting the power supply connector, always make sure that all components are installed properly to ensure that no damage will be caused.
ATX 20-Pin Power Connector: CONN1 This connector allows you to connect to an ATX power supply. To connect to the ATX power supply...
User Guide - Page 45

...out which version to use, consult the vendor of your operating system. Setting options: [1.4], [1.1].
MSI Reminds You... Enabling the functionality of Hyper-Threading Technology for your computer system requires ALL of the following platform Components: *CPU: An Intel® Pentium® 4 Processor with HT Technology; *Chipset: A chipset that supports HT Technology; *BIOS: A BIOS that supports HT...
User Guide - Page 49

... implementation is possible only if your IDE hard drive supports it and the operating environment includes a DMA driver (Windows ME, XP or a third-party IDE bus master driver). If your hard drive and your system software both support Ultra DMA/33, Ultra DMA/66, Ultra DMA/100 and Ultra DMA/133, select [Auto] to enable BIOS support. Setting options: [Auto], [Disabled].
3-14
User Guide - Page 50

... want to use other controller cards to connect an audio device. Setting options: [Auto], [Disabled]. SiS Serial ATA controller This allows you to enable or disable onchip Serial ATA controller. Setting options: [Disabled], [Enabled]. SiS 10/100M Ethernet This item is used to enable/disable the 10/100M Ethernet function. Setting options: [Enabled], [Disabled]. Onboard Lan Boot ROM This item is used...
User Guide - Page 82

... the CD-ROM. Press F6 when the message "Press F6 if you need to install third party SCSI or RAID driver" appears. 2. When the Windows XP/2000 Setup window is generated, press S to specify an Additional Device(s). 3. Insert the driver diskette into drive A: and press . (The information of this driver diskette exists in MSI CD. Please prepare for one formatted floppy disk to copy the...
User Guide - Page 83

... the IDE ATA/ATAPI Controllers hardware type. The driver SiS 964 IDE Dual Channel should appear.
Installation of SiS SATA RAID Driver
SiS RAID driver supports Microsoft Windows XP/2000/ME/98SE.
South Bridge SiS964 SATA controller support Serial ATA w/ RAID0, RAID 1 and JBOD by installing SiS RAID driver.
Insert the MSI CD and click on the SiS SATA RAID Driver to install the software.
4-22
Click...
User Guide - Page 85

... are based on Windows® XP environment and could look slightly different if you install the drivers in different operating systems. 1. Insert the companion CD into the CD-ROM drive. The setup screen will automatically
appear. (Please note the screen below might be different depending on the different mainboard you purchased.) 2. Click Realtek AC97 Audio Drivers.
MSI Reminds You...
User Guide - Page 87

MS-7060 Micro ATX Mainboard
Using 4- or 6-Channel Audio Function
After installing the audio driver, you are able to use the 4-/6-channel audio feature now. To enable 4- or 6-channel audio operation, first connect 4 or 6 speakers to the appropriate audio connectors, and then select 4- or 6-channel audio setting in the software utility.
Using the Back Panel In addition to a default 2-channel analog...