MSI 945GZM5 driver and firmware


Related MSI 945GZM5 Manual Pages
Download the free PDF manual for MSI 945GZM5 and other MSI manuals at ManualOwl.com
User Guide - Page 2

... be obtained from the user's manual, please contact your place of purchase or local distributor. Alternatively, please try the following help resources for further guidance.
Visit the MSI website for FAQ, technical guide, BIOS updates, driver updates, and other information: http://www.msi.com.tw/program/service/faq/ faq/esc_faq_list.php Contact our technical staff at: support@msi.com.tw
ii
User Guide - Page 4
...
T h is eq uip men t h as been tested and found to comply with the limits for a Class B digital device, pursuant to Part 15 of the FCC Rules. These limits are designed to provide reasonable protection against harmful interference in a residential installation. This equipment generates, uses and can radiate radio frequency energy and, if not...
User Guide - Page 8
... Setup 2-1 Quick Components Guide 2-2 CPU (Central Processing Unit 2-3
Introduction to LGA 775 CPU 2-3 CPU & Cooler Installation 2-4 Memory ...2-7 Installing DDRII Modules 2-8 Power Supply ...2-9 ATX 24-Pin Power Connector: ATX1 2-9 ATX 12V Power Connector: PWRCONN1 2-9 Back Panel ...2-10 Connectors ...2-12 Floppy Disk Drive Connector: FDD2 2-12 Hard Disk Connector: IDE1 2-12 Serial ATA...
User Guide - Page 9
Slots ...2-20 PCI Express Slots 2-20 PCI (Peripheral Component Interconnect) Slots 2-20 PCI Interrupt Request Routing 2-21
Chapter 3. BIOS Setup 3-1 Entering Setup ...3-2 Control Keys 3-3 Getting Help 3-3 General Help
User Guide - Page 14
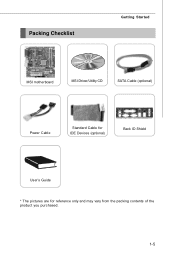
Packing Checklist
Getting Started
MSI motherboard
MSI Driver/Utility CD
SATA Cable (optional)
Power Cable
Standard Cable for IDE Devices (optional)
Back IO Shield
User's Guide * The pictures are for reference only and may vary from the packing contents of the product you purchased.
1-5
User Guide - Page 17
... chapter provides you with the information about hardware setup procedures. While doing the installation, be careful in holding the components and follow the installation procedures. For some components, if you install in the wrong orientation, the components will not work properly. Use a grounded wrist strap before handling computer components. Static electricity may damage the components...
User Guide - Page 19
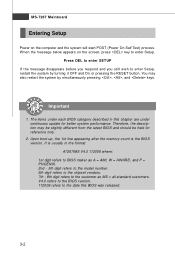
... Setup
CPU (Central Processing Unit)
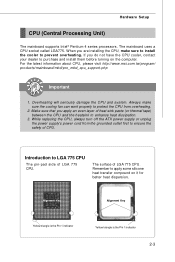
The mainboard supports Intel® Pentium 4 series processors. The mainboard uses a CPU socket called LGA775. When you are installing the CPU, make sure to install the cooler to prevent overheating. If you do not have the CPU cooler, contact your dealer to purchase and install them before turning on the computer. For the latest information about CPU...
User Guide - Page 20
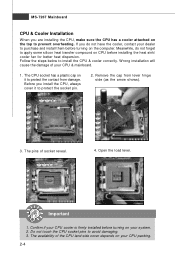
...purchase and install them before turning on the computer. Meanwhile, do not forget to apply some silicon heat transfer compound on CPU before installing the heat...install the CPU, always cover it to protect the socket pin.
2. Remove the cap from lever hinge side (as the arrow shows).
3. The pins of socket reveal.
4. Open the load lever.
Important
1. Confirm if your CPU cooler is firmly installed...
User Guide - Page 22
MS-7267 Mainboard
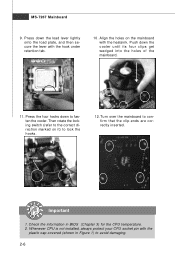
9. Press down the load lever lightly onto the load plate, and then secure the lever with the hook under ... the clip-ends are correctly inserted.
locking switch
Important
1. Check the information in BIOS (Chapter 3) for the CPU temperature. 2. Whenever CPU is not installed, always protect your CPU socket pin with the
plastic cap covered (shown in Figure 1) to avoid damaging.
2-6
User Guide - Page 23
Hardware Setup
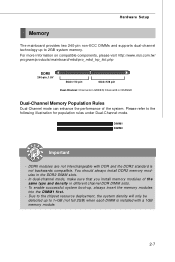
Memory
The mainboard provides two 240-pin non-ECC DIMMs and supports dual-channel technology up to 2GB system memory. For more information on compatible components, please visit http://www.msi.com.tw/ p ro gr a m/ pr o du c t s /m ain bo ar d /m bd / pr o_ m bd _t r p_ lis t. ph p
DDRII
240-pin, 1.8V
56x2=112...
User Guide - Page 24
MS-7267 Mainboard
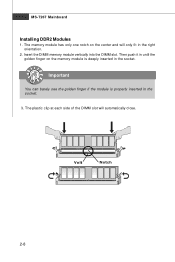
Installing DDR2 Modules
1. The memory module has only one notch on the center and will only fit in the right orientation.
2. Insert the DIMM memory module vertically into the DIMM slot. Then push it in until the golden finger on the memory module is deeply inserted in the socket.
Important
You can...
User Guide - Page 25

...Setup
Power Supply
ATX 24-Pin Power Connector: ATX1
This connector allows you to connect an ATX 24-pin power supply. To connect the ATX 24-pin power supply, make sure the plug of the power supply is inserted in the proper orientation and the pins are aligned. Then push down the power...pin 12
ATX 12V Power Connector: PWRCONN1
This 12V power connector is used to provide power to the CPU.
3
4
1...
User Guide - Page 28
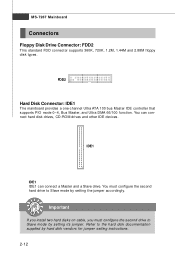
... Ultra ATA 100 bus Master IDE controller that supports PIO mode 0~4, Bus Master, and Ultra DMA 66/100 function. You can connect hard disk drives, CD-ROM drives and other IDE devices.
IDE1
IDE1 IDE1 can connect a Master and a Slave drive. You must configure the second hard drive to Slave mode by setting the jumper accordingly.
Important
If you install two hard disks on cable, you...
User Guide - Page 36

... for Desktop Platforms doubling the capability of existing AGP 8x designs with transfer rates of 4.0 GB/s over a PCI Express x16 lane for graphics controllers, while PCI Express x1 supports transfer rate of 250 MB/s.
PCI Express x16 Slot (For 945GM5/ 945GCM5 series only)
PCI Express x1 Slot
PCI (Peripheral Component Interconnect) Slots
The PCI slots support LAN cards, SCSI cards, USB cards, and...
User Guide - Page 39
...-up, the 1st line appearing after the memory count is the BIOS version. It is usually in the format: A7267IMS V4.0 112006 where: 1st digit refers to BIOS maker as A = AMI, W = AWARD, and P = PHOENIX. 2nd - 5th digit refers to the model number. 6th digit refers to the chipset vendors. 7th - 8th digit refers to the customer as MS = all...
User Guide - Page 45
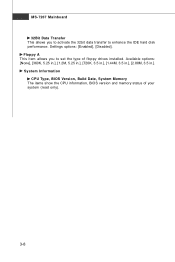
... IDE hard disk performance. Settings options: [Enabled], [Disabled]. Floppy A This item allows you to set the type of floppy drives installed. Available options: [None], [360K, 5.25 in.], [1.2M, 5.25 in.], [720K, 3.5 in.], [1.44M, 3.5 in.], [2.88M, 3.5 in.]. System Information CPU Type, BIOS Version, Build Date, System M emory The items show the CPU information, BIOS version and memory status of...
User Guide - Page 49
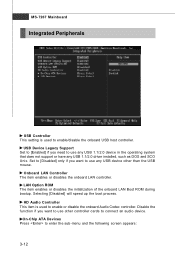
... USB host controller.
USB Device Legacy Support Set to [Enabled] if you need to use any USB 1.1/2.0 device in the operating system that does not support or have any USB 1.1/2.0 driver installed, such as DOS and SCO Unix. Set to [Disabled] only if you want to use any USB device other than the USB mouse.
Onboard LAN Controller The item enables or disables the onboard LAN controller.
LAN Option ROM...
User Guide - Page 63
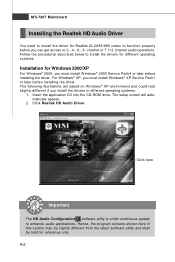
... environment and could look slightly different if you install the drivers in different operating systems.
1. Insert the application CD into the CD-ROM drive. The setup screen will automatically appear.
2. Click Realtek HD Audio Driver.
Click here
Important
The HD Audio Configuration software utility is under continuous update to enhance audio applications. Hence, the program screens shown here in...
User Guide - Page 64
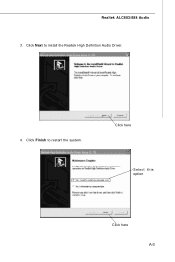
Realtek ALC883/888 Audio 3. Click Next to install the Realtek High Definition Audio Driver.
4. Click Finish to restart the system.
Click here
Select this option
Click here A-3
User Guide - Page 65
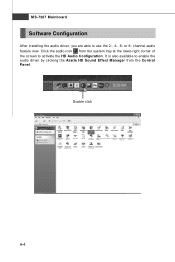
...
Software Configuration
After installing the audio driver, you are able to use the 2-, 4-, 6- or 8- channel audio feature now. Click the audio icon from the system tray at the lower-right corner of the screen to activate the HD Audio Configuration. It is also available to enable the audio driver by clicking the Azalia HD Sound Effect M anager from the Control...