MSI K9NU driver and firmware


Related MSI K9NU Manual Pages
Download the free PDF manual for MSI K9NU and other MSI manuals at ManualOwl.com
User Guide - Page 2
... obtained from the user's manual, please contact your place of purchase or local distributor. Alternatively, please try the following help resources for further guidance.
Visit the MSI website at http://global.msi.com.tw/index.php? func=faqIndex for FAQ, technical guide, BIOS updates, driver updates, and other information. Contact our technical staff at http://support.msi.com.tw/.
ii
User Guide - Page 4
...
T h is eq uip men t h as been tested and found to comply with the limits for a Class B digital device, pursuant to Part 15 of the FCC Rules. These limits are designed to provide reasonable protection against harmful interference in a residential installation. This equipment generates, uses and can radiate radio frequency energy and, if not...
User Guide - Page 8
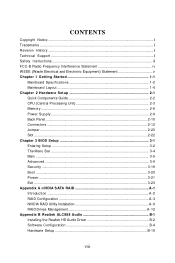
... 3 BIOS Setup 3-1 Entering Setup ...3-2 The Menu Bar ...3-4 Main ...3-5 Advanc ed ...3-6 Security ...3-19 Boot ...3-20 Power ...3-21 Exit ...3-23 Appendix A nVIDIA SATA RAID A-1 Introduction ...A-2 RAID Configuration A-3 NVIDIA RAID Utility Installation A-9 RAID Drives Management A-12 Appendix B Realtek ALC888 Audio B-1 Installing the Realtek HD Audio Driver B-2 Software Configuration...
User Guide - Page 10
... 5~8 DIMMs are installed, the system will automatically tune the memory frequency down to 533MHz due to AMD CPU limitations.
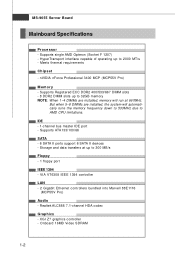
IDE - 1-channel bus master IDE port - Supports ATA133/100/66
SATA - 6 SATA II ports support 6 SATA II devices - Storage and data transfers at up to 300 MB/s
Floppy - 1 floppy port
IEEE 1394 - VIA VT6308 IEEE 1394 controller
LAN - 2 Gigabit Ethernet controllers bundled into...
User Guide - Page 13
... chapter provides you with the information about hardware setup procedures. While doing the installation, be careful in holding the components and follow the installation procedures. For some components, if you install in the wrong orientation, the components will not work properly. Use a grounded wrist strap before handling computer components. Static electricity may damage the components...
User Guide - Page 15
Hardware Setup
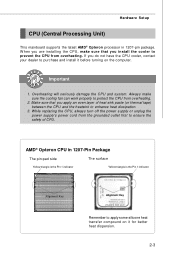
CPU (Central Processing Unit)
This mainboard supports the latest AMD® Opteron processor in 1207-pin package. W hen you are installing the CPU, make sure that you install the cooler to prevent the CPU from overheating. If you do not have the CPU cooler, contact your dealer to purchase and install it before turning on the computer.
Important
1. Overheating will...
User Guide - Page 16
MS-9655 Server Board
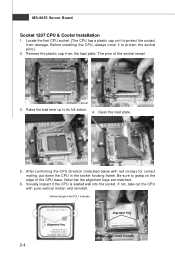
Socket 1207 CPU & Cooler Installation
1. Locate the first CPU socket. (The CPU has a plastic cap on it to protect the contact from damage. Before installing the CPU, always cover it to protect the socket pins.)
2. Remove the plastic cap from the load plate. The pins of the socket reveal.
3. Raise the load lever up to its...
User Guide - Page 18
... mode.
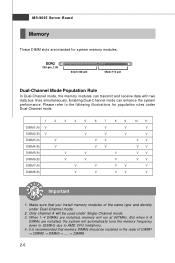
2. Only channel A will be used under Single-Channel mode. 3. When 1~4 DIMMs are installed, memory will run at 667MHz. But when 5~8
DIMMs are installed, the system will automatically tune the memory frequency down to 533MHz due to AMD CPU limitations. 4. It is recommended that memory DIMMs should be installed in the order of DIMM1 -> DIMM2 -> DIMM3 -> .... -> DIMM8.
2-6
User Guide - Page 42
... two or more sections. Setting to [Enabled] allows memory to be accessed faster since each section of memory is capable of being utilized at once.
Node Interleave AMD Opteron CPU supports a mode called node interleave. W hen node interleave is disabled, the memory controller maps the local memory of each processor to a single contiguous range of physical addresses. This allows the...
User Guide - Page 44
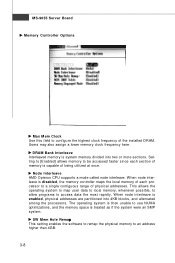
... The L2 ECC Scrub option controls the time allotted for the L2 memory cache to be corrected when in an idle state. Integrated Devices
USB Control This setting enables/disables the onboard USB host controller.
USB BIOS Legacy Support Set to [Enabled] if your need to use any USB 1.1/2.0 device in the operating system that does not support or have any USB 1.1/2.0 driver installed, such as DOS and...
User Guide - Page 60

... disks.
Combines and uses the capacity of odd size drives.
Requires 2 drives for 4+ the storage space of 1 drive-the same as RAID level 1.
Decreases performance because of the difficulty in using drives concurrently or to optimize drives for different uses.
M ul tiple
Fault Tol eran ce None Yes
Yes
No
Important
Please note that the companion MSI Driver/Utility CD supports...
User Guide - Page 61
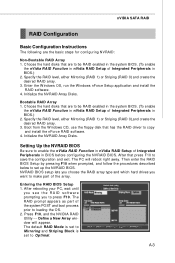
.... (To enable
the nVidia RAID Function in nVidia RAID Setup of Integrated Peripherals in BIOS.) 2. Specify the RAID level, either Mirroring (RAID 1) or Striping (RAID 0),and create the desired RAID array. 3. Boot from the W indows CD, use the floppy disk that has the RAID driver to copy and install the nForce RAID software. 4. Initialize the NVRAID Array Disks.
Setting Up the NVRAID BIOS
Be sure to...
User Guide - Page 64
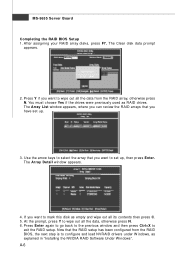
..., press Y to wipe out all the data, otherwise press N. 6. Press Enter again to go back to the previous window and then press Ctrl+X to
exit the RAID setup. Now that the RAID setup has been configured from the RAID BIOS, the next step is to configure and load NVRAID drivers under W indows, as explained in "Installing the NVIDIA RAID Software Under W indows". A-6
User Guide - Page 65
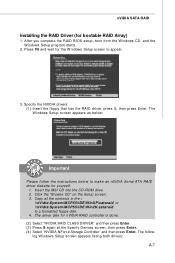
... instructions below to make an nVIDIA Serial ATA RAID driver diskette for yourself.
1. Insert the MSI CD into the CD-ROM drive. 2. Click the "Browse CD" on the Setup screen. 3. Copy all the contents in the :
\\nVidia\System\MCP55\IDE\WinXP\sataraid or \\nVidia\System\M CP55\IDE\Win2K\sataraid to a formatted floppy disk. 4. The driver disk for nVIDIA RAID controller is done. (2) Select "NVIDIA RAID...
User Guide - Page 66
... disk inserted in the floppy drive until the blue screen portion of W indows XP installation is completed, then take out the floppy.
5. Follow the instructions on how to install W indows XP. After W indows XP is completely installed, it is recommended that you install the the RAID management tool.
Important
Each time you add a new hard drive to a RAID array, the RAID driver...
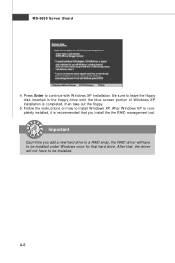
User Guide - Page 67
...The existing W indows IDE Parallel ATA driver (as well as the Serial ATA driver if SATA is enabled) must be upgraded to use the NVIDIA IDE Parallel ATA driver (as well as the NV Serial ATA driver if SATA is enabled). This section describes how to run the setup application and install the RAID software which will upgrade the W indows IDE driver and install the RAID software. 1. Start the NVIDIA C19...
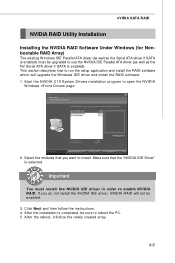
User Guide - Page 86
... environment and could look slightly different if you install the drivers in different operating systems.
1. Insert the application CD into the CD-ROM drive. The setup screen will automatically appear.
2. Click Realtek HD Audio Driver.
Click here
Important
The HD Audio Configuration software utility is under continuous update
to enhance audio applications. Hence, the program screens shown here...
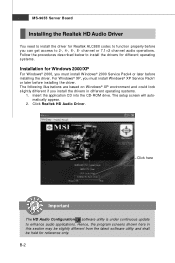
User Guide - Page 87
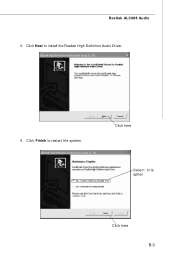
Realtek ALC888 Audio 3. Click Next to install the Realtek High Definition Audio Driver.
4. Click Finish to restart the system.
Click here
Select this option
Click here B-3
User Guide - Page 88
... Server Board
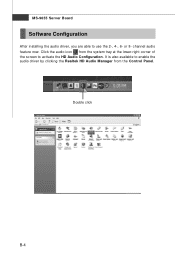
Software Configuration
After installing the audio driver, you are able to use the 2-, 4-, 6- or 8- channel audio feature now. Click the audio icon from the system tray at the lower-right corner of the screen to activate the HD Audio Configuration. It is also available to enable the audio driver by clicking the Realtek HD Audio M anager from the Control Panel...
User Guide - Page 106
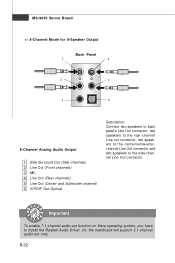
... out connector, two speakers to the center/subwooferchannel Line Out connector and two speakers to the side-channel Line Out connector.
Important
To enable 7.1-channel audio-out function on Vista operating system, you have to install the Realtek Audio Driver. Or, the mainboard will support 5.1-channel audio-out only.
a
B-22