MSI KM4M driver and firmware


Related MSI KM4M Manual Pages
Download the free PDF manual for MSI KM4M and other MSI manuals at ManualOwl.com
User Guide - Page 2

... for a class B digital device, pursuant to part 15 of the FCC rules. These limits are designed to provide reasonable protection against harmful interference when the equipment is operated in a commercial environment. This equipment generates, uses and can radiate radio frequency energy and, if not installed and used in accordance with the instruction manual, may cause...
User Guide - Page 3

... is a registered trademark of Microsoft Corporation. Windows® 98/2000/NT/ XP are registered...Computer Memory Card International Association.
Revision History
Revision V1.0 V1.1
V1.2
V1.3 V1.4 V1.5
Revision History First release NB chipset with optional KM400 / KM400A chipset Update 1394 & CPU FSB jumper description White Brand version Update CPU Description Update JAUD1 pin definition & CPU...
User Guide - Page 4
... for further guidance. h Visit the MSI homepage & FAQ site for technical guide, BIOS updates, driver
updates, and other information: http://www.msi.com.tw & http://www.msi. com.tw/program/service/faq/faq/esc_faq_list.php h Contact our technical staff at: support@msi.com.tw
Safety Instructions
1. Always read the safety instructions carefully. 2. Keep this User's Manual for future reference. 3. Keep...
User Guide - Page 5
... Set 2-5 CPU Clock Frequency Selection through BIOS 2-6 Memory ...2-7 Memory Speed/CPU FSB Support Matrix 2-7 DIMM Module Combination 2-8 Installing DDR Modules 2-8 Power Supply ...2-9 ATX 20-Pin Power Connector: CONN1 2-9 ATX 12V Power Connector: JPW1 2-9 Back Panel ...2-10 Mouse Connector 2-10 Keyboard Connector 2-11 USB Connectors 2-11 Serial Port Connector: COM 1 2-12
VGA Connector...
User Guide - Page 6

... Chipset Features 3-10 Integrated Peripherals 3-13 Power Management Setup 3-17 PNP/PCI Configurations 3-21 PC Health Status 3-23 Frequency/Voltage Control 3-24 Load Fail-Safe/Optimized Defaults 3-25 Set Supervisor/User Password 3-26 Chapter 4. VIA VT8237 Serial ATA RAID Introduction 4-1 Introduction ...4-2 BIOS Configuration 4-3 Installing RAID Software & Drivers 4-10 Using VIA RAID...
User Guide - Page 8
.../8237 chipset provides IDE HDD/CD-ROM with PIO,
Bus Master and Ultra DMA133/100/66/33 operation modes h Can connect up to four IDE devices h Supports 2 SATA devices (for VT8237 only)
On-Board Peripherals h On-Board Peripherals include:
- 1 floppy port supports 2 FDDs with 360K, 720K, 1.2M, 1.44M and 2.88Mbytes - 1 serial port and 1 VGA port - 1 parallel port - Vertical audio ports - 1 RJ-45 LAN...
User Guide - Page 11
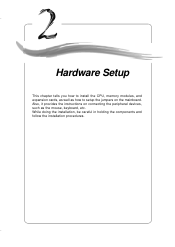
Hardware Setup
Hardware Setup
This chapter tells you how to install the CPU, memory modules, and expansion cards, as well as how to setup the jumpers on the mainboard. Also, it provides the instructions on connecting the peripheral devices, such as the mouse, keyboard, etc. While doing the installation, be careful in holding the components and follow the installation procedures.
2-1
User Guide - Page 13
... sink and cooling fan, contact your dealer to purchase and install them before turning on the computer.
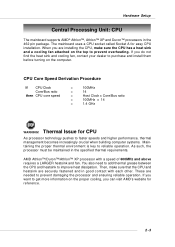
CPU Core Speed Derivation Procedure
If CPU Clock Core/Bus ratio
then CPU core speed
=
100MHz
=
14
=
Host Clock x Core/Bus ratio
=
100MHz x 14
=
1.4 GHz
WARNING! Thermal Issue for CPU
As processor technology pushes to faster speeds and higher performance, thermal management...
User Guide - Page 14
MS-6734 M-ATX Mainboard
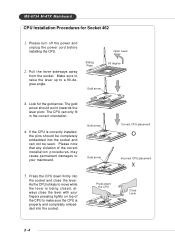
CPU Installation Procedures for Socket 462
1. Please turn off the power and unplug the power cord before installing the CPU.
Open Lever
2. Pull the lever sideways away from the socket. Make sure to raise the lever up to a 90-degree angle.
Sliding Plate
90 degree
...
User Guide - Page 15
Hardware Setup
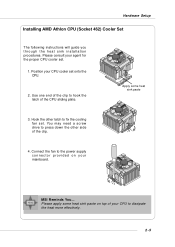
Installing AMD Athlon CPU (Socket 462) Cooler Set
The following instructions will guide you through the heat sink installation procedures. Please consult your agent for the proper CPU cooler set.
1. Position your CPU cooler set onto the CPU.
2. Use one end of the clip to hook the latch of the CPU sliding plate.
Apply some heat sink paste
3. Hook the other latch...
User Guide - Page 16
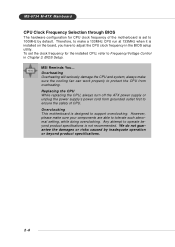
... hardware configuration for CPU clock frequency of the motherboard is set to 100MHz by default. Therefore, to make a 133MHz CPU run at 133MHz when it is installed on the board, you have to adjust the CPU clock frequency in the BIOS setup utility. To set the clock frequency for the installed CPU, refer to Frequency/Voltage Control in Chapter 3. BIOS Setup.
MSI Reminds You... Overheating Overheating...
User Guide - Page 17
Hardware Setup
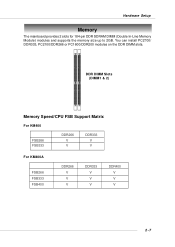
Memory
The mainboard provides 2 slots for 184-pin DDR SDRAM DIMM (Double In-Line Memory Module) modules and supports the memory size up to 2GB. You can install PC2700/ DDR333, PC2100/DDR266 or PC1600/DDR200 modules on the DDR DIMM slots.
DDR DIMM Slots (DIMM1 & 2)
Memory Speed/CPU FSB Support Matrix
For KM400
FSB266 FSB333
DDR266 V V
DDR333 V V
For...
User Guide - Page 18
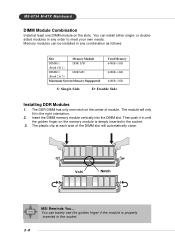
... doublesided modules in any order to meet your own needs. Memory modules can be installed in any combination as follows:
Slot
Memory Module
DIMM 1
DDR S/D
(Bank 0 & 1)
DIMM 2
DDR S/D
(Bank 2 & 3)
Maximum System Memory Suppported
Total Memory 64MB~1GB
64MB~1GB
64MB~2GB
S: Single Side
D: Double Side
Installing DDR Modules
1. The DDR DIMM has only one notch on...
User Guide - Page 47
... driver (Windows 95 OSR2 or a third-party IDE bus master driver). If your hard drive and your system software both support Ultra DMA/33, Ultra DMA/66 and Ultra DMA/100 select Auto to enable BIOS support. The settings are: Auto, Disabled.
VIA OnChip PCI Device Press to enter the sub-menu and the following screen appears:
AC97 Audio Auto allows the motherboard's BIOS to...
User Guide - Page 54
... only when Resources Controlled By is set to Manual. Press and you will enter the sub-menu of the items. IRQ Resources list IRQ 3/4/5/7/9/10/11/12/14/15 for users to set each IRQ a type depending on the type of device using the IRQ. Settings are:
PCI Device Reserved
For Plug & Play compatible devices designed for PCI bus architecture. The...
User Guide - Page 60
... Serial ATA RAID
AppenIdnitxro. dUuscitniogn4- or 6-Channel Audio Function
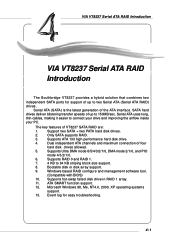
The Southbridge VT8237 provides a hybrid solution that combines two
independent SATA ports for support of up to two Serial ATA (Serial ATA RAID) drives.
Serial ATA (SATA) is the latest generation of the ATA interface. SATA hard drives deliver blistering transfer speeds of up to 150MB/sec. Serial ATA uses long, thin cables...
User Guide - Page 61
... gives a brief introduction on the RAID-related background knowledge and a brief introduction on VIA SATA RAID Host Controller. For users wishing to install their VIA SATA RAID driver and RAID software, proceed to Driver and RAID Software Installation section.
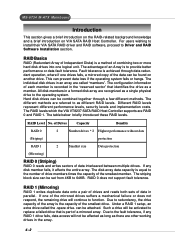
RAID Basics
RAID (Redundant Array of Independent Disks) is a method of combining two or more hard disk drives into one logical unit. The...
User Guide - Page 69
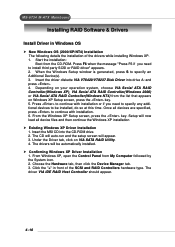
... the CD-ROM. Press F6 when the message "Press F6 if you need to install third party SCSI or RAID driver" appears. 2. When the Windows Setup window is generated, press S to specify an Additional Device(s). 3. Insert the driver diskette VIA VT6420/VT8237 Disk Driver into drive A: and press . 4. Depending on your operation system, choose VIA Serial ATA RAID Controller(Windows XP), VIA Serial ATA RAID...
User Guide - Page 70
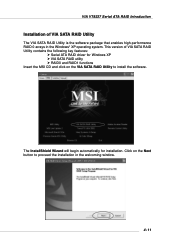
VIA VT8237 Serial ATA RAID Introduction
Installation of VIA SATA RAID Utility
The VIA SATA RAID Utility is the software package that enables high-performance RAID 0 arrays in the Windows* XP operating system. This version of VIA SATA RAID Utility contains the following key features:
h Serial ATA RAID driver for Windows XP h VIA SATA RAID utility h RAID0 and RAID1 functions Insert the MSI CD and ...
User Guide - Page 72
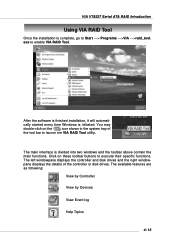
... is divided into two windows and the toolbar above contain the main functions. Click on these toolbar buttons to execute their specific functions. The left windowpane displays the controller and disk drives and the right windowpane displays the details of the controller or disk drives. The available features are as following:
View by Controller
View by Devices
View Event log
Help...