Samsung LN26A330J1D driver and firmware
Related Samsung LN26A330J1D Manual Pages
Download the free PDF manual for Samsung LN26A330J1D and other Samsung manuals at ManualOwl.com
Open Source Guide (ENGLISH) - Page 1
...version 2) and LGPL (version 2.1).
The original manual has wrong versions of the GPL and LGPL.
To send inquiries and requests for questions regarding open sources, contact Samsung via Email (vdswmanager@samsung. com).
This product uses some software programs which are distributed under the Independent JPEG Group.
This product uses some software... used to control compilation and installation of the ...
Open Source Guide (ENGLISH) - Page 2
... SUSTAINED BY YOU OR THIRD PARTIES OR A FAILURE OF THE LIBRARY TO OPERATE WITH ANY OTHER SOFTWARE), EVEN IF SUCH HOLDER OR OTHER PARTY HAS BEEN ADVISED OF THE POSSIBILITY OF SUCH DAMAGES.
... you want it to be of the greatest possible use to the public, we recommend making it free software that everyone can redistribute and change. You can do so by permitting redistribution under these terms (or,...
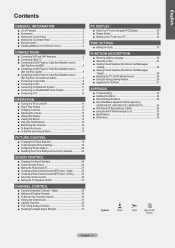
User Manual (ENGLISH) - Page 3
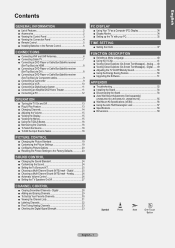
... ■ Remote Control 5 ■ Installing Batteries in the Remote Control 6
Connections
■ Connecting VHF and UHF Antennas 6 ■ Connecting Cable TV 7 ■ Connecting a DVD Player or Cable Box/Satellite receiver
(Set-Top Box) via HDMI 8 ■ Connecting a DVD Player or Cable Box/Satellite receiver
(Set-Top Box) via DVI 8 ■ Connecting a DVD Player or Cable Box/Satellite...
User Manual (ENGLISH) - Page 36
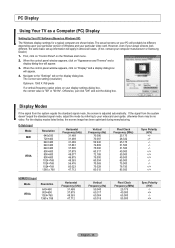
PC Display
Using Your TV as a Computer (PC) Display
Setting Up Your PC Software (Based on Windows XP) The Windows display-settings for a typical computer are shown below. The actual screens on your PC will probably be different, depending upon your particular version of Windows and your particular video card. However, even if your actual screens look different, the same basic set-up information ...
User Manual (ENGLISH) - Page 43
... "Enter PIN" will appear. Enter your 4 digit PIN number.
The default PIN number of a new TV set is "0-0-0-0".
TV
Setup
Plug & Play ►
Language
: English ►
Time ►
V-Chip ►
Caption ►
Melody
: Medium ►
Energy Saving
: Off ►
SW Upgrade ►
Move
Enter
Return
TV
V-Chip
Enter PIN
***
3. The "V-Chip" screen...
User Manual (ENGLISH) - Page 44

... ENTER button. The message "Enter PIN" will appear. Enter your 4 digit PIN number.
TV
Setup
Plug & Play ►
Language
: English ►
Time ►
V-Chip ►
Caption ►
Melody
: Medium ►
Energy Saving
: Off ►
SW Upgrade ►
MMoovvee
Enter
Return
TV
V-Chip
Enter PIN
***
.. Enter PIN
Return
English - 42
User Manual (ENGLISH) - Page 46
... "V-Chip", then press the ENTER button. The message "Enter PIN" will appear. Enter your 4 digit PIN number.
TV
Setup
Plug & Play ►
Language
: English ►
Time ►
V-Chip ►
Caption ►
Melody
: Medium ►
Energy Saving
: Off ►
SW Upgrade ►
Move
Enter
Return
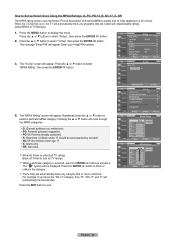
3. The "V-Chip" screen will appear. Press the ▲ or...
User Manual (ENGLISH) - Page 47
... Set up Restrictions Using the 'Canadian English'
1. Press the MENU button to display the menu. Press the ▲ or ▼ button to select "Setup", then press the ENTER button.
2. Press the ▲ or ▼ button to select "V-Chip", then press the ENTER button. The message "Enter PIN" will appear. Enter your 4 digit PIN number.
TV
Setup...
User Manual (ENGLISH) - Page 48

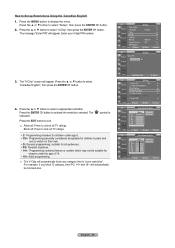
... Set up Restrictions Using the 'Canadian French'
1. Press the MENU button to display the menu. Press the ▲ or ▼ button to select "Setup", then press the ENTER button.
2. Press the ▲ or ▼ button to select "V-Chip", then press the ENTER button. The message "Enter PIN" will appear. Enter your 4 digit PIN number.
TV
Setup...
User Manual (ENGLISH) - Page 49
... your 4 digit PIN number.
TV
Setup
Plug & Play ►
Language
: English ►
Time ►
V-Chip ►
Caption ►
Melody
: Medium ►
Energy Saving
: Off ►
SW Upgrade ►
Move
Enter
Return
TV
V-Chip
Enter PIN
***
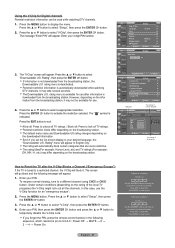
3. The "V-Chip" screen will appear. Press the ▲ or ▼ button to select
"Downloadable U.S. Rating...
User Manual (ENGLISH) - Page 53

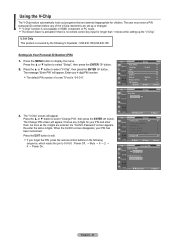
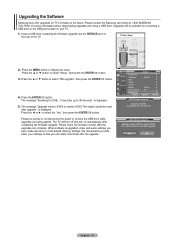
... Please contact the Samsung call center at 1-800-SAMSUNG (726-7864) to receive information about downloading upgrades and using a USB drive. Upgrades will be possible by connecting a USB drive to the USB port located on your TV.
1. Insert a USB drive containing the firmware upgrade into the SERVICE port on the rear of the TV.
TV Rear Panel
USB Drive
2. Press the MENU button to display the menu...
User Manual (ENGLISH) - Page 54
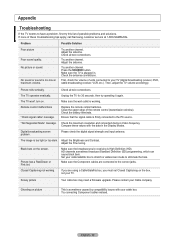
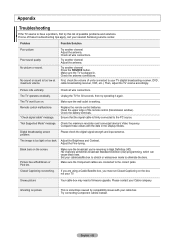
... upper edge of the remote control (transmission window). Check the battery terminals. Ensure that the signal cable is firmly connected to the PC source.
"Not Supported Mode" message. Check the maximum resolution and connected device's Video frequency. Compare these values with the data in the Display Modes.
Digital broadcasting screen problem.
Please check the digital signal strength and input...
Quick Guide (ENGLISH) - Page 11
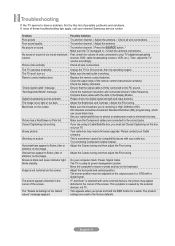
... is working. Replace the remote control batteries. Clean the upper edge of the remote control (transmission window). Check the battery terminals. Ensure that the signal cable is firmly connected to the PC source. Check the maximum resolution and connected device's Video frequency. Compare these values with the data in the Display Modes. Please check the digital signal strength and input...
User Manual (ENGLISH) - Page 3
... ■ Remote Control 5 ■ Installing Batteries in the Remote Control 6
Connections
■ Connecting VHF and UHF Antennas 6 ■ Connecting Cable TV 7 ■ Connecting a DVD Player or Cable Box/Satellite receiver
(Set-Top Box) via HDMI 8 ■ Connecting a DVD Player or Cable Box/Satellite receiver
(Set-Top Box) via DVI 8 ■ Connecting a DVD Player or Cable Box/Satellite...
User Manual (ENGLISH) - Page 53
... Please contact the Samsung call center at 1-800-SAMSUNG (726-7864) to receive information about downloading upgrades and using a USB drive. Upgrades will be possible by connecting a USB drive to the USB port located on your TV.
1. Insert a USB drive containing the firmware upgrade into the SERVICE port on the rear of the TV.
TV Rear Panel
USB Drive
2. Press the MENU button to display the menu...
User Manual (ENGLISH) - Page 54
... upper edge of the remote control (transmission window). Check the battery terminals. Ensure that the signal cable is firmly connected to the PC source.
"Not Supported Mode" message. Check the maximum resolution and connected device's Video frequency. Compare these values with the data in the Display Modes.
Digital broadcasting screen problem.
Please check the digital signal strength and input...
All Windows (
2.87
) - Page 3
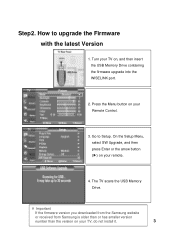
... your TV on, and then insert the USB Memory Drive containing the firmware upgrade into the WISELINK port.
2. Press the Menu button on your Remote Control.
3. Go to Setup. On the Setup Menu, select SW Upgrade, and then press Enter or the arrow button (▶) on your remote.
4. The TV scans the USB Memory Drive.
※ Important
If the firmware version you downloaded from the Samsung website...
All Windows (
2.87
) - Page 4
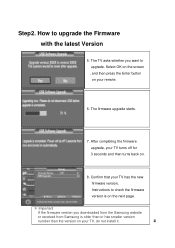
... the firmware upgrade, your TV turns off for 3 seconds and then turns back on.
8. Confirm that your TV has the new firmware version, Instructions to check the firmware version is on the next page.
※ Important
If the firmware version you downloaded from the Samsung website
or received from Samsung is older than or has smaller version
number than the version on your TV, do not install it...