Sony FWD-42LX1/W driver and firmware
Related Sony FWD-42LX1/W Manual Pages
Download the free PDF manual for Sony FWD-42LX1/W and other Sony manuals at ManualOwl.com
Operating Instructions (Flat Panel Display) - Page 2
...
If you have any questions about this product, you may call; Sony Customer Information Services Center 1-800-222-7669 or http://www.sony.com/
Declaration of Conformity
Trade Name:
SONY
Model:
FWD-42LX1/42LX1E/32LX1/
32LX1E
Responsible Party: Sony Electronics Inc.
Address:
16450 W. Bernardo Dr, San Diego,
CA 92127 U.S.A.
Telephone Number: 858-942-2230
This device complies with Part 15...
Operating Instructions (Flat Panel Display) - Page 5
... Take this into account when you install the unit outdoor or by a window. • Do not push, scratch...cleaning the display The panel surface • Be sure to unplug the power cord before cleaning the
display. &#...display panel The display panel's special surface finish should be treated with care when cleaning or handling the TV...questions on this unit, contact your authorized Sony dealers.
5 (GB)
Operating Instructions (Flat Panel Display) - Page 7
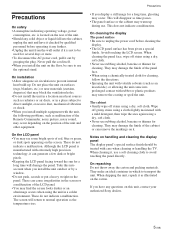
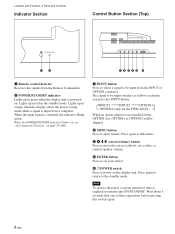
... details on the control button section, see "Control Button Section (Top)" on page 8 (GB).
3 Stand installation hooks Use these hooks to install the stand (not supplied).
4 SPEAKER Socket Connects the speakers (not supplied) to this socket to output the audio matching the signal displayed on the screen.
5 - AC IN socket Connect the supplied AC power cord to...
Operating Instructions (Flat Panel Display) - Page 8
... FWD-42LX1)
When an option adaptor is not installed in the OPTION slot, OPTION1 or OPTION2 will be skipped.
2 MENU button Press to show menus. Press again to hide them.
3 4 m/M (cursor/volume) button Press to move the cursor (yellow), set a value, or control speaker volume.
5 ENTER button Press to set your choice.
6 1POWER switch Press to power...
Operating Instructions (Flat Panel Display) - Page 10
... of a computer.
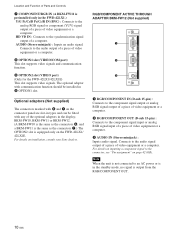
AUDIO (Stereo minijack) : Inputs an audio signal. Connects to the audio output of a piece of video equipment or a computer.
8 OPTION1 slot (VIDEO/COM port) This slot supports video signals and communication function.
9 OPTION2 slot (VIDEO port) (Only for the FWD-42LX1/42LX1E) This slot supports video signals. The optional adaptor with communication function should be installed in...
Operating Instructions (Flat Panel Display) - Page 11

Remote Commander RM-980
1
2
MUTING DISPLAY STBY ON
3
4
5
qf
6
qg
7
qh
8
qj
9
ENTER
123
0
456
789
qa
0
qk
qs
ON SET
qd
ql
MONITOR
RM-980
1 POWER ON switch Press to power on the display.
2 STANDBY button Press to change the display to the standby mode.
3 MUTING button Press to mute the sound. Press again to restore sound...
Operating Instructions (Flat Panel Display) - Page 12
Location and Function of Parts and Controls
qk CHROMA button Adjusts the chroma when the picture mode is set to any of "User1" to "User3." Press this button and adjust the chroma with the M/m or
Operating Instructions (Flat Panel Display) - Page 13
... 95 °F).
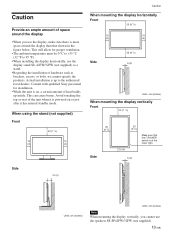
• When installing the display horizontally, use the display stand SU-42FW/32FW (not supplied) as a stand.
• Regarding the installation of hardware such as brackets, screws, or bolts, we cannot specify the products. Actual installation is up to the authorized local dealers. Consult with qualified Sony personnel for installation.
• While the unit is...
Operating Instructions (Flat Panel Display) - Page 16
...
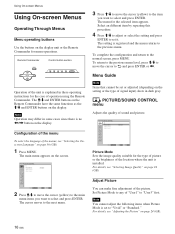
Menu operating buttons
Use the buttons on the display unit or the Remote Commander for menu operations.
Remote Commander
MENU
Control button section
ENTER
Operation of the unit is explained in these operating instructions for the case of operation using the Remote Commander. The M/m and ENTER buttons on the Remote Commander have the same functions as the...
Operating Instructions (Flat Panel Display) - Page 20
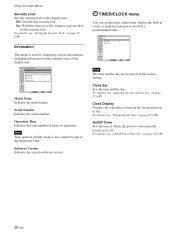
.... On: With this item set to On, requires a password to
set the security lock. For details, see "Setting the Security Lock" on page 38 (GB).
Information
This menu is used for displaying various information, including information on the internal status of the display unit.
INITIAL SETUP/INFORMATION Information
Model Name: Serial Number: Operation Time: Software Version:
Select
Set ENTER
Exit MENU...
Operating Instructions (Flat Panel Display) - Page 23
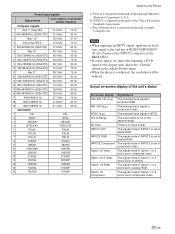
... a DVD signal to the display unit, adjust the "Chroma" setting in the Adjust Picture menu.
• When the phase is readjusted, the resolution will be reduced.
Actual on-screen display of the unit's status
On-screen display 640×480 / 60 (e.g.) 480 / 60i (e.g.)
NTSC (e.g.) Out of Range
No Sync INPUT1 DVI
INPUT2 RGB
INPUT2 Component
Option...
Operating Instructions (Flat Panel Display) - Page 24
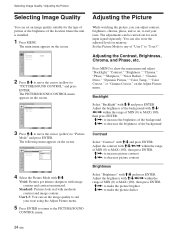
... of the location where the unit is installed.
1 Press MENU.
The main menu appears on the screen.
PICTURE/SOUND CONTROL
Picture Mode: Adjust Picture Adjust Sound
Standard
Select
Set ENTER
Exit MENU
2 Press M/m to move the cursor (yellow) to
"PICTURE/SOUND CONTROL" and press ENTER. The PICTURE/SOUND CONTROL menu appears on the screen.
PICTURE...
Operating Instructions (Flat Panel Display) - Page 28

...; Television broadcasts containing a signal for setting
the aspect ratio to 4:3.
1 Press MENU.
The main menu appears on the screen.
PICTURE/SOUND CONTROL
Picture Mode: Adjust Picture Adjust Sound
Standard
Select
Set ENTER
Exit MENU
2 Press M/m to move the cursor (yellow) to
"SCREEN CONTROL" and press ENTER. The SCREEN CONTROL menu appears on the screen.
SCREEN CONTROL
Multi Display Setup...
Operating Instructions (Flat Panel Display) - Page 35
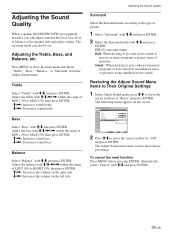
Adjusting the Sound Quality
When a speaker SS-SP42FW/32FW (not supplied) installed, you can adjust sound treble level, bass level, or balance of the speaker (left and right) volume. The surround mode can also be set.
Adjusting the Treble, Bass, and Balance, etc.
Press MENU to show the main menu and adjust "Treble...
Operating Instructions (Flat Panel Display) - Page 40
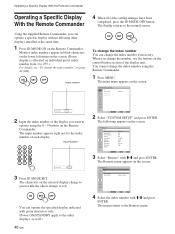
... screen.
CUSTOM SETUP
Power Saving: Speaker Out: Closed Caption: Display: Color Matrix: HD Mode: RGB Mode: Sync Mode: Illumination: Remote
Standard Off Off Off Y/PB/PR 1080i DTV H/Comp High
Select
Set ENTER
Exit MENU
3 Select "Remote" with M/m and press ENTER.
The Remote menu appears on the screen.
CUSTOM SETUP Remote
Index Number: Control Mode:
1 Display + Remote
Select
Set ENTER
Exit...