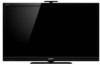
Sony KDL-55HX800 - 55" Class Bravia Hx800 Led Backlit Lcd Hdtv driver and firmware
Drivers and firmware downloads for this Sony item
Related Sony KDL-55HX800 Manual Pages
Download the free PDF manual for Sony KDL-55HX800 and other Sony manuals at ManualOwl.com
Safety and Regulatory Booklet - Page 1

...) above the TV set and 4 inches (10 cm) on each side. If mounted on the wall, allow at least 4 inches (10 cm) of clearance at the bottom of the screen. (See additional information provided in the Operating Instructions manual.)
INSTALLATION
The TV should be installed near an easily accessible AC power outlet. ☐ Do not install the TV face up...
Additional Information for Using Sony® Wall-Mount Bracket (SU-WL500) - Page 1
... Sony Wall-Mount Bracket (SU-WL500)
A-DLR-100-14(1)
Compatible TV models for this Wall-Mount Bracket information:
to refer to the various methods of installing the Wall-Mount Bracket for step 5 of "Secure the Mounting Hook to the rear of the TV" (page 5).
KDL-55HX701/KDL-46HX701/KDL-40HX701/ KDL-46EX507/KDL-40EX507/KDL-32EX507/ KDL-60EX505/KDL...
Additional Information for Using Sony® Wall-Mount Bracket (SU-WL500) - Page 2
...-60LX900/KDL-60NX801/KDL-60NX800
For product protection and safety reasons, Sony strongly recommends that you use the Wall-Mount Bracket model designed for your TV and that the wall-mounting of your TV is performed by Sony dealers or licensed contractors.
To Customers Please provide your licensed contractor with this installation supplement as well as the instructions...
Additional Information for Using Sony® Wall-Mount Bracket (SU-WL500) - Page 3
...install your TV. Refer to the TV installation dimensions table.
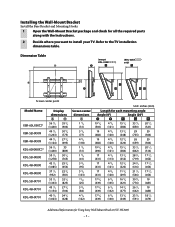
Dimension Table
(except KDL-32EX*)
(KDL-32EX* only)
Screen center point
Model Name
XBR-60LX90* XBR-52HX909 XBR-46HX909 KDL-60NX80* KDL-55HX800 KDL-46HX800 KDL-40HX800 KDL-55HX701 KDL-46HX701 KDL-40HX701
Display... Sony Wall-Mount Bracket (SU-WL500) − −
Additional Information for Using Sony® Wall-Mount Bracket (SU-WL500) - Page 5
... the built-in BD player before installing the TV on a wall.
Figures in the above table may differ slightly depending on the installation. CAUTION The wall that the TV will be installed on should be capable of supporting a weight of at least four times that of the TV. Refer to your TV's operating instructions for its weight.
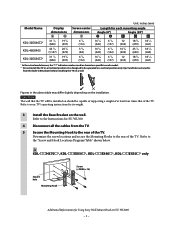
3 Install the Base Bracket...
Additional Information for Using Sony® Wall-Mount Bracket (SU-WL500) - Page 7
KDL-55HX800/KDL‑55EX717/KDL‑55EX713/KDL‑55EX711/KDL‑55EX710/ KDL‑EX70* only
Before installing, remove screws
Square hole
Screw (+PSW6 × 16)
Mounting Hook
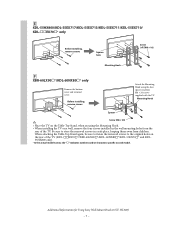
XBR-60LX90*/KDL-60NX80* only
Remove the bottom cover and terminal cover.
Before installing, remove screws
Attach the Mounting Hook using the four ...
Additional Information for Using Sony® Wall-Mount Bracket (SU-WL500) - Page 8

...‑32EX71*/KDL-32EX70*/ KDL‑32EX60*
f, j
KDL-32EX40B/KDL-32EX50*/
e, g
KDL-32EX40*/KDL-32EX30*
* In the actual model names, the "" indicates numbers and/or characters specific to each model.
Hook Location a a b
b
c c
Screw Location When installing the Mounting Hook on the TV.
d
Hook Location When installing the TV onto the...
Additional Information for Using Sony® Wall-Mount Bracket (SU-WL500) - Page 9
... specific to each model.
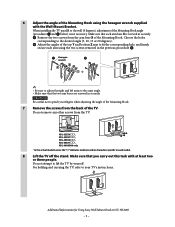
8 Lift the TV off the stand. Make sure that you carry out this task with at least two or three people. Do not attempt to lift the TV by yourself. For holding and carrying the TV, refer to your TV's instructions.
Additional Information for Using Sony Wall-Mount Bracket (SU-WL500) −...
Additional Information for Using Sony® Wall-Mount Bracket (SU-WL500) - Page 10
9 Install the TV on the wall. Refer to the Instructions for SU-WL500.
✍
• When you put the TV back on the stand, reverse the above steps. • Remove the screws or install the Mounting Hook on a stable and level surface.
Additional Information for Using Sony Wall-Mount Bracket (SU-WL500) − 10 −
Setup Guide (Operating Instructions) - Page 3
...receiver from Sony.
4 Setup
Install your TV and connect your sources. See page 8 for sample connection diagrams.
To help assure the highest quality for your HD experience, use Sony HDMI (High-Definition Multimedia Interface) cables.
To learn more about HDTV, visit:
U.S.A.: http://www.sony.com/HDTV Canada: http://www.SonyStyle.ca/hd
This TV displays all video input signals in a resolution of 1,920...
Setup Guide (Operating Instructions) - Page 6
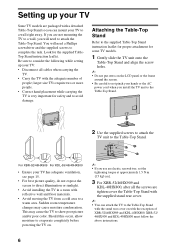
... on the LCD panel or the frame
around the screen. • Be careful to not pinch your hands or the AC
power cord when you install the TV unit to the Table-Top Stand.
2 Use the supplied screws to attach the
TV unit to the Table-Top Stand.
For XBR-52/46HX909 For KDL-55/46/40HX800...
Setup Guide (Operating Instructions) - Page 7
Setting up your TV
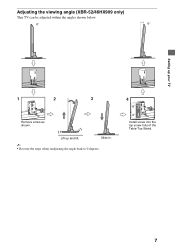
Adjusting the viewing angle (XBR-52/46HX909 only)
This TV can be adjusted within the angles shown below.
0°
6°
1
2
3
4
Remove screw as shown.
Lift up and tilt.
Slide in.
~ • Reverse the steps when readjusting the angle back to 0 degrees.
Install screw into the top screw hole of the Table-Top Stand.
7
Setup Guide (Operating Instructions) - Page 12
... and TV sets. • Avoid placing or hanging items on the TV. • Never install the TV on:
- slippery, unstable and/or uneven surfaces. - furniture that can easily be used as steps,
such as a chest of drawers. • Install the TV where it cannot be pulled,
pushed, or knocked over. • Route all AC power cords and connecting
cables...
Setup Guide (Operating Instructions) - Page 13
Setting up your TV
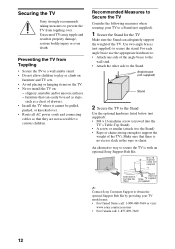
3 Anchor the TV to the Wall
Anchor the TV to the wall by using bolts, wall anchor and chain (or rope).
Anchor bolts (not supplied)
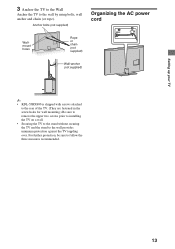
Organizing the AC power cord
Wallmount holes
Rope or chain (not supplied)
Wall-anchor (not supplied)
~
• KDL-55HX800 is shipped with screws attached to the rear of the...
Setup Guide (Operating Instructions) - Page 14
... channel scan while in the setup
menus, TV Guide will be disabled.
~
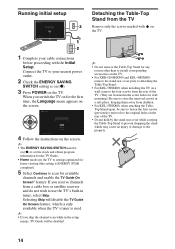
• Do not remove the Table-Top Stand for any reason other than to install corresponding accessories on the TV.
• For XBR-52/46HX909 and KDL-40HX800, remove the stand rear cover prior to detaching the Table-Top Stand.
• For KDL-55HX800, when installing the TV on...
Setup Guide (Operating Instructions) - Page 15
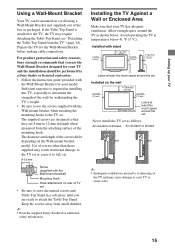
...TV" (page 14). Prepare the TV for the Wall-Mount Bracket before making cable connections.
For product protection and safety reasons, Sony strongly recommends that you use the Wall-Mount Bracket designed for your TV and the installation should be performed by a Sony dealer or licensed contractor. • Follow the instruction guide... in internal damage to the TV set or cause it to fall, etc.
8-12...
Setup Guide (Operating Instructions) - Page 20
...
AUDIO OUT DIGITAL AUDIO OUT (OPTICAL) PC IN PC/HDMI 4 AUDIO INPUT LAN
USB/DLNA 3D SYNC REMOTE (HX909 series only)
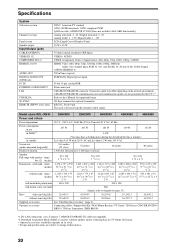
NTSC: American TV standard ATSC (8VSB terrestrial): ATSC compliant 8VSB QAM on cable: ANSI/SCTE 07 2000 (Does not include CableCARD functionality) Analog terrestrial: 2 - 69 / Digital terrestrial: 2 - 69 Analog Cable: 1 - 135 / Digital Cable: 1 - 135 LCD (Liquid Crystal Display...
Setup Guide (Operating Instructions) - Page 21
... digital cable television programming via subscription service to a cable service provider. Availability of digital cable television programming in your area depends on the type of programming and signal provided by your cable service provider.
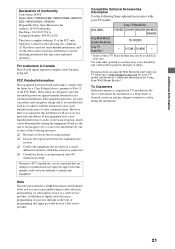
Compatible Optional Accessories Information
Use the following Sony optional accessories with
your TV model.
Sony TV Model No.
KDL-/XBR-
55HX800...
Setup Guide (Operating Instructions) - Page 24
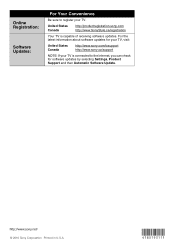
...
Your TV is capable of receiving software updates. For the latest information about software updates for your TV, visit:
United States Canada
http://www.sony.com/tvsupport http://www.sony.ca/support
NOTE: If your TV is connected to the Internet, you can check for software updates by selecting Settings, Product Support and then Automatic Software Update.
© 2010 Sony Corporation...