Sony VPL-HW30ESB driver and firmware

Related Sony VPL-HW30ESB Manual Pages
Download the free PDF manual for Sony VPL-HW30ESB and other Sony manuals at ManualOwl.com
User Manual - Page 2

... with the limits for a Class B digital device, pursuant to Part 15 of the FCC Rules. These limits are designed to provide reasonable protection against harmful interference in a residential installation. This equipment generates, uses, and can radiate radio frequency energy and, if not installed and used in accordance with the instructions, may cause harmful interference to...
User Manual - Page 5
...
Front/Right Side 8 Rear/Bottom 9 Remote Control 10
Connections and Preparations
Unpacking 11 Step 1: Installing the Projector .........13
Before Setting Up the Projector 13 Positioning the Projector and a screen 16 Step 2: Adjusting the Picture Position 20 Step 3: Connecting the Projector .....25 Connecting to a VCR 25 Connecting to a Computer ..........27 Connecting to an Optional TMR...
User Manual - Page 6

... Screen of the Projector 73 How to Use the USB Charging AC Power Adaptor 73 Specifications 75
Preset Signals 77 Input Signals and Adjustable/ Setting Items 79 Compatible 3D Signals 81 3D Signals and Adjustable/ Setting Items 81 Ceiling Installation 83 Index 87
Trademark Information "PS3" is a registered trademark of Sony Computer Entertainment Inc. HDMI, the HDMI logo and High...
User Manual - Page 11

... this lens cap when you use the projector. • USB charging AC power adaptor (1) • Operating Instructions (this manual)
For VPL-HW30AES, the following items are also contained. • 3D glasses (2) • USB charging cable (1) • Pouch for the 3D glasses (2) • 3D Sync Transmitter (1)
Inserting the batteries into the remote control
Insert the batteries E side first as...
User Manual - Page 12

... Sie die Gesetze der jeweiligen Region und des jeweiligen Landes befolgen. Installing batteries Two size AA (R6) batteries are supplied for Remote Control. To avoid risk of explosion, use size AA (R6) manganese or alkaline batteries. Caution about handling the remote control • Handle the remote control with care. Do not drop or step on it, or...
User Manual - Page 13

Connections and Preparations
Step 1: Installing the Projector
The projector displays pictures output from a VCR or other device. The lens shift allows you to have broader options for placing the projector and viewing pictures easily.
Before Setting Up the Projector
Installing the projector in such a location may cause a malfunction of the unit due to moisture condensation or rise in temperature...
User Manual - Page 14

... Setting" in the Setup menu to "High" (1 page 53). Failing to set this mode when using the projector at high altitudes could have adverse effects, such as reducing the reliability of certain components.
15° or more
15° or more
14
15° or more
WARNING When installing the unit, incorporate a readily accessible disconnect device...
User Manual - Page 16

... illustration. Use the values L, x and y in the table on page 15 or 16 as a guide.
Screen
*
**
* Installation position not using lens shift (x = 0, y = 0) ** Example of installation position using lens shift (x, y)
L: Distance between the screen and the front end of the projector's lens. x: Horizontal distance between the center of the screen and the center of the...
User Manual - Page 17

...
3695 (145 1/2)
5605 (220 3/4)
0
(0)
971 (38 1/4)
133 (5 1/4) 777 (30 5/8) 266 (10 1/2) 583
(23)
398 (15 3/4)
389 (15 3/8)
531
(21)
194 (7 3/4) 664 (26 1/4)
0
(0)
To calculate the installation positions L (minimum) = 31.1781 (1 7/32) × SS - 46.1543 (1 13/16) L (maximum) = 47.0644 (1 27/32) × SS - 42.3308 (1 21/32) y = -1.463 × x (mm...
User Manual - Page 18

...
4533 (178 1/2)
6870 (270 1/2)
0
(0)
1189 (46 7/8)
163 (6 1/2) 951 (37 1/2) 325 (12 7/8) 713 (28 1/8) 488 (19 1/4) 475 (18 3/4) 650 (25 5/8) 238 (9 3/8) 813 (32 1/8)
0
(0)
To calculate the installation positions L (minimum) = 38.1569 (1 1/2) × SS - 46.1543 (1 13/16) L (maximum) = 57.5992 (2 9/32) × SS - 42.3308 (1 21/32) y = -1.463 × x (mm or inch...
User Manual - Page 20

Step 2: Adjusting the Picture Position
Project an image on the screen and then adjust the picture position.
1 ON/STANDBY indicator
4 Lens shift dials
Remote control detector
5, 6
Zoom lever, Focus ring
2 ?/1 (On/
standby)
switch
3 PATTERN button
Tip The ?/1 (ON/STANDBY), INPUT, MENU, and M/m/
User Manual - Page 24

To adjust the tilt of the installation surface
If the projector is installed on an uneven surface, use the adjusters to keep the projector level.
Turn to adjust. Adjusters Notes • Pointing the projector at too high or too low of a tilt will result in trapezoidal distortion in the projected image. • Be careful not to catch your finger when turning the adjusters.
24
User Manual - Page 40

Adjusting the Picture Using Real Color Processing
The Real Color Processing (RCP) feature allows you to adjust the color, hue, and brightness of each target of the projected picture you specify independently. You can thus obtain a picture more suitable to your taste.
Tip Freeze the scene of the video source when you are adjusting the picture using Real Color Processing.
2, 3, 4, 5
M/m/
User Manual - Page 41

Projecting
2 Press M/m to select "Position" or "Range," and specify it more delicate color position and color range you want to adjust using
User Manual - Page 42

... different from the actual menu display.
Operation through the Menus
The projector is equipped with an on-screen menu for making various adjustments and settings. Some of the adjustable/setting items are displayed in a pop-up menu, in a setting menu or adjustment menu with no main menu, or in the next menu window. If you select an...
User Manual - Page 43
Using the Menus
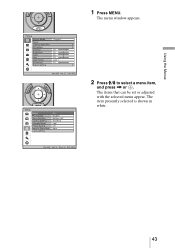
1 Press MENU.
The menu window appears.
2 Press M/m to select a menu item,
and press , or . The items that can be set or adjusted with the selected menu appear. The item presently selected is shown in white.
43
User Manual - Page 44
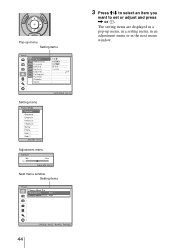
Pop-up menu Setting items
3 Press M/m to select an item you
want to set or adjust and press , or .
The setting items are displayed in a pop-up menu, in a setting menu, in an adjustment menu or in the next menu window.
Setting menu
Adjustment menu Next menu window
Setting items
44
User Manual - Page 52

...setting when noise
appears along the edge of the picture. Off: Projects the whole of the input picture.
Tip
To display the displayable region within the four directions of the screen, refer to "Blanking" on the Installation... the image signal for pictures from a computer. Phase: Adjusts the dot phase and the phase of computer signal of
pictures from a computer. Adjusts the picture to the point where...
User Manual - Page 58

...installation settings.
V Keystone Image Flip Blanking
Corrects the vertical trapezoidal distortion of the picture. When the bottom of the trapezoid is longer than the top ( ):
Sets a lower value (- direction) When the top of the trapezoid is longer than the bottom ( ):
Sets...for installation for the backside projection or ceiling installation.
This feature allows you to adjust the displayable ...
User Manual - Page 74

....
Precautions about USB charging AC power adaptor
Installation Do not place the USB charging AC power adaptor in a location where it is: • Subject to extreme high temperature (E.g.,
in a car with its windows closed) •...the finish of the cabinet. • If you use any chemical cleaner, observe the instructions provided with the product. • If the cabinet of the unit is splashed with ...