TRENDnet TV-IP672WI driver and firmware
Drivers and firmware downloads for this TRENDnet item
Related TRENDnet TV-IP672WI Manual Pages
Download the free PDF manual for TRENDnet TV-IP672WI and other TRENDnet manuals at ManualOwl.com
User's Guide - Page 2

...21 Audio Setup ...21 Image Setup ...21 Action...22 Recording ...22
Table of Contents
Video Clip ...23 Snapshot ...25 Preset Position ...25 SD Management...27 Motion Detection ...27 Tools ...28 System...28 Firmware Upgrade 28 Advanced ...29 Device Info ...29 Log...29
How to setup/access the camera remotely 30 Technical Specifications 33 Troubleshooting 37
© Copyright 2011 TRENDnet. All...
User's Guide - Page 3

...-Language Quick Installation Guide CD-ROM (Utility & User's Guide) Network cable (1.5m / 5ft) Power adapter (12V DC, 1.25A)
If any package contents are missing or damaged, please contact the retail store, online retailer, or reseller/distributor that the item was purchased.
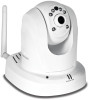
TV-IP672W / TV-IP672WI
Features
TV-IP672W The Megapixel Wireless N PTZ Internet Camera, provides...
User's Guide - Page 5

... you intend to use the network camera as a wired device, connect one end of the included Ethernet cable into the Ethernet port on the rear panel of the camera and connect the other end to an available port on your network. If you prefer to use the camera on a wireless network, see below for instructions on connecting the power adapter.
TV-IP672W / TV-IP672WI
WPS Connection
An alternative method...
User's Guide - Page 6

... the camera align with the two screw holes on the base of the camera. Secure the metal plate to the base of the Camera with the two screws provided. The camera can now be mounted to the ceiling or a wall. See the diagram below for more information.
TV-IP672W / TV-IP672WI
© Copyright 2012 TRENDnet. All...
User's Guide - Page 7

... begin the installation wizard. Begin by selecting Setup Wizard and follow the on-screen steps to continue the installation.
TV-IP672W / TV-IP672WI
2. Connect an RJ-45 cable from a switch/router to the Ethernet port on the back of the camera and connect the AC power adapter to the camera. Click Next to proceed.
3. From the list of cameras that appears, select the camera you wish...
User's Guide - Page 12

TRENDnet User's Guide
Configuration
After completing the Setup Wizard, you are ready to use your camera. The camera's built-in Web configuration utility is designed to allow you to easily access and configure your TV-IP672W or TV-IP672WI camera. Open a web browser such as Internet Explorer® and enter the IP address of your camera. To log in, use the User name...
User's Guide - Page 20

TRENDnet User's Guide
TV-IP672W / TV-IP672WI
Wireless Setup This screen shows the Wireless Settings. Click the Wireless checkbox to enable wireless. Complete the details in the fields according to your router. Enter a Network Name, under Site Survey select the SSID from the drop-down list or rescan your network settings. Select the Wireless Mode from the drop-down list (Infrastructure, Ad-Hoc ...
User's Guide - Page 27

... These settings control SNAPSHOT settings for your camera. The Trigger by settings is similar to settings above, so please view the settings above. The Snapshot Type provides for a Single snapshot or 6 snapshots at 1-2 second intervals. The Target FTP and Email settings are similar to settings explained above. Please read the configuration in the above explanation.
TV-IP672W / TV-IP672WI
Preset...
User's Guide - Page 29

... procedure)
TV-IP672W / TV-IP672WI
Motion Detection
These settings control the motion detection settings on the camera. Motion detection allows you to designate an area in the cameras viewing angle to capture motion within that area. All other areas will not be recorded. This is useful if you want to limit your recording to a particular size.
© Copyright 2012 TRENDnet. All...
User's Guide - Page 30

... on your hard drive and to display the data click Load Configuration
.
TV-IP672W / TV-IP672WI
Firmware Upgrade
These settings display the Current Firmware Version and the Current Firmware Build Number.
To do the Firmware Upgrade, locate the path of your upgrade file by clicking the browse
button and click the Upload
button to upgrade the firmware.
When you want to reset the camera to system...
User's Guide - Page 31

...phones network settings. The description is laid out in the picture below.
TV-IP672W / TV-IP672WI
Log
These settings display the Current Log of the device. Click the Clear
button to reset the log or click the Download file in txt format.
button to download a
© Copyright 2012 TRENDnet. All Rights Reserved.
For more monitoring features, please refer to SecurView Pro software user's guide...
User's Guide - Page 35
... Ethernet
LED
Power, Link/Act
WPS Button
Enable WPS connection
Reset Button
Reset to factory default
Privacy Button
Privacy mode on/off
© Copyright 2011 TRENDnet. All Rights Reserved.
TV-IP672W / TV-IP672WI
Power Consumption Power Dimension Weight Temperature Humidity Certifications Requirement Management Interface To Run software SecurView Pro Software Network Protocols
Wireless...
User's Guide - Page 36
...: 640 x 400, 320 x 192, 160 x 96 - Max frame rate: 30fps Profile 3: MJPEG
© Copyright 2011 TRENDnet. All Rights Reserved.
3GPP
Recording
Event Action Port Settings Time TV-IP672WI Camera General
TV-IP672W / TV-IP672WI
- Resolution: 1280 x 800, 640 x 400, 320 x 192, 160 x 96 - Max frame rate: 1280 x 800 @ 5fps, 640 x 400/320 x 192@30fps - JPEG quality: Low, Fair, Standard, Good, ...
User's Guide - Page 37
... / TV-IP672WI
Management Interface To Run software SecurView Pro Software Network Protocols
Wireless Standard Frequency Antenna Date Rate
Security Output Power
Receiving Sensitivity
Internet Explorer 7.0 or above Firefox, Safari, and Chrome
Windows 7 (32/64-bit), Vista (32/64-bit), XP (32/64-bit) Windows Server 2003, 2008
Channel: supports up to 32 cameras Record/Playback/Motion Detection/Audio...
User's Guide - Page 38

... RTSP: http://ipcamera_ip/3gpp
Audio format/AMR Video format/MPEG4 Protocols/RTSP, RTP, RTCP
Resolution: Define individual resolution for up to 4 profiles Required storage: 32MB (minimum per profile)
© Copyright 2011 TRENDnet. All Rights Reserved.
Event Action Port Settings Time
TV-IP672W / TV-IP672WI
Recording type: event based (motion detection and digital input trigger), continuous, and...
User's Guide - Page 39

... but not remotely
This might be caused by a firewall. Check the Internet firewall with your system administrator. The firewall may need to have some settings changed in order for the Network Camera to be accessible outside your local LAN. For more information, please refer to the section about installing your camera behind a router. Make sure that the Network Camera isn't conflicting...
User's Guide - Page 40

... outdoor radio links and/or for supplying public access to telecommunications and/or network services. This device may not be used for setting up outdoor radio links in France and in some areas the RF output power may be limited to 10 mW EIRP in the frequency range of 2454 - 2483.5 MHz. For detailed information...
User's Guide - Page 42

...'s Guide
Limited Warranty
TRENDnet warrants its products against defects in material and workmanship, under normal use and service, for the following lengths of time from the date of purchase.
TV-IP672W / TV-IP672WI - 3 Years Warranty
AC/DC Power Adapter, Cooling Fan, and Power Supply carry 1 year warranty.
If a product does not operate as warranted during the applicable warranty period, TRENDnet...
Quick Installation Guide - Page 2

...; TV-IP672WI CD-ROM (Utility and User's Guide) Multi-Language Quick Installation Guide 1 x 2dbi detachable antenna Network cable (1.5 m / 5 ft.) Mounting kit Power adapter (12V DC, 1.25A)
Minimum Requirements
A computer with an Ethernet port and web browser CD-ROM drive Wired or wireless network (wireless router or...
Quick Installation Guide - Page 3

...into your CD-ROM drive.
4. Click Install Camera and follow the instructions.
5. Congratulations! Your camera is now connected to your wireless network. Click TV-IP672WI to confirm access to the management interface.
6. Once the management interface has opened in your web browser, save the link of the IP address to your desktop for ease of access.
7. See the User's Guide for information concerning...