Toshiba TDP-S81U driver and firmware

Related Toshiba TDP-S81U Manual Pages
Download the free PDF manual for Toshiba TDP-S81U and other Toshiba manuals at ManualOwl.com
Owners Manual - Page 2
...
USA only A digital device, pursuant to part 15 of the FCC Rules. These limits are designed
to provide reasonable protection against harmful interference when the equipment
is operated in a commercial environment. This equipment generates, uses, and
can radiates radio frequency energy and, if not installed and used in accordance
with the instruction manual, may cause...
Owners Manual - Page 3
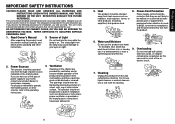
...'S MANUAL AND THOSE MARKED ON THE UNIT. RETAIN THIS BOOKLET FOR FUTURE REFERENCE.
This set has been designed and manufactured to assure personal safety. Improper use can result in electric shock or fire hazard. The safeguards incorporated in this unit will protect you if you observe the following procedures for installation, use and servicing...
Owners Manual - Page 5
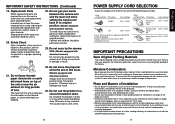
... document camera) Always store the arm back in position when moving the projector. Otherwise injury or damage may result.
25. Do not use the product in a closed installation state.
Do not place the product in a box or in any other closed installation state. Otherwise it may overheat. This could result in a risk of fire.
8
POWER...
Owners Manual - Page 6
..., Digital Micromirror Device and DMD are trademakes of Texas Instruments.
• Macintosh is a registered trademark of Apple Computer, Inc. • Windows is a registered trademark of Microsoft Corporation in the U.S. and other
countries. • Adobe is a registered trademark and Acrobat Reader is a trademark of Adobe Systems
Incorporated.
Notational Conventions Used in This Manual
•...
Owners Manual - Page 8
... immediately where you purchased the product.
(1)
(4)
(7)
(2)
(5)
(3)
(6)
(8)
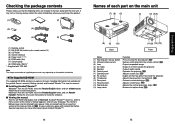
■ (1) Remote control ■ (2) R6 (SIZE AA) batteries for remote control (2) ■ (3) CD-ROM ■ (4) Owner's Manual ■ (5) Power cord (See note) ■ (6) RGB cable (3m) ■ (7) Carrying bag ■ (8) RGB cable (25cm)* *: Supplied with TDP-S81.
Note The shape and number of supplied...
Owners Manual - Page 11
... projector.
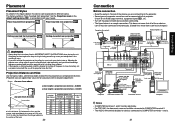
Check for an RGB output terminal, supported signal p.45 , etc. • Turn off the power of both devices before connecting. • The figure below is a sample connection. This does not mean that all of these devices
can or must be connected simultaneously. (Dotted lines mean items can be exchanged.)
Computer (for control)
VCR
Video recorder, DVD player, etc.
Audio...
Owners Manual - Page 13
... set to SVGA resolution. • With some models of computer having LCD displays or the like, displaying images simultaneously on the projector and the monitor's display may prevent the images from displaying properly. If this happens, turn off the computer's LCD display. For information on how to turn off the LCD display, see the owner's manual of your computer. • If a signal not supported...
Owners Manual - Page 15

... use this function on video software sold on the market, broadcast or
broadcast on cable except for the purpose of ...settings using the operation buttons p.16 on the control panel (main unit side) and remote control.
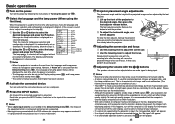
■ How to use the menus
The menu shown below is for operation instructions purposes and might differ from the actual display.
1. Press the MENU button Display the Setting display...
Owners Manual - Page 17
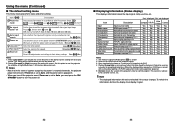
... used as
a counter of guaranteed lamp time.) When the displayed time approaches 2,000 hours, consult with a store about getting a TLPLW5 replacement lamp (sold separately) prepared. 5: [Version] shows the version of the projector's internal control program. This version is referred to for customer service, etc.
Note
• The displayed information will not be refreshed if the status changes. To...
Owners Manual - Page 18
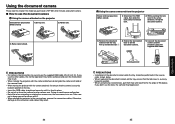
... if the model you purchased is TDP-S81 which includes a document camera.
■ How to use the document camera
Using the camera attached on the projector
Status before preparation (When stored)
1) Set up arm.
2) Rotate arm.
3) Raise camera head.
Using the camera removed from the projector
Status before preparation (When stored)
1) Disconnect the RGB cable, then slide the lock switch...