ASRock P4VM890 driver and firmware
Related ASRock P4VM890 Manual Pages
Download the free PDF manual for ASRock P4VM890 and other ASRock manuals at ManualOwl.com
RAID Installation Guide - Page 1

...
1.3.1 Enter BIOS Configuration Utility 3
1.3.2 Create Disk Array ...3
1.3.3 Delete Disk Array ...6 1.3.4 Select Boot Array ...6
2. VIA Windows RAID Installation Guide 7
2.1
Create RAID Array ...8
2.2
Delete Disk Array ...10
2.3
Check All Disks ...10
2.4
Verify Mirror Disk ...11
2.5
Synchronize Mirror Disk ...12
2.6
Disk Error Detection ...13
2.7
Duplicate Critical RAID 1 Array...
RAID Installation Guide - Page 2

... BIOS RAID Installation Guide
You are allowed to configure RAID functions under BIOS environment.
1.1 Introduction of RAID
VIA VT8237 south bridge chipset integrates RAID controller supporting RAID 0, RAID 1, and JBOD functions with two independent SATA channels. This section will introduce the basic knowledge of RAID.
RAID The term "RAID" stands for "Redundant Array of Independent Disks", which...
RAID Installation Guide - Page 7

2. VIA Windows RAID Installation Guide
You are allowed to configure RAID functions under Windows environment. The "RAID Software" is a Windows-based software utility with graphical user interface and provides user an easy-operation tool to configure and manage disk drives or disk arrays connected to VT8237 SATA controller.
After GUI software is installed, it will automatically start every time ...
RAID Installation Guide - Page 8

... pop up. If you select "Custom", the "Available Disks" window will list the available disk drives for array-creating. Select a disk drive and click right arrow button to add the specific disk drive to array. After adding a disk drive, user can also remove the selected disk drive from array. Click the disk drive in "Array Disks" windows, then click left arrow button to remove the selected...
User Manual - Page 3
...Installation of Memory Modules (DIMM 13 2.4 Expansion Slots (PCI, AMR, and PCI Express Slots) .... 14 2.5 Jumpers Setup 15 2.6 Onboard Headers and Connectors 16 2.7 Serial ATA (SATA) Hard Disks Installation 19 2.8 Hot Plug and Hot Swap Functions for SATA HDDs ....... 19 2.9 Driver Installation Guide 19 2.10 AMR Card and Driver Installation 20 2.11 Installing Windows® 2000 / XP With RAID...
User Manual - Page 4

3.7 Exit Screen 38
4. Software Support 39
4.1 Install Operating System 39 4.2 Support CD Information 39
4.2.1 Running Support CD 39 4.2.2 Drivers Menu 39 4.2.3 Utilities Menu 39 4.2.4 Contact Information 39
4
User Manual - Page 5

... Contents
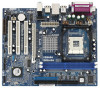
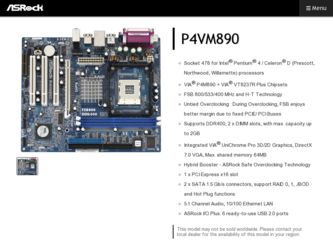
ASRock P4VM890 Motherboard (Micro ATX Form Factor: 9.6-in x 8.0-in, 24.4 cm x 20.3 cm)
ASRock P4VM890 Quick Installation Guide ASRock P4VM890 Support CD One 80-conductor Ultra ATA 66/100/133 IDE Ribbon Cable One Ribbon Cable for a 3.5-in Floppy Drive One Serial ATA (SATA) Cable (Optional) One Serial ATA (SATA) HDD Power Cable (Optional) One ASRock I/O PlusTM Shield One COM Port Bracket...
User Manual - Page 7

...power connector - CD in header - AUX in header - Front panel audio connector - 2 x USB 2.0 headers (support 4 USB 2.0 ports; 2 of them are
shared with USB45 ports on the I/O panel) (see CAUTION 5) - 4Mb AMI BIOS - AMI Legal BIOS - Supports "Plug and Play" - ACPI 1.1 Compliance Wake Up Events - Supports jumperfree - AMBIOS 2.3.1 Support - Drivers, Utilities, AntiVirus Software (Trial Version) - CPU...
User Manual - Page 8

... system, please check if the CPU fan on the motherboard functions properly and unplug the power cord, then plug it back again. To improve heat dissipation, remember to spray thermal grease between the CPU and the heatsink when you install the PC system. 5. Power Management for USB 2.0 works fine under Microsoft® Windows® XP SP1 or SP2...
User Manual - Page 19

... Plus southbridge chipset that supports Serial ATA (SATA) hard disks and RAID (RAID 0, RAID 1 and JBOD) functions. You may install SATA hard disks on this motherboard for internal storage devices. This section will guide you to install the SATA hard disks.
STEP 1: Install the SATA hard disks into the drive bays of your chassis. STEP 2: Connect the SATA power cable to the SATA hard disk. STEP...
User Manual - Page 20
.../ XP With RAID Functions
If you want to install Windows® 2000 / Windows® XP OS on your SATA
HDDs with RAID functions, please follow below steps.
STEP 1: Set up BIOS.
A.
Enter BIOS SETUP UTILITY Advanced screen IDE Configuration.
B.
Set the "SATA Operation Mode" option to [RAID].
STEP 2: Make a SATA driver diskette.
A.
Insert the ASRock Support CD into your optical drive to boot...
User Manual - Page 21

... "VIA RAID Tool" in Windows® environment, please install SATA drivers from the Support CD again so that "VIA RAID Tool" will be installed to your system as well.
2.12 Installing Windows® 2000 / XP Without RAID
Functions
If you want to install Windows® 2000 / XP on your SATA HDDs without RAID functions, please follow below steps. STEP 1: Set up BIOS.
A.
Enter BIOS SETUP UTILITY...
User Manual - Page 23

...BIOS SETUP UTILITY to configure your system. The Flash Memory on the motherboard stores the BIOS SETUP UTILITY. You may run the BIOS SETUP UTILITY when you start up the computer. Please press during the Power-On-Self-Test (POST) to enter the BIOS SETUP...and then back on.
Because the BIOS software is constantly being updated, the following BIOS setup screens and descriptions are for reference ...
User Manual - Page 26

... a computer system with an Intel Pentium® 4 processor that supports Hyper-Threading technology and an operating system that includes optimization for this technology, such as Microsoft® Windows® XP. Set to [Enabled] if using Microsoft® Windows® XP, or Linux kernel version 2.4.18 or higher. This option will be hidden if the installed CPU does not support Hyper...
User Manual - Page 39

... CD to display the menus.
4.2.2 Drivers Menu
The Drivers Menu shows the available devices drivers. Please install the necessary drivers to activate the devices.
4.2.3 Utilities Menu
The Utilities Menu shows the applications software that the motherboard supports. Click on a specific item then follow the installation wizard to install it.
4.2.4 Contact Information
If you need to contact ASRock or...
Quick Installation Guide - Page 4

... P4VM890 Motherboard (Micro ATX Form Factor: 9.6-in x 8.0-in, 24.4 cm x 20.3 cm)
ASRock P4VM890 Quick Installation Guide ASRock P4VM890 Support CD One 80-conductor Ultra ATA 66/100/133 IDE Ribbon Cable One Ribbon Cable for a 3.5-in Floppy Drive One Serial ATA (SATA) Cable (Optional) One Serial ATA (SATA) HDD Power Cable (Optional) One ASRock I/O PlusTM Shield One COM Port Bracket
4 ASRock P4VM890...
Quick Installation Guide - Page 6
...power connector - CD in header - AUX in header - Front panel audio connector - 2 x USB 2.0 headers (support 4 USB 2.0 ports; 2 of them are
shared with USB45 ports on the I/O panel) (see CAUTION 5) - 4Mb AMI BIOS - AMI Legal BIOS - Supports "Plug and Play" - ACPI 1.1 Compliance Wake Up Events - Supports jumperfree - AMBIOS 2.3.1 Support - Drivers, Utilities, AntiVirus Software (Trial Version) - CPU...
Quick Installation Guide - Page 17

.../ XP With RAID Functions
If you want to install Windows® 2000 / Windows® XP OS on your SATA
HDDs with RAID functions, please follow below steps.
STEP 1: Set up BIOS.
A.
Enter BIOS SETUP UTILITY Advanced screen IDE Configuration.
B.
Set the "SATA Operation Mode" option to [RAID].
STEP 2: Make a SATA driver diskette.
A.
Insert the ASRock Support CD into your optical drive to boot...
Quick Installation Guide - Page 18

...your SATA HDDs without RAID functions,
please follow below steps.
STEP 1: Set up BIOS.
A.
Enter BIOS SETUP UTILITY Advanced screen IDE Configuration.
B.
Set the "SATA Operation Mode" option to [non-RAID].
STEP 2: Install Windows® 2000 / XP OS on your system.
After setting up BIOS, you can start to install Windows® 2000 / XP on your
system.
English
18 ASRock P4VM890 Motherboard
Quick Installation Guide - Page 19

..., but PCI / PCIE bus is in the fixed mode so that FSB can operate under a more stable overclocking environment.
Please refer to the warning on page 6 for the possible overclocking risk before you apply Untied Overclocking Technology.
3. BIOS Information
The Flash Memory on the motherboard stores BIOS Setup Utility. When you start up the computer, please press during the Power-On...