Acer AL1911 driver and firmware

Related Acer AL1911 Manual Pages
Download the free PDF manual for Acer AL1911 and other Acer manuals at ManualOwl.com
AL1911 Service Guide - Page 11
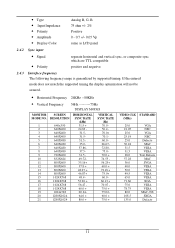
...supported timing the display optimization will not be assured.
• Horizontal Frequency 24KHz --80KHz
• Vertical Frequency
56Hz ---------75Hz
DISPLAY MODES
MONITOR MODE NO.
1 2 3 4 5 6 7 8 9 10 11 12 13 14 15 16 17 18 19 20 21
SCREEN RESOLUTION....0 49.5 65.0 71.66 75.0 78.75 80.0 108.5 135.0
VGA NEC VGA NEC Defacto MAC VESA VESA Text Defacto MAC SVGA VESA VESA VESA VESA XGA VESA VESA...
AL1911 Service Guide - Page 12

2.4.4
TIMING
Supported Timing
FH(KHZ) SYNC
TOTAL ACTIVE
FV(HZ) POLARITY (DOT/LINE) (DOT/LINE)
640x350
31.469
+
VGA-350
70.087
-
640x400
24.83
-
NEC PC9801
56.42
-
640x400
31.469
-
VGA-GRAPH
70.087
+
640x400
31.5
-
NEC PC9821
70.15
-
640x480
31.469
-
VGA-480
59.94
-
640x480
35.00
-
APPLE MAC-
66.67...
AL1911 Service Guide - Page 15

...;K color temperature. Set CIE coordinate at 9300°K color temperature. Exit OSD menu function.
Sharpness : Adjust the scale-up effect(smoother or sharper.) OSD Transparency: Adjust the transparency level of OSD. The range is from 0 to 100 scales.
Comment:
• 1280x1024: • 60 HZ: • VER 1.00:
Current mode resolution. Current mode...
AL1911 Service Guide - Page 16

... mode whenever encounter this mode again. Total 21 recent used modes are recorded into (AM969)
n VESA DPMS Functionality When signaled by the host CPU, (AM969) show a black screen about 3 seconds. If no further signal, then it shows "No Signal" and enter power saving mode.
2.6 White Color Temperature
White color temperature is 4 preset as...
AL1911 Service Guide - Page 43

... for the surge voltage test is 2.0 KV, and without any degradation or loss of function that is not recoverable due to damage of component or software allowed.
10.7 Display set high-resolution mode, AC input use AC 240V.
43
AL1911 Service Guide - Page 51
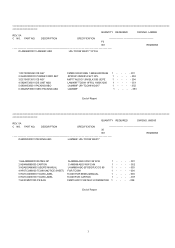
... DC190020440 CB ASY 2 GA0500000C0 POWER CORD SET 3 DC190013810 CB ASY 4 ...58290730001 DIS UNIT ABO 5 68009530001 PACKING ABO 6 X66ANF30001 MEC PACKING ABO
CM999 SIG/2CORE 1.8M BLK90DSUB SP305X1.8MXIS14 SVT OPL AM777 AUDIO 1.8M BLK G/B J/EPE LAM969F TCO99 19"...ABO W/W CHN
1 - - - - 002
3 HDABOAM9600 USER'S MANUAL
U-AM969-ABO EFGSIDPJC/CS 99
1 - - - - 003
4 HF6TCO99000 ...
AL1911 User Guide - Page 1

... from Its Stand 2 Interface for Arm Applications...3 Cable Installation...3 Connecting the Display to your Computer 3 Connecting the AC Power...3 Connecting the Audio Cable ...3 Setting Up the LCD Monitor...4 Power Management System ...4
Chapter 2 Display Controls 4
User Controls ...4 Adjusting the Monitor's Display...4 Function Description ...5
Chapter 3 Technical Information 7
Specifications...
AL1911 User Guide - Page 2

...device weight above 3 kg, a line not lighter than H05VV-F, 3G, 0.75 mm2 must be used. 8. For use only with power supply LINEARITY LAD6019AB5 and Li-shin, LSE9901B1260.
Chapter 1 Installation
Unpacking
Before unpacking the LCD Monitor, prepare a suitable workspace for your Monitor and computer...User's Manual
* 1.8M Monitor-to-PC VGA Cable
* 1.8M Power Cord
* 1.8M Stereo Jack Audio Cable
If you...
AL1911 User Guide - Page 3

... for this application.
Cable Installation
Please follow these instructions to install the cables. 1. Remove the back panel n from the rear of the monitor.(See Fig. 1-4) 2. Place the signal cable, the audio cable into their correct socket.
Figure 1-3
Connecting the Display to your Computer
1. Power off your computer. 2. Connect one end of the signal cable to the LCD Monitor's VGA port.
(See Fig...
AL1911 User Guide - Page 4

... as shown on Fig.
2-2:
Continue pressing the Function Select buttons to scroll through the entire
menu items, then press Adjustment Control buttons to adjust content of
selected item.
Figure 2-2 Attention: Firmware revision may have been updated into a latest version while the version number shown on all OSD menus in this manual will stay as Ver. 1.00.
4
AL1911 User Guide - Page 5

..., French, Spanish, and Italian. Press the left or right adjustment control button to select other language.
Auto
Press button ( ) to activate the Auto Adjustment. The Auto Adjustment function let you adjust the display size, clock and phase to obtain the best viewing settings. This process will take 3 ~ 5 seconds to complete. Attention : After Auto...
AL1911 User Guide - Page 9

... and 1024x768 66Hz modes cannot be supported when Digital (TMDS) input.
Troubleshooting
This LCD Monitor has pre-adjusted using factory standard VGA timings. Due to the output timing differences among various
VGA cards in the market, users may initially experience an unstable or unclear display whenever a new display mode or new
VGA card is selected.
Attention
This LCD Monitor...