Acer Aspire G7710 driver and firmware
Drivers and firmware downloads for this Acer Computers item

Related Acer Aspire G7710 Manual Pages
Download the free PDF manual for Acer Aspire G7710 and other Acer manuals at ManualOwl.com
Aspire G7710 Series User's Guide - EN - Page 3
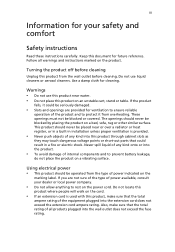
...Safety instructions
Read these instructions carefully. Keep this document for future reference. Follow all warnings and instructions ... over a radiator or heat register, or in a built-in installation unless proper ventilation is provided.
• Never push objects of any...type of power available, consult your dealer or local power company.
• Do not allow anything to rest on the power cord. Do...
Aspire G7710 Series User's Guide - EN - Page 6

...Users are also at risk of physical injury after long hours of working in front of a computer. Long work periods, bad posture, poor work habits, stress, inadequate working conditions, personal ...shoulders • avoid tensing your muscles or shrugging your shoulders • install the external display, keyboard and mouse properly and within
comfortable reach
• if you view your monitor ...
Aspire G7710 Series User's Guide - EN - Page 7

...reflections by: • placing your display in such a way that the side faces the window or
any light source
• ...display's top front edge
• Avoid adjusting your display to an awkward viewing angle. • Avoid looking at bright light sources, such as open windows, for extended
periods of time.
Developing good work habits
Develop the following work habits to make your computer...
Aspire G7710 Series User's Guide - EN - Page 10

... the optical drive
39
Taking care of your optical disks
40
Connecting options
41
Printer
41
IEEE 1394 devices
41
eSATA devices
42
Audio devices
42
USB devices
44
Connecting a video game console
45
6 Upgrading your computer
47
Installation precautions
48
ESD precautions
48
Preinstallation instructions
48
Post-installation instructions
49
Opening your Aspire G7710
50...
Aspire G7710 Series User's Guide - EN - Page 14

...; ICH10R chipset
System memory Up to 12 GB of DDR3 1066 MHz SDRAM (three-channel support on six DIMMs)
Hard drives
Up to four Serial ATA hard disks, each up to 1 TB Four 3.5" easy-swap HDD bays
Optical drive
Two 5.25" drive bays Optical drive options: • BD + SuperMulti burner • BD/HD DVD reader + SuperMulti burner • SuperMulti with Labelflash? technology
Card reader
Multi...
Aspire G7710 Series User's Guide - EN - Page 16

...
4
1 First things first
I/O expansion
Software
Dimensions BIOS Power supply System compliance Certification Optional accessories
Three PCI Express® x16 slots (one full x16 slot, two x8 refitted to x16 size) Two PCI Express® x1 slots PCI Express® x8 slot PCI 2.3 5 V slot
Acer Empowering Technology (Acer eRecovery Management) Acer GameZone Acer Arcade™ Live McAfee®...
Aspire G7710 Series User's Guide - EN - Page 17

... set up your computer. Carefully unpack the carton and remove the contents. If any of the following items are missing or damaged, contact your dealer immediately: • Aspire G7710 • Items contained in the accessory box
• USB keyboard • USB mouse • User's Guide and installation poster • Other user documentation and third-party software
Accessing the User Guide...
Aspire G7710 Series User's Guide - EN - Page 25

English
13
To remove a memory card:
1 Before ejecting a card: • Exit the application using the card. • Left-click on the Safely Remove Hardware icon on the Windows taskbar and stop the card operation.
2 Gently press the card further into the slot to pop it out. 3 Pull out the card from the slot.
Aspire G7710 Series User's Guide - EN - Page 32
...
2 System tour
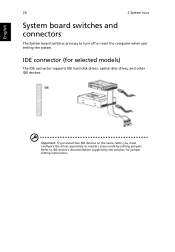
System board switches and connectors
The System board switches are easy to turn off or reset the computer when user testing the system.
IDE connector (for selected models)
The IDE connector supports IDE hard disk drives, optical disk drives, and other IDE devices.
Important: If you install two IDE devices on the same cable, you must configure the drives separately to master...
Aspire G7710 Series User's Guide - EN - Page 46

34
3 Setting up your computer
English
Turning off your computer
The software procedure below applies to system running a Windows OS. For other OS shutdown procedures, refer to the related user documentation.
1 On the Windows Vista taskbar, click on the Start button, and click
,
then click Shut Down.
2 Turn off all peripherals connected to your computer.
If you cannot...
Aspire G7710 Series User's Guide - EN - Page 60

English
48
6 Upgrading your computer
Installation precautions
Before you install any computer component, we recommend that you read the following sections. These sections contain important ESD precautions along with preinstallation and post-installation instructions.
ESD precautions
Electrostatic discharge (ESD) can damage your processor, disk drives, expansion boards, and other components. ...
Aspire G7710 Series User's Guide - EN - Page 62

English
50
6 Upgrading your computer
Opening your Aspire G7710
Caution: Before you proceed, make sure that you have turned off your computer and all peripherals connected to it. Read the "Preinstallation instructions" on page 48.
You need to open your computer before you can install upgrade components. The side panel is removable to allow access to the computer's internal components. Refer...
Aspire G7710 Series User's Guide - EN - Page 64

English
52
6 Upgrading your computer
Removing and installing the side panel
To remove the side panel:
1 Remove the bezel door. Refer to the previous section for instructions. 2 Remove the side panel.
a Release the locks on the rear side
b Hold the rear edge of the panel with both hands then slide the panel towards the rear of the chassis.
c Lift the panel upward to detach it.
Aspire G7710 Series User's Guide - EN - Page 66

English
54
6 Upgrading your computer
Removing and installing a hard drive
The computer supports up to four easy-swap hard disk drives. Each hard disk is mounted in a carrier that holds a standard 3.5-inch Serial ATA hard drive and connects to a SATA interface on the disk cage backplane.
Aspire G7710's EasySwap technology allows you to replace hard drives without powering down the system. Easy-...
Aspire G7710 Series User's Guide - EN - Page 70

58
6 Upgrading your computer
English
Upgrading the system memory
This section explains the procedures for removing and installing a memory module.
System memory interface
The six 240-pin sockets on the mainboard support Double Data Rate 2 (DDR2) Synchronous Dynamic Random Access Memory (SDRAM)-type DIMMs. You may install 1 GB or 2 GB DIMMs for a maximum memory capacity of 12 GB.
The DDR2 DIMMs ...
Aspire G7710 Series User's Guide - EN - Page 71

... guidelines
• To ensure data integrity, use only Acer-approved modules in 1 GB or 2 GB capacities.
• Use identical modules - same specification for size, speed, and organization.
• In minimum configuration, the FDB should be installed in DIMM 2 slot. • Install memory pair upgrades in the following sequence:
• First pair: DIMM 2, DIMM 4 and DIMM...
Aspire G7710 Series User's Guide - EN - Page 72

...Upgrading your computer
To remove a memory...install a new memory module, proceed to the next section for related procedure, then observe the post-installation instructions described on page 49.
To install a memory module:
Note: DIMM slots on the mainboard must be installed...DIMM, note that the system supports dual channel configuration. The total size of the DIMMs installed in the channel A slots ...
Aspire G7710 Series User's Guide - EN - Page 74

...
6 Upgrading your computer
Installing an expansion card
This section explains how to install an expansion card and a second CrossFireReady graphic card.
PCI bus slots interface
3 PCI Express x16 slots compatible with PCIE 2.0 specification, supports CrossFire mode. • The mazarine PCIE x16 (PCI_EX1, 3, 5) slot supports PCIE x16 speed • The blue PCIE x16 (PCI_EX2, 4) slot supports PCIE...
Aspire G7710 Series User's Guide - EN - Page 76

English
64
6 Upgrading your computer
of the case. This back plate will go where the tabs used to be. 8 Press the release latch to secure the card in place. 9 Locate the second PCI Express power cord from the CrossFire-Ready power
supply and plug it in to the second graphic card.
10 Attach the CrossFire connector to connect...
Aspire G7710 Series User's Guide - EN - Page 102

English
90
modem notices 79 setting up computer 26, 28
area 26 chair 26 connect
broadband network 29 external monitor 29 keyboard 28 mouse 28 connecting power cable 30 keyboard 27 monitor 27 mouse 27 side panel install 53 remove 53 system board audio card 20 connectors 20 mainboard 17
Index
switches 20 system memory
install 60
T
turning off computer 34 software shutdown 34 suspend...