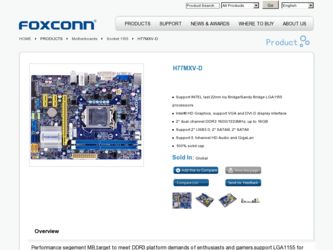
Foxconn H77MXV-D driver and firmware
Related Foxconn H77MXV-D Manual Pages
Download the free PDF manual for Foxconn H77MXV-D and other Foxconn manuals at ManualOwl.com
User manual - Page 6

...a Memory 11 2-3 Install an Expansion Card 13 2-4 Install other Internal Connectors 14
Chapter 3 BIOS Setup Enter BIOS Setup 21 Main...22 F-Center...24 Smart BIOS 24 Fox Intelligent Stepping 25 CPU Configuration 26 Performance Tuning 27 Advanced...29 North Bridge 29 Onboard Device Configuration 30 SATA Configuration 31 Super IO Configuration 32 Trusted Computing 33 Boot...34 Power...35...
User manual - Page 7

... 65 5-2 Intel® Rapid Storage Technology enterprise 67 5-3 Steps to Install Serial ATA Hard Disks 67 5-4 Create a RAID driver diskette 68 5-5 BIOS Configuration 69 5-6 Create RAID in BIOS 69 1. Enter RAID BIOS Setup 69 2. Create RAID Volume 70 3. Delete RAID Volume 85 4. Reset Disks to Non-RAID 86 5. Recovery Volume Options 91 6. Exit RAID BIOS 92 5-7 Install a New Windows XP 93
User manual - Page 10

... Software
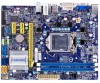
Operating System Form Factor
1 x ME header
1 x PS/2 Keyboard port 4 x USB 2.0 ports 1 x VGA port 1 x DVI-D port(H77MXV-D) 1 x HDMI port(H77MXV) 1 x RJ45 LAN port 2 x USB 3.0 ports 3 x Audio ports
System voltage detection CPU/System temperature detection CPU/System fan speed detection CPU Overheating warning CPU/System fan speed control
Support PCI Express Gen2 5GT/S data rate Low power...
User manual - Page 12

...USB 2.0 Port
3 VGA Port
4
HDMI Port (H77MXV)
2 USB 2.0 Port
8 Audio Port
5
DVI-D Port (H77MXV-D)
1. PS/2 Keyboard Port Use the upper port to connect a PS/2 keyboard.
2. USB 2.0 Port The USB port supports the USB 2.0/1.1 specification. Use this port for USB devices such as an USB keyboard/mouse, USB printer, USB flash drive and etc.
3. VGA Port Use this port to connect external display devices...
User manual - Page 20

... the chassis cover. 6. Turn on your computer. If necessary, go to BIOS Setup to make any required BIOS changes
for your expansion card(s). 7. Install the driver provided with the expansion card in your operating system. Installing and Removing a PCI Express x16 Graphics Card:
• Installing a Graphics Card: Gently insert the graphics card into the PCI Express x16 slot. Make sure the graphics...
User manual - Page 47

Chapter 4 CD Instruction
The utility CD that came with the motherboard contains useful software and several utility drivers that enhance the motherboard features. This chapter includes the following information: ■ Install driver and utility ■ FOX ONE ■ FOX LiveUpdate ■ FOX LOGO ■ FOX DMI ■ Smart Charger
User manual - Page 49

CD INSTRUCTION 2. Install Utility Use these options to install additional software programs. And click "User's Manual" button to view the product manual.
The Driver and Utility items displayed above represent a Windows 7 based system. The appearance may change with different Operating Systems.
42
User manual - Page 61

CD INSTRUCTION
4-3 FOX LiveUpdate
FOX LiveUpdate is a useful utility to backup and update your system BIOS, drivers and utilities by local or online.
Supporting Operating Systems Windows 2000 ■ Windows XP (32-bit and 64-bit Windows 2003 (32-bit and 64-bit Windows Vista (32-bit and 64-bit Windows 7 (32-bit and 64-bit)
Please set the BIOS setting "BIOS Write Protect" or...
User manual - Page 63

... Online Update
2-1 Online Update - Update BIOS This page lets you update your system BIOS from Internet. Click "start", it will search the new BIOS from Internet. Then follow the wizard to finish the update operation.
Click here
Current information
Select BIOS to update
Search new BIOS from Internet
Browse detailed information Update BIOS Close the window
2-2 Online Update - Update Driver This...
User manual - Page 64

Select the driver to update
CD INSTRUCTION
Browse detailed information Install the selected driver Close the window
2-3 Online Update - Update Utility This page lets you update utilities from Internet. Click "start", it will search the new utilities from Internet. Then follow the wizard to finish the update operation.
Click here
Select the utility to update
Current information
Search new ...
User manual - Page 65

CD INSTRUCTION 2-4 Online Update - Update All This page lets you update your system drivers from Internet. Click "start", it will search all new BIOS/drivers/utilities from Internet. Then follow the wizard to finish the update operation.
Click here
Current information
Search all new BIOS/ drivers/utilities from Internet
Close the window
Browse detailed BIOS information
Browse detailed driver ...
User manual - Page 71

Chapter 5 RAID Configuration
This chapter includes the following information : ■ RAID Configuration Introduction ■ Intel® Rapid Storage Technology enterprise ■ Steps to Install Serial ATA Hard Disks ■ Create a RAID Driver Diskette ■ BIOS Configuration ■ Create RAID in BIOS ■ Install a New Windows XP
User manual - Page 72

... in-box driver by its own and can skip this step). 3. Follow 5-5 to set BIOS setting "SATA Mode" to RAID or AHCI. 4. Follow 5-6 to create RAID in BIOS. 5. Follow 5-7 to Install Windows Operating System.
5-1 RAID Configuration Introduction
RAID (Redundant Array of Independent Disks) is a method for computer data storage schemes that divide and/or replicate data among multiple hard drives. RAID can...
User manual - Page 74

... end of the SATA cable to motherboard's SATA connector, and the other end to
SATA hard disk. 3. Connect SATA power cable to the power connector of SATA hard disk.
N
■ Both AHCI and RAID modes need to install Intel® Rapid Storage Technology enterprise driver.
■ Set SATA mode in BIOS to AHCI, you can skip RAID BIOS creation steps, but the software driver installation of Intel®...
User manual - Page 75

... configure the SATA Mode in BIOS to either AHCI or RAID first. You also need to create a RAID driver diskette for use in installing your Windows XP system. Windows 7 has native RAID driver in itself, you can skip these steps. 1. Find a PC, put a diskette into its floppy drive A:, this diskette will be formatted later. Put the
driver CD into DVD-ROM drive.
2. Depending on...
User manual - Page 76

...driver for additional specific devices, for example, a RAID device.
10. Install Serial ATA Hard Disks : 10-1. Shut down your computer. 10-2. Install SATA hard disks into the drive bays, connect all power and SATA cables.
5-5 BIOS Configuration
1. Enter the BIOS setup by pressing key during the POST(Power On Self Test). 2. Set the "SATA Mode" to "RAID Mode". (Please refer to Chapter 3 BIOS Setup...
User manual - Page 99

...174; Rapid Storage Technology enterprise program. The system will enter
BIOS setup. 3. Shut down the computer, remove the Non-RAID disk, and we will continue for Windows OS
installation. If you do not remove irrelevant hard disk, Windows may detect it during the installation, and you could be confused. 4. Remove any diskette from floppy drive. 5. Restart computer to start Windows installation.
92
User manual - Page 100

...Install a New Windows XP
RAID CONFIGURATION
When set the SATA Mode in BIOS to either AHCI or RAID, you need to follow the following steps to install Windows OS.
1. Press to enter BIOS Setup during POST. 2. Insert the Windows installation CD into the optical drive. 3. Set the first Boot device to CD/DVD, save changes and exit the BIOS setup. (Please refer
to Chapter 3 BIOS Setup) 4. The computer...
User manual - Page 101

...or more mass storage devices installed in your system, or you have chosen to manually specify an adapter. Currently, Setup will load support for the following mass storage device(s):
* To specify additional SCSI adapters, CD-ROM drivers, or special
disk controllers for use with Windows, including those for which you have a device support disk from a mass storage device manufacturer, press S. * If...
User manual - Page 103

... in the floppy drive during Windows XP installation, otherwise, Windows may ask you to put it inside again by below message. There are many
times Windows XP may copy files from the floppy drive, please remember. 11. Follow the Windows XP install processes to finish the set up.
Windows XP Professional Setup
Insert the disk labeled: Intel Matrix Storage Manager driver
into drive A: * Press ENTER...