Gigabyte GA-B75M-D2V driver and firmware
Drivers and firmware downloads for this Gigabyte item

Related Gigabyte GA-B75M-D2V Manual Pages
Download the free PDF manual for Gigabyte GA-B75M-D2V and other Gigabyte manuals at ManualOwl.com
Manual - Page 3

...carefully read the User's Manual. „„ For product-related information, check on our website at: http://www.gigabyte.com
Identifying Your Motherboard Revision The revision number on your motherboard looks like this: "REV: X.X." For example, "REV: 1.0" means the revision of the motherboard is 1.0. Check your motherboard revision before updating motherboard BIOS, drivers, or when looking for...
Manual - Page 4

Table of Contents
GA-B75M-D2V Motherboard Layout 5 GA-B75M-D2V Motherboard Block Diagram 6
Chapter 1 Hardware Installation 7 1-1 Installation Precautions 7 1-2 Product Specifications 8 1-3 Installing the CPU 10 1-4 Installing the Memory 11 1-5 Installing an Expansion Card 11 1-6 Back Panel Connectors 12 1-7 Internal Connectors 13
Chapter 2 BIOS Setup 20 2-1 Startup Screen 20 2-2 The ...
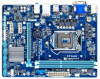
Manual - Page 5

...
DVI VGA
DDR3_1 DDR3_2
KB_MS ATX_12V
LGA1155
R_USB
SYS_FAN ATX
R_USB30
USB_LAN
AUDIO
CPU_FAN BAT
Realtek GbE LAN
PCIEX16
iTE
PCIEX1_1
Super I/O
CODEC
PCIEX1_2
GA-B75M-D2V
Intel® B75
F_USB30
BIOS SATA3 0
F_AUDIO
CLR_CMOS
SATA2 5 4 3 2 1
F_USB2 F_USB1 F_PANEL
Box Contents 55 GA-B75M-D2V motherboard 55 Motherboard driver disk 55 User's Manual
55 Two SATA 6Gb/s cables...
Manual - Page 7

... a motherboard, CPU or memory. If you do not have an ESD wrist strap, keep your hands dry and first touch a metal object to eliminate static electricity. •• Prior to installing the motherboard, please have it on top of an antistatic pad or within an electrostatic shielding container. •• Before unplugging the power supply cable from...
Manual - Page 8

... Extreme Memory Profile (XMP) memory modules
* To support XMP memory, you must install an Intel 22nm (Ivy Bridge) CPU.
(Go to GIGABYTE's website for the latest supported memory speeds and memory modules.) ŠŠ Integrated Graphics Processor: - 1 x D-Sub port - 1 x DVI-D port, supporting a maximum resolution of 1920x1200
* The DVI-D port does not support D-Sub connection by adapter.
Š...
Manual - Page 9

...fan speed control function is supported will depend on the CPU/system cooler you install.
1 x 64 Mbit flash Use of licensed AMI EFI BIOS PnP 1.0a, DMI 2.0, SM BIOS 2.6, ACPI 2.0a Support for @BIOS Support for Q-Flash Support for Xpress Install Support for Easy Tune
* Available functions in EasyTune may differ by motherboard model. Support for Smart Recovery 2 Support for Auto Green Support for ON...
Manual - Page 10

...Features" and "Bundled Software" columns.
1-3 Installing the CPU
Read the following guidelines before you begin to install the CPU: •• Make sure that the motherboard supports the CPU.
(Go to GIGABYTE's website for the latest CPU support list.) •• Always turn off the computer and unplug the power cord from the power outlet before installing the
CPU to prevent hardware damage...
Manual - Page 11

... that memory of the same capacity, brand, speed, and chips be used for optimum performance.
1-5 Installing an Expansion Card
Read the following guidelines before you begin to install an expansion card: •• Make sure the motherboard supports the expansion card. Carefully read the manual that came
with your expansion card. •• Always turn off the computer and unplug the power...
Manual - Page 13

... connectors you wish to connect. •• Before installing the devices, be sure to turn off the devices and your computer. Unplug the power
cord from the power outlet to prevent damage to the devices. •• After installing the device and before turning on the computer, make sure the device cable has been
securely attached to the connector on the motherboard.
- 13 -
Manual - Page 14

... on the motherboard. Before connecting the power connector, first make sure the power supply is turned off and all devices are properly installed. The power connector possesses a foolproof design. Connect the power supply cable to the power connector in the correct orientation. The 12V power connector mainly supplies power to the CPU. If the 12V power connector is not connected, the computer will...
Manual - Page 15

.... For optimum heat dissipation, it is recommended that a system fan be installed inside the chassis.
1 CPU_FAN/SYS_FAN
CPU_FAN/SYS_FAN: Pin No. Definition
1 GND 2 +12V 3 Sense 4 Speed Control
•• Be sure to connect fan cables to the fan headers to prevent your CPU and system from overheating. Overheating may result in damage to the...
Manual - Page 19

... No. Definition BIOS Switche1r (SW4) Power (5V)
2 Power (5V) 3 USB DX4 USB DY5 USB DX+ 6 USB DY+ 7 GND 8 GND 9 No Pin 10 NC
•• Do not plug the IEEE 1394 bracket (2x5-pin) cable into the USB header. •• Prior to installing the USB bracket, be sure to turn off your computer and unplug the power cord
from the power outlet to...
Manual - Page 20

... the power is turned on. To upgrade the BIOS, use either the GIGABYTE Q-Flash or @BIOS utility. •• Q-Flash allows the user to quickly and easily upgrade or back up BIOS without entering the operating system. •• @BIOS is a Windows-based utility that searches and downloads the latest version of BIOS from the Internet
and updates the BIOS.
•• Because BIOS flashing...
Manual - Page 23

... information on CPU/memory frequencies/parameters.
`` Advanced Frequency Settings
&& Processor Graphics Clock Allows you to set the onboard graphics clock. The adjustable range is from 400 MHz to 1600 MHz. (Default: Auto)
&& CPU Clock Ratio Allows you to alter the clock ratio for the installed CPU. The adjustable range is dependent on the CPU being installed.
&& CPU Frequency Displays the current...
Manual - Page 24

... whether to enable multi-threading technology when using an Intel CPU that supports this function. This feature only works for operating systems that support multi-processor mode. Auto lets the BIOS automatically configure this setting. (Default: Auto)
(Note)
This item is present only when you install a CPU that supports this feature. For more information about Intel CPUs' unique features...
Manual - Page 31

... storage devices that support GPT format will be prefixed with "UEFI:" string on the boot device list. To boot from an operating system that supports GPT partitioning, select the device prefixed with "UEFI:" string. Or if you want to install an operating system that supports GPT partitioning such as Windows 7 64-bit, select the optical drive that contains the Windows 7 64-bit installation disk...
Manual - Page 32

&& Hard Drive/CD/DVD ROM Drive/Floppy Drive/Network Device BBS Priorities Specifies the boot order for a specific device type, such as hard drives, optical drives, floppy disk drives, and devices that support Boot from LAN function, etc. Press on this item to enter the submenu that presents the devices of the same type that are connected. This item is present only if at least one device for...
Manual - Page 33

...is configurable only when CSM Support is set to Always.
&& Other PCI Device ROM Priority Allows you to select whether to enable the UEFI or Legacy option ROM for the PCI device controller other than the LAN, storage device, and graphics controllers. Legacy OpROM Enables legacy option ROM only. UEFI OpROM Enables UEFI option ROM only. (Default)
&& Network stack Disables or enables booting...
Manual - Page 35

...: For Windows 7 USB 3.0 Streams support, devices may require UASP class driver updates from UASP driver vendors to be fully compatible with Intel USB 3.0 Streams Support. (Default: Enabled)
&& USB2.0 Controller Enables or disables the integrated USB 2.0/1.1 controller. (Default: Enabled)
&& Audio Controller Enables or disables the onboard audio function. (Default: Enabled) If you wish to install...
Manual - Page 40

... to My Computer, double-click the optical drive and execute the Run.exe program.) After inserting the driver disk, "Xpress Install" will automatically scan your system and then list all the drivers that are recommended to install. You can click the Install All button and "Xpress Install" will install all the recommended drivers. Or click Install Single Items to manually select the drivers you wish...