Lexmark MS417 driver and firmware
Related Lexmark MS417 Manual Pages
Download the free PDF manual for Lexmark MS417 and other Lexmark manuals at ManualOwl.com
User Guide - Page 2
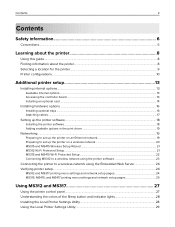
... controller board ...13 Installing an optional card ...14
Installing hardware options...16
Installing optional trays ...16 Attaching cables ...17
Setting up the printer software...18
Installing the printer software...18 Adding available options in the print driver ...19
Networking...19
Preparing to set up the printer on an Ethernet network 19 Preparing to set up the printer on a wireless network...
User Guide - Page 8

... for?
Initial setup instructions:
• Connecting the printer • Installing the printer software
Additional setup and instructions for using the printer:
• Selecting and storing paper and specialty media • Loading paper • Configuring printer settings • Viewing and printing documents and photos • Setting up and using the printer software • Con...
User Guide - Page 9
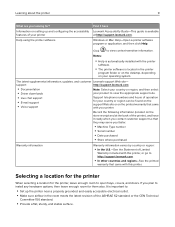
... on setting up and configuring the accessibility Lexmark Accessibility Guide-This guide is available
features of your printer
at http://support.lexmark.com.
Help using the printer software
Windows or Mac Help-Open a printer software program or application, and then click Help.
? Click
to view context‑sensitive information.
Notes:
• Help is automatically installed with...
User Guide - Page 16
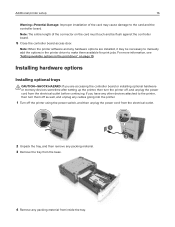
... more information, see "Adding available options in the print driver" on page 19.
Installing hardware options
Installing optional trays
CAUTION-SHOCK HAZARD: If you are accessing the controller board or installing optional hardware or memory devices sometime after setting up the printer, then turn the printer off, and unplug the power cord from the electrical outlet before continuing. If you have...
User Guide - Page 17
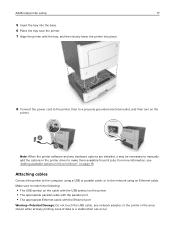
... the printer software and any hardware options are installed, it may be necessary to manually add the options in the printer driver to make them available for print jobs. For more information, see "Adding available options in the print driver" on page 19.
Attaching cables
Connect the printer to the computer using a USB or parallel cable, or to the network using an Ethernet cable. Make...
User Guide - Page 18
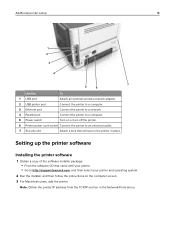
... a copy of the software installer package. • From the software CD that came with your printer. • Go to http://support.lexmark.com, and then select your printer and operating system.
2 Run the installer, and then follow the instructions on the computer screen. 3 For Macintosh users, add the printer.
Note: Obtain the printer IP address from the TCP/IP section in the Network/Ports menu...
User Guide - Page 19

...of hardware options, and then add any installed options. 3 Apply the changes.
Networking
Notes:
• Purchase a MarkNetTM N8352 wireless network adapter before setting up the printer on a wireless
network. For information on the compatible adapter, go to www.lexmark.com.
• A Service Set Identifier (SSID) is a name assigned to a wireless network. Wired Equivalent Privacy (WEP),
Wi-Fi...
User Guide - Page 23
...settings after installation. • Install the printer on additional network computers.
Installing the Wireless Setup Assistant
1 Go to the Lexmark support Web site at http://support.lexmark.com. 2 Download the latest Wireless Setup Assistant application. 3 Double‑click the downloaded software installer package. 4 Follow the instructions on the computer screen.
Launching the Wireless Setup...
User Guide - Page 28
... pattern
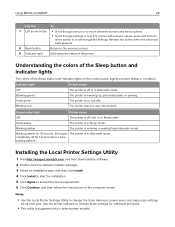
Installing the Local Printer Settings Utility
1 Visit http://support.lexmark.com, and then download the software. 2 Double‑click the software installer package. 3 Select an installation type, and then click Install. 4 Click Install to start the installation. 5 Click Agree to accept the license agreement. 6 Click Continue, and then follow the instructions on the computer screen...
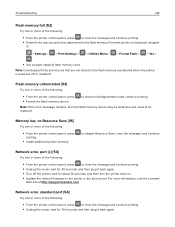
User Guide - Page 110
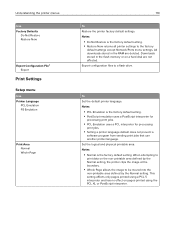
... Restore is the factory default setting. • Restore Now returns all printer settings to the factory
default settings except Network/Ports menu settings. All downloads stored in the RAM are deleted. Downloads stored in the flash memory or on a hard disk are not affected. Export configuration files to a flash drive.
To Set the default printer language. Notes:
• PCL...
User Guide - Page 111
...Edge
To
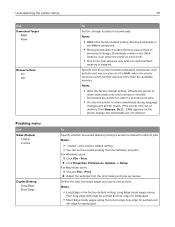
Set the storage location for downloads.
Notes:
• RAM is the factory default setting. Storing downloads in
the RAM is temporary.
• Storing downloads in a flash memory places them in
permanent storage. Downloads remain in the flash memory even when the printer is turned off.
• This menu item appears only when an optional flash
memory is installed.
Specify...
User Guide - Page 113
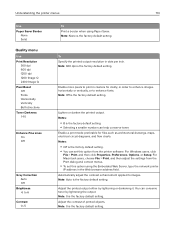
... default setting. • You can set this option from the printer software. For Windows users, click
File > Print, and then click Properties, Preferences, Options, or Setup. For Macintosh users, choose File > Print, and then adjust the settings from the Print dialog and context menus.
• To set this option using the Embedded Web Server, type the network printer
IP address in...
User Guide - Page 117
... assigned.
Display the factory default setting assigned to each tray or feeder.
Restore all tray and feeder assignments to their factory default settings.
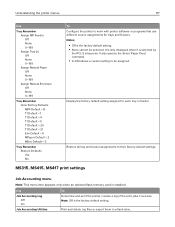
MS315, MS415, MS417 print settings
Job Accounting menu
Note: This menu item appears only when an optional flash memory card is installed.
Use
To
Job Accounting Log Off On
Determine and set if the printer creates...
User Guide - Page 144
... turn the printer back on. • Update the network firmware in the printer or the print server. For more information, visit the Lexmark
Web site at http://support.lexmark.com.
Network error, standard port [54]
Try one or more of the following:
• From the printer control panel, press to clear the message and continue printing. • Unplug the router, wait for...
User Guide - Page 148
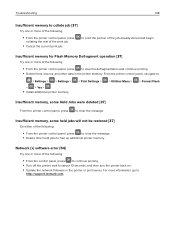
... free up additional printer memory.
Network [x] software error [54]
Try one or more of the following:
• From the control panel, press to continue printing. • Turn off the printer, wait for about 10 seconds, and then turn the printer back on. • Update the network firmware in the printer or print server. For more information, go to
http://support.lexmark.com.
User Guide - Page 149
...
on the printer and computer.
• From the printer control panel, press to continue printing. • Turn off the printer, and then turn it back on.
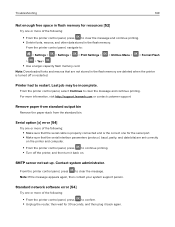
SMTP server not set up. Contact system administrator.
From the printer control panel, press to clear the message. Note: If the message appears again, then contact your system support person.
Standard network software error [54]
Try...
User Guide - Page 150

... the message and continue printing.
Note: The printer discards any data received through the USB port.
• From the printer control panel, set USB Buffer to Auto.
Too many flash options installed [58]
1 Turn off the printer. 2 Unplug the power cord from the electrical outlet. 3 Remove the extra flash memory. 4 Connect the power cord to a properly grounded electrical outlet. 5 Turn...
User Guide - Page 165
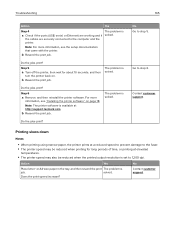
...
Yes
Step 4
a Check if the ports (USB, serial, or Ethernet) are working and if
the cables are securely connected to the computer and the printer.
The problem is solved.
Note: For more information, see the setup documentation that came with the printer.
b Resend the print job.
Do the jobs print?
Step 5
a Turn off the printer, then wait for about 10...
User Guide - Page 201
... latest version. Firmware updates may modify printer settings and cause counterfeit and/or unauthorized products, supplies, parts, materials (such as toners and inks), software, or interfaces to stop working. Authorized use of genuine Lexmark products will not be impacted.
Before you present this product for warranty service, remove all print cartridges, programs, data, and removable storage media...
User Guide - Page 205
... flash memory [51] 143 device and network settings
erasing 72 directory list
printing 58 display troubleshooting
printer display is blank 160 display, printer control panel
adjusting brightness 69 documents, printing
from a computer 54 from a mobile device 56
E
Eco‑Mode setting 64, 66 embedded solutions
erasing 72 Embedded Web Server
accessing 31 accessing the remote control
panel 62...