Samsung SP-H03 driver and firmware
Drivers and firmware downloads for this Samsung item
Related Samsung SP-H03 Manual Pages
Download the free PDF manual for Samsung SP-H03 and other Samsung manuals at ManualOwl.com
User Manual (user Manual) (ver.1.0) (English) - Page 2
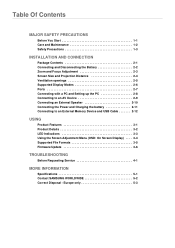
... the Power and Charging the battery 2-11 Connecting to an External Memory Device and USB Cable 2-12
USING
Product Features 3-1 Product Details 3-2 LED Indications 3-3 Using the Screen Adjustment Menu (OSD: On Screen Display) . . . . 3-4 Supported File Formats 3-5 Firmware Update 3-6
TROUBLESHOOTING
Before Requesting Service 4-1
MORE INFORMATION
Specifications 5-1 Contact SAMSUNG WORLDWIDE...
User Manual (user Manual) (ver.1.0) (English) - Page 6
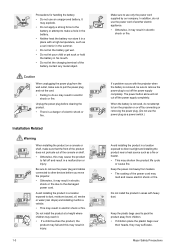
... fall off and result in a malfunction or injury.
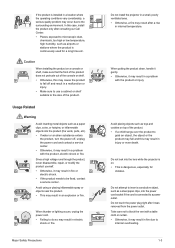
Be sure to remove the power plug and cables connected to other devices before you move the projector.
• Otherwise, it may result in electric shock or fire due to the damaged power cord.
Avoid installing the product in a location
exposed to dust, moisture (sauna), oil, smoke
or...
User Manual (user Manual) (ver.1.0) (English) - Page 7
... may occur due to the
SAMSUNG
surrounding environment. In this case, install
!
the product only after consulting...or shelf suitable to the size of the product.
Do not install the projector in a small, poorly ventilated area.
30
LUMEN
• Otherwise...vents, ports, etc).
• If water or an alien substance enters the product, turn the power off, unplug the power cord and contact a service center...
User Manual (user Manual) (ver.1.0) (English) - Page 10
... from your local Samsung dealer.
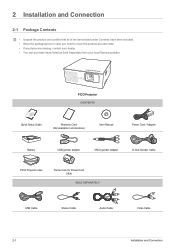
PICO Projector CONTENTS
Quick Setup Guide
Warranty Card (Not available in all locations)
User Manual
Power Cord / Adapter
B
Battery
USB gender adaptor
3RCA gender adaptor
D-Sub Gender Cable
PICO Projector case
Ferrite Core for Power Cord (1EA)
SOLD SEPARATELY
B
USB Cable
Stereo Cable
Audio Cable
Video Cable
2-1
Installation and Connection
User Manual (user Manual) (ver.1.0) (English) - Page 11
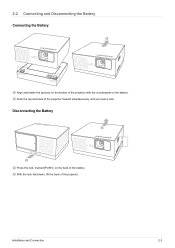
2-2 Connecting and Disconnecting the Battery Connecting the Battery
Align and fasten the grooves on the bottom of the projector with the counterparts on the battery. Push the top and back of the projector forward simultaneously until you hear a click.
Disconnecting the Battery
Press the lock, marked [PUSH], on the back of the battery...
User Manual (user Manual) (ver.1.0) (English) - Page 12
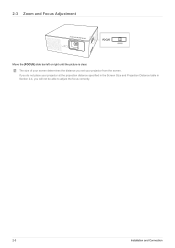
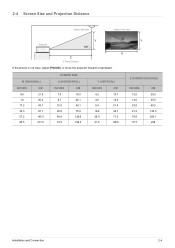
... [FOCUS] slide bar left or right until the picture is clear. The size of your screen determines the distance you set your projector from the screen. If you do not place your projector at the projection distance specified in the Screen Size and Projection Distance table in Section 2-4, you will not be able...
User Manual (user Manual) (ver.1.0) (English) - Page 13
...°
M
Y
X Z
Z: Throw Distance
If the picture is not clear, adjust [FOCUS], or move the projector forward or backward.
M (DIAGONAL)
INCHES
CM
8.6
21.8
10
25.4
17.2
43.7
34.3
87.1
57.2
145.3
85.5
217.2
SCREEN SIZE
X (....7
28.0
71.2
41.9
106.5
Z (THROW DISTANCE)
INCHES 12.0 14.0 23.8 47.4 78.8 117.7
CM 30.5 35.5 60.5 120.5 200.1 299
Installation and Connection
2-4
User Manual (user Manual) (ver.1.0) (English) - Page 14
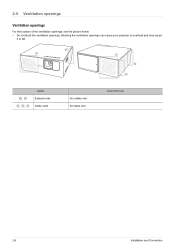
2-5 Ventilation openings
Ventilation openings
For the location of the ventilation openings, see the picture below: • Do not block the ventilation openings. Blocking the ventilation openings can cause your projector to overheat and may cause
it to fail.
, , ,
NAME Exhaust vents Intake vents
Air outtake vent Air intake vent
DESCRIPTION
2-5
Installation and Connection
User Manual (user Manual) (ver.1.0) (English) - Page 15
...
83.5 79.5 74.5
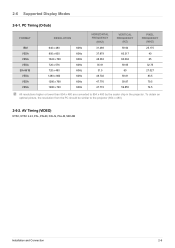
All resolutions higher or lower than 854 x 480 are converted to 854 x 480 by the scaler chip in the projector. To obtain an optimal picture, the resolution from the PC should be similar to the projector (854 x 480).
2-6-2. AV Timing (VIDEO)
NTSC, NTSC 4.43, PAL, PAL60, PAL-N, PAL-M, SECAM
Installation and Connection
2-6
User Manual (user Manual) (ver.1.0) (English) - Page 16
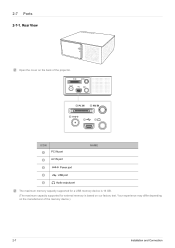
... the cover on the back of the projector.
PC IN
AV IN
ICON
PC IN port
AV IN port
NAME
Power port USB port Audio output port
The maximum memory capacity supported for a USB memory device is 16 GB.
(The maximum capacity supported for external memory is based on our factory test. Your experience may differ depending on the manufacturer of the memory device.)
2-7
Installation and Connection
User Manual (user Manual) (ver.1.0) (English) - Page 17
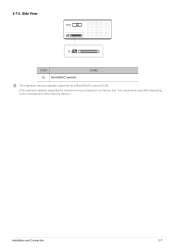
2-7-2. Side View
FOCUS
ICON MicroSD(HC) card slot
NAME
The maximum memory capacity supported for a MicroSD(HC) card is 32 GB.
(The maximum capacity supported for external memory is based on our factory test. Your experience may differ depending on the manufacturer of the memory device.)
Installation and Connection
2-7
User Manual (user Manual) (ver.1.0) (English) - Page 18
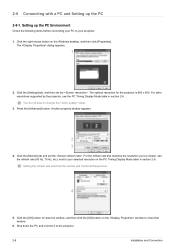
... the right mouse button on the Windows desktop, and then click [Properties]. The dialog appears.
1
2. Click the [Settings] tab, and then set the . The optimal resolution for the projector is 800 x 600. For other resolutions supported by the projector, see the PC Timing Display Mode table in section 2-6.
You do not have to change the setup. 3. Press the [Advanced] button. Another...
User Manual (user Manual) (ver.1.0) (English) - Page 19
....
• Projected images may differ from the images on your monitor depending on the monitor manufacturer or Windows version.
• When connecting the projector to a PC, make sure that the PC setup complies with the display settings supported by this projector. If it does not, you may have signal problems.
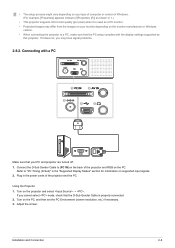
2-8-2. Connecting with a PC
PC IN
AV IN
RGB...
User Manual (user Manual) (ver.1.0) (English) - Page 20
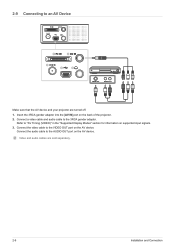
... of the projector. 2. Connect a video cable and audio cable to the 3RCA gender adaptor.
Refer to "AV Timing (VIDEO)" in the "Supported Display Modes" section for information on supported input signals. 3. Connect the video cable to the VIDEO OUT port on the AV device.
Connect the audio cable to the AUDIO OUT port on the AV device.
Video and audio cables are sold separately.
2-9
Installation and...
User Manual (user Manual) (ver.1.0) (English) - Page 21
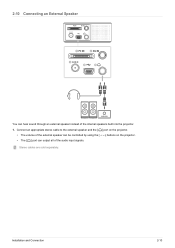
... of the internal speakers built into the projector. 1. Connect an appropriate stereo cable to the external speaker and the [ ] port on the projector.
• The volume of the external speaker can be controlled by using the [ ] buttons on the projector. • The [ ] port can output all of the audio input signals.
Stereo cables are sold separately.
Installation and Connection
2-10
User Manual (user Manual) (ver.1.0) (English) - Page 24
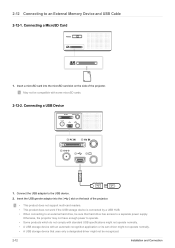
... USB adapter to the USB device. 2. Insert the USB gender adaptor into the [ ] slot on the back of the projector.
• This product does not support multi-card readers. • This product does not work if the USB storage device is connected by a USB HUB. • When connecting to an external hard drive, be sure that hard drive has access to a separate power supply.
Otherwise, the projector...
User Manual (user Manual) (ver.1.0) (English) - Page 25
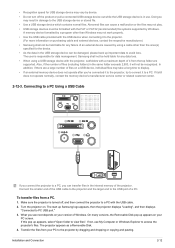
... USB cable. 2. Turn the projector on. The start up Samsung logo appears, then the projector displays "Loading", and then displays
"Connected to PC USB port." 3. What you see next depends on your version of Windows. On many versions, the Removable Disk pop up appears on your
PC screen. If this pop up appears, select "Open folder to view files". If not, use My Computer or Windows...
User Manual (user Manual) (ver.1.0) (English) - Page 26

... result in loss of data or damage to the projector. • The connection will not end if you have projector files open on the PC. Close all projector files and try again. • Other versions of Windows operate similarly. Follow the correct procedure for removing a USB device from your PC safely for your version of Windows.
2-12
Installation and Connection
User Manual (user Manual) (ver.1.0) (English) - Page 47
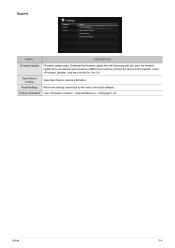
Support
Settings
Category General Support
Option Firmware Update Open Source License Reset Settings Product Information
MENU
DESCRIPTION
Firmware Update
Firmware update steps: Download the firmware update from the Samsung web site, save the firmware update file to an external memory device (USB memory device), connect the device to the projector, select , and then run the file. See 3-6.
...
User Manual (user Manual) (ver.1.0) (English) - Page 49
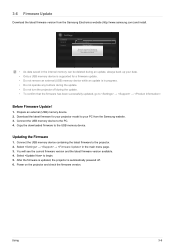
3-6 Firmware Update
Download the latest firmware version from the Samsung Electronics website (http://www.samsung.com) and install.
Settings
Category General Support
Option Firmware Update
Open SoFiurmrcweaLreicUepndsaete
Reset Settings Please, do not turn off the power. PThroe dpuoawcftteerrInwufpioldlrabmteeaoistfiffoiannuisthoemda.tically
• As data saved in the internal memory can be ...