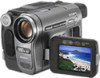
Sony DCR-TRV280 - Digital8 Handycam Camcorder driver and firmware
Related Sony DCR-TRV280 Manual Pages
Download the free PDF manual for Sony DCR-TRV280 and other Sony manuals at ManualOwl.com
Camera Operations Guide - Page 3

... of your camcorder.
Notes on using this manual
• The images of the LCD screen and the viewfinder
used on this manual are captured using a digital still
camera, and thus may appear different from what
you see.
• In this instruction manual, each model is indicated as
follows.
CCD-TRV138:
TRV138
CCD-TRV338:
TRV338
DCR-TRV280: TRV280
Instructions with no specific...
Camera Operations Guide - Page 4

• The illustrations used on this manual are based on the model DCR-TRV280.
• The screens shown in this manual are from a Windows XP computer. The screens may vary depending on the OS.
Notes on using the camcorder • Hold your camcorder correctly.
• Turn the SEL/PUSH EXEC dial to select desired item, then press the dial...
Camera Operations Guide - Page 7

... to another tape 61 Dubbing a tape easily - Easy Dubbing
( TRV138/338 62 Recording pictures from a VCR
( TRV280 66 Dubbing selected scenes from a tape
- Digital program editing ( TRV280 67
Using with your computer
Features ( TRV280 72 Installing the software and "First Step
Guide" on a computer ( TRV280 74 Using "First Step Guide" ( TRV280 78 Creating a DVD (Direct Access to "Click to DVD...
Camera Operations Guide - Page 8

... Start Guide
Recording movies
1 Attach the charged battery pack to the camcorder.
To charge the battery, see page 12.
a Lift up the viewfinder.
b Slide the battery pack in the direction of the arrow until it clicks.
2 Insert a cassette into the camcorder.
a Slide the OPEN/ b Insert the cassette with c Press
.
EJECT lever in the
its window...
Camera Operations Guide - Page 12

... by attaching the "InfoLITHIUM" battery pack (M series) to your camcorder.
b Notes • You cannot use batteries other than the
... from the wall outlet immediately if any malfunction occurs. • Do not install the appliance in a confined space, such as a bookcase or build-in ... arrow until it clicks.
DC IN jack
Battery pack DC plug
Power cord To the wall outlet
AC Adaptor
3 With the v mark...
Camera Operations Guide - Page 19

2 Insert a cassette with its window-side
facing up.
Window-side
Step 7: Setting the screen language
You can select the language to be used on...
POWER switch
1 Turn on your camcorder.
2 Press OPEN to open the LCD panel.
3 Press MENU.
MANUAL SET PROGRAM AE P EFFECT AUTO SHTR
STBY
[MENU] : END
4 Turn the SEL/PUSH EXEC dial to
select (SETUP MENU), then press the dial.
SETUP MENU CLOCK SET USB ...
Camera Operations Guide - Page 28

...
1 Press EXPOSURE in CAMERA mode.
The exposure indicator appears on the screen.
2 Turn the SEL/PUSH EXEC dial to
adjust the brightness.
Set the NIGHTSHOT PLUS switch to ON. and ["NIGHTSHOT PLUS"] appear.
To cancel NightShot plus, set the NIGHTSHOT PLUS switch to OFF.
While exposure is set to manual mode, is displayed in the left...
Camera Operations Guide - Page 72

... your camcorder to your computer.
Software and features available for Macintosh computers differ from those available for Windows computers. For details, refer to chapter 6 of "First Step Guide" on CD-ROM. For "First Step Guide," see the next section.
z Tip • There are 2 ways to connect your camcorder to
a computer. - USB cable
This method is good for copying video and sound recorded on...
Camera Operations Guide - Page 73

..." is an instruction manual you can refer to on your computer. This "First Step Guide" describes basic operations, from initial hookup of your camcorder and computer and making settings, to general operation the first time you use the software stored on the CD-ROM (supplied). After installing the CD-ROM, reading "Installing the software and "First Step Guide" on a computer ( TRV280)" (p. 74), start...
Camera Operations Guide - Page 74

...; Other: Disc drive
Installing the software and "First Step Guide" on a computer
( TRV280)
You need to install the software etc., with the supplied CD-ROM on your computer before connecting your camcorder and your computer. Once you install it, the installation is not required thereafter. The software to be used varies depending on the OS system you are using. Windows computer: Picture Package...
Camera Operations Guide - Page 75

... [Next].
8 Select where to save the software, then
click [Next].
Depending on the operating system on the computer, a message appears notifying you that "First Step Guide" cannot be installed automatically with the InstallShield Wizard. In such a case, manually copy "First Step Guide" to your computer according to the message instructions.
Using with your computer
,continued
Using with your...
Camera Operations Guide - Page 77

... the desktop.
15Remove the CD-ROM from the disc
drive of your computer.
If you have any questions about Picture Package
Contact information is listed on page 78.
Installing on a Macintosh computer
7 Double-click [IMXINST.SIT] in the
folder it was copied to.
8 Double-click the unzipped
[ImageMixerVCD2_Install].
9 When the user acceptance screen is
displayed, enter your name and password...
Camera Operations Guide - Page 78

... [First Step Guide].
Starting up on a Macintosh computer
Double-click "FirstStepGuide.pdf."
z Tip • To view the PDF, Adobe Reader is needed. If it is
not installed on your computer, you can download it from the Adobe Systems web page: http://www.adobe.com/
For inquires about this software
Pixela User Support Center Pixela Home Page Windows: http://www...
Camera Operations Guide - Page 79

... connect your camcorder to a Sony VAIO series computer* that supports "Click to DVD" via an i.LINK cable (optional). The picture is automatically copied and written to a DVD.
* Note that you need a Sony VAIO computer equipped with a DVD drive that can be used to write DVDs. You also need the computer with "Click to DVD Ver.1.2" (Sony original software) or later installed.
The following...
Camera Operations Guide - Page 87

... on the computer.
cDisconnect the cable from the computer, turn on the camcorder, then connect it again.
cSlide the POWER switch to select the CAMERA mode, set [USB STREAM] to [ON] in the (SETUP MENU). (p. 55) (Only when connecting to the Windows computer with a USB cable)
For TRV280: You cannot view the pictures recorded on a tape on the computer.
cDisconnect the cable from the computer, turn...
Camera Operations Guide - Page 88

...; [USB Device] in the [Other devices] folder • [USB Composite Device] in the [Universal Serial Bus
Controller] folder
5 When the [Confirm Device Removal] screen appears,
click [OK].
6 Turn off the power of your camcorder, disconnect the
USB cable, then restart the computer.
7 Place the CD-ROM in the disc drive of your computer.
8 Follow the steps below and try to install the USB driver
again...
Camera Operations Guide - Page 89

...USB Composite Device] in the [Universal Serial Bus
Controller] folder • [USB Audio Device] in the [Sound, video and game
controller] folder • [Composite USB Device] in the [Other devices] folder
7 When the [Confirm Device Removal] screen appears,
click [OK].
8 Turn off the power of your camcorder, disconnect the
USB cable, then restart the computer.
9 Place the CD-ROM in the disc drive...
Camera Operations Guide - Page 90

...; [USB Composite Device] in the [Universal Serial Bus
Controller] folder • [USB Audio Device] in the [Sound, video and game
controllers] folder • [USB Device] in the [Other devices] folder
8 When the [Confirm Device Removal] screen appears,
click [OK].
9 Turn off the power of your camcorder, disconnect the
USB cable, then restart the computer.
10 Place the CD-ROM in the disc drive of...
Camera Operations Guide - Page 98

... (DV Interface) compatible device made by Sony (e.g. a VAIO series personal computer) as well as to video device. Before connecting this unit to your computer, make sure that application software supported by this unit is already installed on your computer. Some i.LINK compatible video device such as Digital Televisions, DVD recorders/players, and MICROMV recorders/players are not compatible with...
Marketing Specifications - Page 2

... system
Power Adapter/In-Camera Charger (AC-L15)
InfoLITHIUM® Rechargeable Battery (NPFM30)
Fader Effect(s): Black, Monotone, Mosaic, White
Video
AV Cable USB Cable Lens Cap
Video Recording System: 2 Rotary Heads, Helical Scanning System
Video Signal System: NTSC color, EIA standards
Analog-to-Digital Converter: N/A
Inputs and Outputs
Shoulder Strap CD-ROM with USB Driver (PicturePackage...