ASRock B75M R2.0 driver and firmware
Related ASRock B75M R2.0 Manual Pages
Download the free PDF manual for ASRock B75M R2.0 and other ASRock manuals at ManualOwl.com
User Manual - Page 3

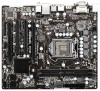
...and CPU fan 18 2.5 Installation of Memory Modules (DIMM 19 2.6 Expansion Slots (PCI and PCI Express Slots 20 2.7 CrossFireXTM and Quad CrossFireXTM Operation Guide. 21 2.8 Dual Monitor and Surround Display Features 25 2.9 ASRock Smart Remote Installation Guide 29 2.10 Jumpers Setup 30 2.11 Onboard Headers and Connectors 31 2.12 Serial ATA (SATA) / Serial ATA2 (SATA2) Hard Disks
Installation...
User Manual - Page 4

... 57 3.4.7 Super IO Configuration 58 3.4.8 ACPI Configuration 59 3.4.9 USB Configuration 60 3.4.10 Network Configuration 61 3.5 Hardware Health Event Monitoring Screen 62 3.6 Boot Screen 64 3.7 Security Screen 65 3.8 Exit Screen 66
4 Software Support 67
4.1 Install Operating System 67 4.2 Support CD Information 67
4.2.1 Running Support CD 67 4.2.2 Drivers Menu 67 4.2.3 Utilities...
User Manual - Page 5

....3 cm)
ASRock B75M R2.0 Quick Installation Guide ASRock B75M R2.0 Support CD 2 x Serial ATA (SATA) Data Cables (Optional) 1 x I/O Panel Shield
ASRock Reminds You... To get better performance in Windows® 7 / 7 64-bit / VistaTM / VistaTM 64bit, it is recommended to set the BIOS option in Storage Configuration to AHCI mode. For the BIOS setup, please refer to the "User Manual" in our support CD...
User Manual - Page 9

... can use ASRock XFast RAM to utilize the memory that Windows® cannot use.
5. Only PCIE1 slot supports Gen 3 speed. To run the PCI Express in Gen 3 speed, please install an Ivy Bridge CPU. If you install a Sandy Bridge CPU, the PCI Express will run only at PCI Express Gen 2 speed.
6. The maximum shared memory size is defined by the chipset vendor and is...
User Manual - Page 10

... Flash ROM. This convenient BIOS update tool allows you to update system BIOS without entering operating systems first like MS-DOS or Windows®. With this utility, you can press the key during the POST or the key to enter into the BIOS setup menu to access ASRock Instant Flash. Just launch this tool and save the new BIOS file to your USB flash drive...
User Manual - Page 11

... their lifespan.
16. ASRock Crashless BIOS allows users to update their BIOS without fear of failing. If power loss occurs during the BIOS update process, ASRock Crashless BIOS will automatically finish the BIOS update procedure after regaining power. Please note that BIOS files need to be placed in the root directory of your USB disk. Only USB2.0 ports support this feature.
17. Administrators...
User Manual - Page 21

...XP with Service Pack 2 / VistaTM / 7 OS. Quad CrossFireXTM is supported by Windows® VistaTM / 7 OS only. Please check AMD's website for AMD CrossFireXTM driver updates.
1. If a customer incorrectly configures their system they will not see the performance benefits of CrossFireXTM. All three CrossFireXTM components, a CrossFireXTM Ready graphics card, a CrossFireXTM Ready motherboard and...
User Manual - Page 23

... You must have Microsoft .NET Framework installed prior to downloading and installing the CATALYST Control Center. Please check Microsoft's website for details. For Windows® 7 / VistaTM OS: Install the CATALYST Control Center. Please check AMD's website for details. Restart your computer. Install the VGA card drivers to your system, and restart your computer. You will find "AMD Catalyst...
User Manual - Page 26

... adjust the UEFI setup, the default value of "Share Memory", [Auto], will disable D-Sub function when an add-on VGA card is inserted to this motherboard.
4. Install the onboard VGA driver and the add-on PCI Express VGA card driver to your system. If you have installed the drivers already, there is no need to install them again.
5. Set up a multi-monitor display.
For Windows® XP / XP...
User Manual - Page 28

...Press or to enter BIOS Setup Utility. Make sure the option "CIR Controller" is setting at [Enabled]. (Advanced -> Super IO Configuration -> CIR Controller -> [Enabled])
If you cannot find this option, please shut down your system and install Multi-Angle CIR Receiver to the other front USB port then try again.
Step5. Enter Windows. Execute ASRock support CD and install CIR Driver. (It is listed...
User Manual - Page 40

... want to install Windows® XP / XP 64-bit OS on your SATA / SATA2 / SATA3 HDDs without RAID functions, please follow the steps below.
AHCI mode is not supported under Windows® XP / XP 64-bit.
Using SATA / SATA2 / SATA3 HDDs without NCQ function STEP 1: Set Up UEFI. A. Enter UEFI SETUP UTILITY Advanced screen Storage Configuration. B. Set the option "SATA Mode Selection...
User Manual - Page 42
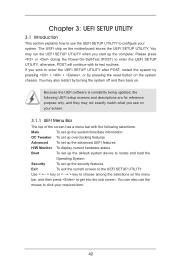
...Because the UEFI software is constantly being updated, the following UEFI setup screens and ...set up overclocking features
Advanced To set up the advanced UEFI features
H/W Monitor To display current hardware status
Boot
To set up the default system device to locate and load the
Operating System
Security
To set up the security features
Exit
To exit the current screen or the UEFI SETUP...
User Manual - Page 49

..., USB Configuration and Network Configuration.
Setting wrong values in this section may cause the system to malfunction.
Instant Flash Instant Flash is a UEFI flash utility embedded in Flash ROM. This convenient UEFI update tool allows you to update system UEFI without entering operating systems first like MS-DOS or Windows®. Just save the new UEFI file to your USB flash drive, floppy disk or...
User Manual - Page 67

... CD-ROM drive. The CD automatically displays the Main Menu if "AUTORUN" is enabled in your computer. If the Main Menu does not appear automatically, locate and double click on the file "ASRSETUP.EXE" in the Support CD to display the menu. 4.2.2 Drivers Menu The Drivers Menu shows the available device's drivers if the system detects installed devices. Please install the necessary drivers to...
Quick Installation Guide - Page 4

... 8.4-in, 24.4 cm x 21.3 cm)
ASRock B75M R2.0 Quick Installation Guide ASRock B75M R2.0 Support CD 2 x Serial ATA (SATA) Data Cables (Optional) 1 x I/O Panel Shield
ASRock Reminds You... To get better performance in Windows® 7 / 7 64-bit / VistaTM / VistaTM 64bit, it is recommended to set the BIOS option in Storage Configuration to AHCI mode. For the BIOS setup, please refer to the "User...
Quick Installation Guide - Page 8

.... To run the PCI Express in Gen 3 speed, please install an Ivy Bridge CPU. If you install a Sandy Bridge CPU, the PCI Express will run only at PCI Express Gen 2 speed.
6. The maximum shared memory size is defined by the chipset vendor and is subject to change. Please check Intel® website for the latest information.
English
8 ASRock B75M R2.0 Motherboard
Quick Installation Guide - Page 9

... you to quickly charge many Apple devices simultaneously and even supports continuous charging when your PC enters into Standby mode (S1), Suspend to RAM (S3), hibernation mode (S4) or power off (S5). With APP Charger driver installed, you can easily enjoy the marvelous charging experience. ASRock website: http://www.asrock.com/Feature/AppCharger/index.asp
9 ASRock B75M R2.0 Motherboard
English
Quick Installation Guide - Page 18

... CrossFireXTM feature. For other CrossFireXTM cards that AMD has released or will release in the future, please refer to AMD graphics card manuals for detailed installation guide.
Step 1.
Insert one Radeon graphics card into PCIE1 slot and the other Radeon graphics card to PCIE2 slot. Make sure that the cards are properly seated on the slots.
English
18 ASRock B75M R2.0 Motherboard
Quick Installation Guide - Page 20
.... Install the VGA card drivers to your system, and restart your computer. You will find "AMD Catalyst Control Center" on your Windows® taskbar.
AMD Catalyst Control Center
Step 6.
Double-click "ATI Catalyst Control Center". Click "View", select "CrossFireXTM", and then check the item "Enable CrossFireXTM". Select "2 GPUs" and click "Apply".
English
20 ASRock B75M R2.0 Motherboard
Quick Installation Guide - Page 23
... adjust the UEFI setup, the default value of "Share Memory", [Auto], will disable D-Sub function when an add-on VGA card is inserted to this motherboard.
4. Install the onboard VGA driver and the add-on PCI Express VGA card driver to your system. If you have installed the drivers already, there is no need to install them again.
5. Set up a multi-monitor display.
For Windows® XP / XP...