ASRock Fatal1ty Z97M Killer driver and firmware
Drivers and firmware downloads for this ASRock item

Related ASRock Fatal1ty Z97M Killer Manual Pages
Download the free PDF manual for ASRock Fatal1ty Z97M Killer and other ASRock manuals at ManualOwl.com
User Manual - Page 6

... Panel
9
Chapter 2 Installation
11
2.1 Installing the CPU
12
2.2 Installing the CPU Fan and Heatsink
15
2.3 Installing Memory Modules (DIMM)
16
2.4 Expansion Slots (PCI Express Slots)
18
2.5 Jumpers Setup
19
2.6 Onboard Headers and Connectors
20
2.7 SLITM and Quad SLITM Operation Guide
25
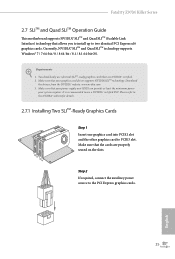
2.7.1 Installing Two SLITM-Ready Graphics Cards
25
2.7.2 Driver Installation and Setup
27...
User Manual - Page 33
Fatal1ty Z97M Killer Series
2.7 SLITM and Quad SLITM Operation Guide
his motherboard supports NVIDIA® SLITM and Quad SLITM (Scalable Link Interface) technology that allows you to install up to two identical PCI Express x16 graphics cards. Currently, NVIDIA® SLITM and Quad SLITM technology supports Windows® 7 / 7 64-bit / 8 / 8 64-bit / 8.1 / 8.1 64-bit OS.
Requirements 1. You should...
User Manual - Page 35
Fatal1ty Z97M Killer Series
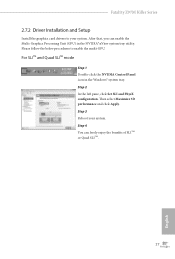
2.7.2 Driver Installation and Setup
Install the graphics card drivers to your system. Ater that, you can enable the Multi-Graphics Processing Unit (GPU) in the NVIDIA® nView system tray utility. Please follow the below procedures to enable the multi-GPU.
For SLITM and Quad SLITM mode
Step 1 Double-click the NVIDIA Control Panel icon in the...
User Manual - Page 36
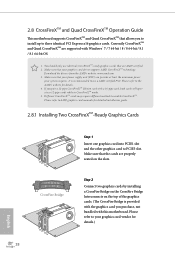
... you to install up to three identical PCI Express x16 graphics cards. Currently CrossFireXTM and Quad CrossFireXTM are supported with Windows® 7 / 7 64-bit / 8 / 8 64-bit / 8.1 / 8.1 64-bit OS.
1. You should only use identical CrossFireXTM-ready graphics cards that are AMD certiied. 2. Make sure that your graphics card driver supports AMD CrossFireXTM technology.
Download the drivers from the...
User Manual - Page 38
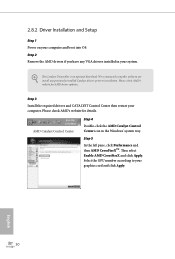
...Step 1 Power on your computer and boot into OS. Step 2 Remove the AMD drivers if you have any VGA drivers installed in your system.
he Catalyst Uninstaller is an optional download. We recommend using this utility to uninstall any previously installed Catalyst drivers prior to installation. Please check AMD's website for AMD driver updates.
Step 3
Install the required drivers and CATALYST Control...
User Manual - Page 42
Chapter 3 Software and Utilities Operation
3.1 Installing Drivers
he Support CD that comes with the motherboard contains necessary drivers and useful utilities that enhance the motherboard's features.
Running The Support CD
To begin using the support CD, insert the CD into your CD-ROM drive. he CD automatically displays the Main Menu if "AUTORUN" is enabled in your computer. If the Main Menu does ...
User Manual - Page 43
Fatal1ty Z97M Killer Series
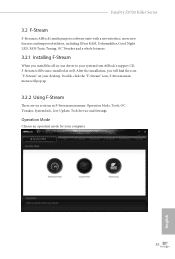
3.2 F-Stream
F-Stream is ASRock's multi purpose sotware suite with a new interface, more new features and improved utilities, including XFast RAM, Dehumidiier, Good Night LED, FAN-Tastic Tuning, OC Tweaker and a whole lot more.
3.2.1 Installing F-Stream
When you install the all-in-one driver to your system from ASRock's support CD, F-Stream will be auto-installed as ...
User Manual - Page 49
Fatal1ty Z97M Killer Series
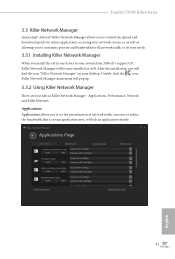
3.3 Killer Network Manager
Qualcomm® Atheros® Killer Network Manager allows you to control the upload and download speeds for online applications accessing your network resources, as well as allowing you to customize priority and bandwidth for all network traic to it your needs.
3.3.1 Installing Killer Network Manager
When you install the all-in-one driver to ...
User Manual - Page 53
Fatal1ty Z97M Killer Series
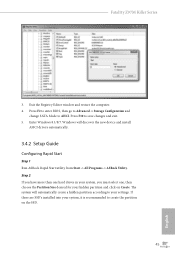
3. Exit the Registry Editor window and restart the computer. 4. Press F2 to enter BIOS, then go to Advanced ‐> Storage Coniguration and
change SATA Mode to AHCI. Press F10 to save changes and exit. 5. Enter Windows 8.1/8/7. Windows will discover the new device and install
AHCI drivers automatically.
3.4.2 Setup Guide
Coniguring Rapid Start
Step 1 Run ASRock Rapid ...
User Manual - Page 60

Step 6
Double-click the Intel® Smart Connect Technology Manager icon Windows system tray.
in the
Step 7
Drag the slider to conigure how oten the system will connect to the network to download updates. Shorter durations will provide more frequent updates, but may cause more power consumption.
Using Smart Connect
1. Keep the applications which you wish to...
User Manual - Page 64
... and control the remote host installed with the Orbweb.ME Professional host sotware.
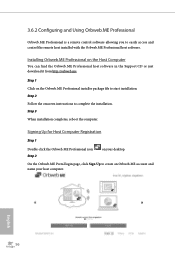
Installing Orbweb.ME Professional on the Host Computer
You can find the Orbweb.ME Professional host software in the Support CD or just download it from http://orbweb.me.
Step 1 Click on the Orbweb.ME Professional installer package ile to start installation. Step 2 Follow the onscreen instructions to...
User Manual - Page 69
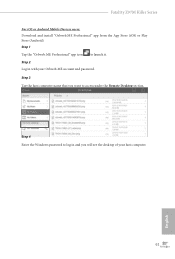
... iOS or Android Mobile Devices users: Download and install "Orbweb.ME Professional" app from the App Store (iOS) or Play Store (Android). Step 1 Tap the "Orbweb.ME Professional" app icon to launch it. Step 2 Log in with your Orbweb.ME account and password. Step 3 Tap the host computer name that you want to access under the Remote Desktop section.
Step 4 Enter the Windows password...
User Manual - Page 76
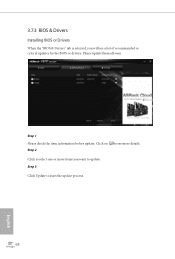
3.7.3 BIOS & Drivers
Installing BIOS or Drivers
When the "BIOS & Drivers" tab is selected, you will see a list of recommended or critical updates for the BIOS or drivers. Please update them all soon.
Step 1 Please check the item information before update. Click on Step 2
to see more details.
Click to select one or more items you want to update. Step 3
Click Update to start the update process...
User Manual - Page 111
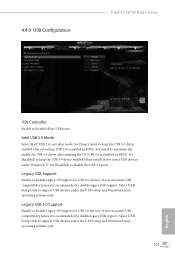
...3.0 controller mode. Set [Smart Auto] to keep the USB 3.0 driver enabled ater rebooting (USB 3.0 is enabled in BIOS). Set [Auto] to automatically enable the USB 3.0 driver ater entering the OS (USB 3.0 is disabled in BIOS). Set [Enabled] to keep the USB 3.0 driver enabled (Must install driver to use USB devices under Windows® 7). Set [Disabled] to disable the USB 3.0 ports.
Legacy USB Support...
User Manual - Page 115
Fatal1ty Z97M Killer Series
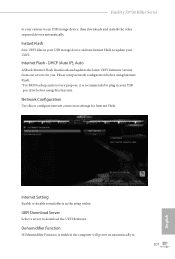
to your system via an USB storage device, then downloads and installs the other required drivers automatically.
Instant Flash
Save UEFI iles in your USB storage device and run Instant Flash to update your UEFI.
Internet Flash - DHCP (Auto IP), Auto
ASRock Internet Flash downloads and updates the latest UEFI irmware version from our servers for you. Please setup network ...
RAID Installation Guide - Page 7
... and set the option SATA Mode Selection to [RAID]. Press key to save your change before you exit BIOS setup. STEP 2: Use ASRock Easy RAID Installer Easy RAID Installer can copy the RAID driver from a support CD to your USB storage device with just one simple click in UEFI setup. Please note that this feature is not available for all models. A. Plug in your USB lash drive into a USB port. B. Enter...
RAID Installation Guide - Page 18
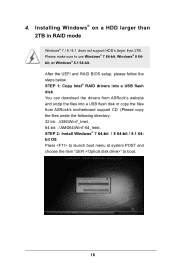
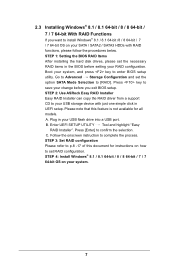
4. Installing Windows® on a HDD larger than 2TB in RAID mode
Windows® 7 / 8 / 8.1 does not support HDD's larger than 2TB. Please make sure to use Windows® 7 64-bit, Windows® 8 64bit, or Windows® 8.1 64-bit. After the UEFI and RAID BIOS setup, please follow the steps below. STEP 1: Copy Intel® RAID drivers into a USB lash disk You can download the drivers from ASRock's...
RAID Installation Guide - Page 19

Start Windows® Installation. When you see "Where do you want to install Windows?" page, please click "Load Driver".
Plug the USB flash disk into your USB port; select "Browse" to find the RAID driver. Then choose the directory you have copied in the irst step.
Please keep the USB flash disk installed until the system's first reboot. Continue to install the OS by following the instructions.
19
RAID Installation Guide - Page 20

.... Disk volume > 2TB), it may take more time to boot into Windows® or install driver/utilities. If you encounter this problem, you will need to follow the instructions below to ix this problem. Windows® 7 64-bit / 8 64-bit / 8.1 64-bit: A. Please request the hotix KB2505454 through this link:
http://support.microsoft.com/kb/2505454/ B. After installing Windows...
Intel Rapid Storage Guide - Page 12
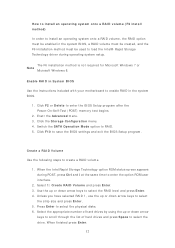
...load t he I nt el® Rapid St orage Technology driver during operat ing syst em set up.
The F6 inst allat ion m et hod is not required for Microsoft Windows 7 or Note
Microsoft Windows...er t he BI OS Set up program aft er t he Power- On- Self- Test ( POST) m em ory t est begins.
2. Enet r t he Adva nce d m enu. 3. Click t he St or a ge Con figu r a t ion m enu. 4. Swit ch t he SATA Ope r a t ion ...