ASRock H81M-VG4 R3.0 driver and firmware

Related ASRock H81M-VG4 R3.0 Manual Pages
Download the free PDF manual for ASRock H81M-VG4 R3.0 and other ASRock manuals at ManualOwl.com
User Manual - Page 4
...
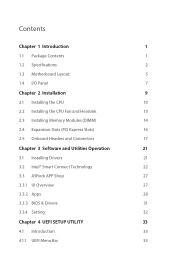
13
2.3 Installing Memory Modules (DIMM)
14
2.4 Expansion Slots (PCI Express Slots)
16
2.5 Onboard Headers and Connectors
17
Chapter 3 Software and Utilities Operation
21
3.1 Installing Drivers
21
3.2 Intel® Smart Connect Technology
22
3.3 ASRock APP Shop
27
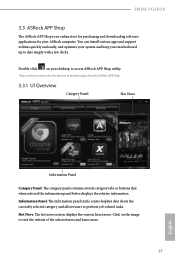
3.3.1 UI Overview
27
3.3.2 Apps
28
3.3.3 BIOS & Drivers
31
3.3.4 Setting
32
Chapter 4 UEFI SETUP UTILITY
33...
User Manual - Page 6
.... You may find the latest VGA cards and CPU support list on ASRock's website as well. ASRock website http://www.asrock.com.
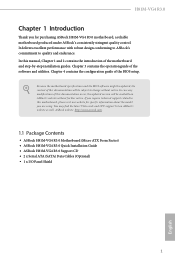
1.1 Package Contents
• ASRock H81M-VG4 R3.0 Motherboard (Micro ATX Form Factor) • ASRock H81M-VG4 R3.0 Quick Installation Guide • ASRock H81M-VG4 R3.0 Support CD • 2 x Serial ATA (SATA) Data Cables (Optional) • 1 x I/O Panel Shield
1
English
User Manual - Page 7
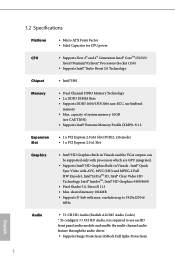
... 11.1 • Max. shared memory 1024MB • Supports D-Sub with max. resolution up to 1920x1200 @
60Hz
Audio
• 7.1 CH HD Audio (Realtek ALC887 Audio Codec) * To configure 7.1 CH HD Audio, it is required to use an HD front panel audio module and enable the multi-channel audio feature through the audio driver. • Supports Surge Protection (ASRock Full Spike Protection)
English
2
User Manual - Page 9
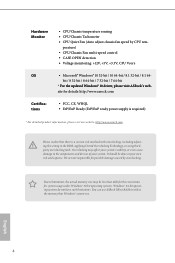
...; FCC, CE, WHQL • ErP/EuP Ready (ErP/EuP ready power supply is required)
* For detailed product information, please visit our website: http://www.asrock.com
Please realize that there is a certain risk involved with overclocking, including adjusting the setting in the BIOS, applying Untied Overclocking Technology, or using thirdparty overclocking tools. Overclocking may...
User Manual - Page 13
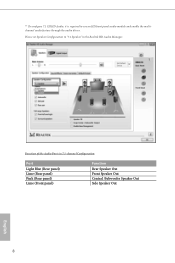
... is required to use an HD front panel audio module and enable the multichannel audio feature through the audio driver.
Please set Speaker Configuration to "7.1 Speaker"in the Realtek HD Audio Manager.
Function of the Audio Ports in 7.1-channel Configuration:
Port
Light Blue (Rear panel) Lime (Rear panel) Pink (Rear panel) Lime (Front panel)
Function
Rear Speaker Out Front...
User Manual - Page 14
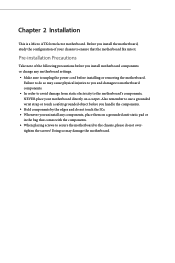
... ATX form factor motherboard. Before you install the motherboard, study the configuration of your chassis to ensure that the motherboard fits into it.
Pre-installation Precautions
Take note of the following precautions before you install motherboard components or change any motherboard settings. • Make sure to unplug the power cord before installing or removing the motherboard.
Failure to do...
User Manual - Page 15
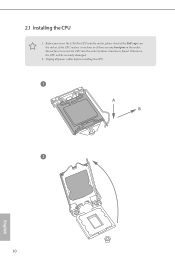
2.1 Installing the CPU
1. Before you insert the 1150-Pin CPU into the socket, please check if the PnP cap is on the socket, if the CPU surface is unclean, or if there are any bent pins in the socket. Do not force to insert the CPU into the socket if above situation is found. Otherwise, the CPU will be seriously damaged.
2. Unplug all power cables before installing the CPU.
1 A B
2
10
English
User Manual - Page 26
H81M-VG4 R3.0
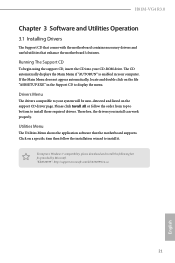
Chapter 3 Software and Utilities Operation
3.1 Installing Drivers
The Support CD that comes with the motherboard contains necessary drivers and useful utilities that enhance the motherboard's features.
Running The Support CD
To begin using the support CD, insert the CD into your CD-ROM drive. The CD automatically displays the Main Menu if "AUTORUN" is enabled in your computer. If the...
User Manual - Page 27
...computer from Windows® sleep state to refresh email or social networking applications. It saves your waiting time and keeps the content always up-to-date.
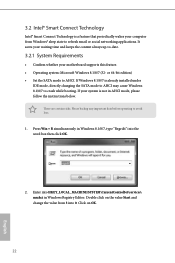
3.2.1 System Requirements
• Confirm whether your motherboard supports this feature. • Operating system: Microsoft Windows 8.1/8/7 (32- or 64-bit edition) • Set the SATA mode to AHCI. If Windows 8.1/8/7 is already installed...
User Manual - Page 28
H81M-VG4 R3.0
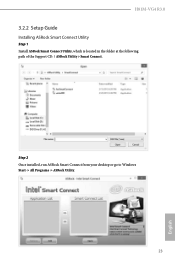
3.2.2 Setup Guide
Installing ASRock Smart Connect Utility
Step 1 Install ASRock Smart Connect Utility, which is located in the folder at the following path of the Support CD: \ ASRock Utility > Smart Connect.
Step 2 Once installed, run ASRock Smart Connect from your desktop or go to Windows Start -> All Programs -> ASRock Utility.
23
English
User Manual - Page 30
H81M-VG4 R3.0
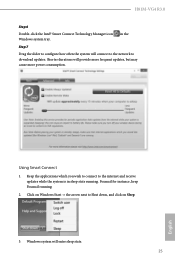
Step 6
Double-click the Intel® Smart Connect Technology Manager icon Windows system tray.
in the
Step 7
Drag the slider to configure how often the system will connect to the network to download updates. Shorter durations will provide more frequent updates, but may cause more power consumption.
Using Smart Connect
1. Keep the applications which you wish to...
User Manual - Page 32
H81M-VG4 R3.0
3.3 ASRock APP Shop
The ASRock APP Shop is an online store for purchasing and downloading software applications for your ASRock computer. You can install various apps and support utilities quickly and easily, and optimize your system and keep your motherboard up to date simply with a few clicks.
Double-click
on your desktop to access ASRock APP Shop utility.
*You need to be...
User Manual - Page 33
...is selected, you will see all the available apps on screen for you to download.
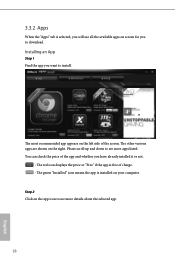
Installing an App
Step 1 Find the app you want to install.
The most recommended app appears on the left side of the screen. The... it or not.
- The red icon displays the price or "Free" if the app is free of charge. - The green "Installed" icon means the app is installed on your computer. Step 2 Click on the app icon to...
User Manual - Page 34
H81M-VG4 R3.0
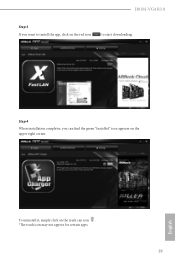
Step 3 If you want to install the app, click on the red icon
to start downloading.
Step 4
When installation completes, you can find the green "Installed" icon appears on the upper right corner.
English
To uninstall it, simply click on the trash can icon . *The trash icon may not appear for certain apps.
29
User Manual - Page 35
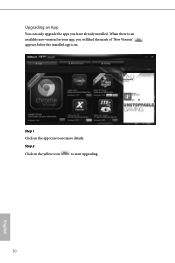
Upgrading an App
You can only upgrade the apps you have already installed. When there is an available new version for your app, you will find the mark of "New Version" appears below the installed app icon.
Step 1 Click on the app icon to see more details. Step 2
Click on the yellow icon
to start upgrading.
English
30
User Manual - Page 36
H81M-VG4 R3.0
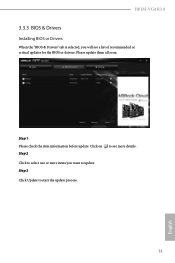
3.3.3 BIOS & Drivers
Installing BIOS or Drivers
When the "BIOS & Drivers" tab is selected, you will see a list of recommended or critical updates for the BIOS or drivers. Please update them all soon.
Step 1 Please check the item information before update. Click on Step 2
to see more details.
Click to select one or more items you want to update. Step 3
Click Update to start the ...
User Manual - Page 38
H81M-VG4 R3.0
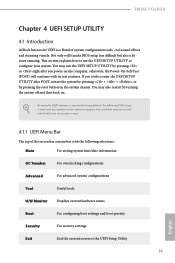
Chapter 4 UEFI SETUP UTILITY
4.1 Introduction
ASRock Interactive UEFI is a blend of system configuration tools, cool sound effects and stunning visuals. Not only will it make BIOS setup less difficult but also a lot more amusing. This section explains how to use the UEFI SETUP UTILITY to configure your system. You may run the UEFI SETUP UTILITY by pressing...
User Manual - Page 41
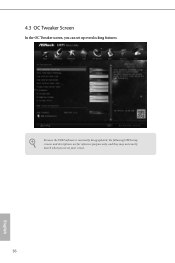
4.3 OC Tweaker Screen
In the OC Tweaker screen, you can set up overclocking features.
Because the UEFI software is constantly being updated, the following UEFI setup screens and descriptions are for reference purpose only, and they may not exactly match what you see on your screen.
36
English
User Manual - Page 59
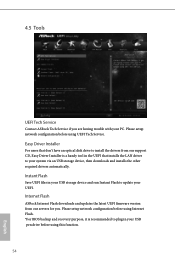
... Tech Service
Contact ASRock Tech Service if you are having trouble with your PC. Please setup network configuration before using UEFI Tech Service.
Easy Driver Installer
For users that don't have an optical disk drive to install the drivers from our support CD, Easy Driver Installer is a handy tool in the UEFI that installs the LAN driver to your system via an USB storage device, then downloads...
User Manual - Page 60
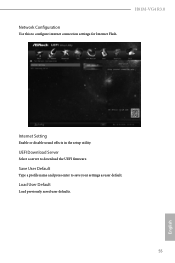
... Configuration
Use this to configure internet connection settings for Internet Flash.
H81M-VG4 R3.0
Internet Setting
Enable or disable sound effects in the setup utility.
UEFI Download Server
Select a server to download the UEFI firmware.
Save User Default
Type a profile name and press enter to save your settings as user default.
Load User Default
Load previously saved user defaults.
55
English