ASRock J4005DC-ITX driver and firmware
Related ASRock J4005DC-ITX Manual Pages
Download the free PDF manual for ASRock J4005DC-ITX and other ASRock manuals at ManualOwl.com
User Manual - Page 4
...Motherboard Layout
5
1.4 I/O Panel
7
Chapter 2 Installation
9
2.1 Installation of Memory Modules (SO-DIMM)
10
2.2 Expansion Slot (PCI Express Slot)
12
2.3 Jumpers Setup
13
2.4 Onboard Headers and Connectors
14
2.5 M.2 WiFi/BT Module and Intel® CNVi (Integrated WiFi/BT)
Installation Guide
18
Chapter 3 Software and Utilities Operation
20
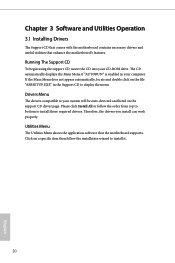
3.1 Installing Drivers
20
3.2 ASRock...
User Manual - Page 6
... latest VGA cards and CPU support list on ASRock's website as well. ASRock website http://www.asrock.com.
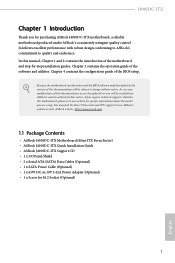
1.1 Package Contents
• ASRock J4005DC-ITX Motherboard (Mini-ITX Form Factor) • ASRock J4005DC-ITX Quick Installation Guide • ASRock J4005DC-ITX Support CD • 1 x I/O Panel Shield • 2 x Serial ATA (SATA) Data Cables (Optional) • 1 x SATA Power Cable (Optional...
User Manual - Page 8
...8226; Supports Energy Efficient Ethernet 802.3az • Supports PXE
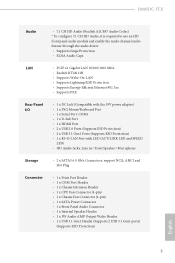
Rear Panel I/O
• 1 x DC Jack (Compatible with the 19V power adapter) • 1 x PS/2 Mouse/Keyboard Port • 1 x Serial Port: COM1 • 1 x D-Sub Port • 1 x HDMI Port • 2 x USB 2.0 Ports (Supports ESD Protection) • 2 x USB 3.1 Gen1 Ports (Supports ESD Protection) • 1 x RJ-45 LAN Port with...
User Manual - Page 9
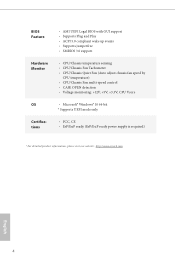
... multi-speed control • CASE OPEN detection • Voltage monitoring: +12V, +5V, +3.3V, CPU Vcore
OS
• Microsoft® Windows® 10 64-bit
* Supports UEFI mode only
Certifications
• FCC, CE • ErP/EuP ready (ErP/EuP ready power supply is required)
* For detailed product information, please visit our website: http://www.asrock.com
English...
User Manual - Page 13
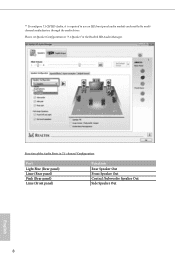
... is required to use an HD front panel audio module and enable the multichannel audio feature through the audio driver.
Please set Speaker Configuration to "7.1 Speaker"in the Realtek HD Audio Manager.
Function of the Audio Ports in 7.1-channel Configuration:
Port
Light Blue (Rear panel) Lime (Rear panel) Pink (Rear panel) Lime (Front panel)
Function
Rear Speaker Out Front...
User Manual - Page 14

J4005DC-ITX
Chapter 2 Installation
This is a Mini-ITX form factor motherboard. Before you install the motherboard, study the configuration of your chassis to ensure that the motherboard fits into it.
Pre-installation Precautions
Take note of the following precautions before you install motherboard components or change any motherboard settings. • Make sure to unplug the power cord before ...
User Manual - Page 15
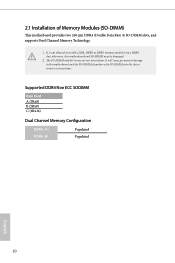
... 4) SO-DIMM slots, and supports Dual Channel Memory Technology.
1. It is not allowed to install a DDR, DDR2 or DDR3 memory module into a DDR4 slot; otherwise, this motherboard and SO-DIMM may be damaged...the motherboard and the SO-DIMM if you force the SO-DIMM into the slot at incorrect orientation.
Supported DDR4 Non ECC SODIMM
Raw Card A (1Rx8) B (2Rx8) C (1Rx16)
Dual Channel Memory ...
User Manual - Page 17

... the power cord is unplugged. Please read the documentation of the expansion card and make necessary hardware settings for the card before you start the installation.
PCIe slot: PCIE1 (PCIe 2.0 x1 slot) is used for PCI Express x1 lane width cards. Warning: To ensure better graphics compability, the BIOS is set to "boot from Onboard VGA" as default even the user install a VGA card on PCIe...
User Manual - Page 20
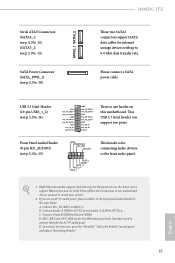
...ATA3 Connectors (SATA3_1: see p.5, No. 12) (SATA3_2: see p.5, No. 15)
SATA Power Connector (SATA_PWR_1) (see p.5, No. 10)
SATA3_1 SATA3_2
J4005DC-ITX
These two SATA3 connectors support SATA data cables for internal storage devices with up to 6.0 Gb/s data transfer rate.
Please connect a SATA power cable.
USB 3.1 Gen1 Header (19-pin USB3_1_2) (see p.5, No. 14)
Vbus IntA_PA_SSRXIntA_PA_SSRX+
GND...
User Manual - Page 23
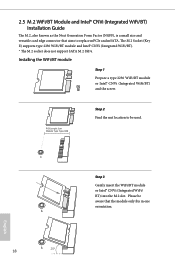
...® CNVi (Integrated WiFi/BT) Installation Guide
The M.2, also known as the Next Generation Form Factor (NGFF), is a small size and versatile card edge connector that aims to replace mPCIe and mSATA. The M.2 Socket (Key E) supports type 2230 WiFi/BT module and Intel® CNVi (Integrated WiFi/BT). * The M.2 socket does not support SATA M.2 SSDs.
Installing the WiFi/BT module
Step...
User Manual - Page 25
Chapter 3 Software and Utilities Operation
3.1 Installing Drivers
The Support CD that comes with the motherboard contains necessary drivers and useful utilities that enhance the motherboard's features.
Running The Support CD
To begin using the support CD, insert the CD into your CD-ROM drive. The CD automatically displays the Main Menu if "AUTORUN" is enabled in your computer. If the Main Menu ...
User Manual - Page 26
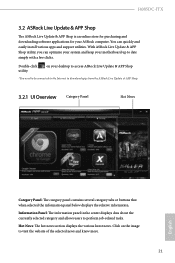
... and downloading software applications for your ASRock computer. You can quickly and easily install various apps and support utilities. With ASRock Live Update & APP Shop utility, you can optimize your system and keep your motherboard up to date simply with a few clicks.
Double-click utility.
on your desktop to access ASRock Live Update & APP Shop
*You need to be connected to the Internet...
User Manual - Page 27
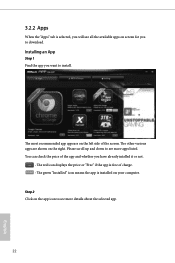
...is selected, you will see all the available apps on screen for you to download.
Installing an App
Step 1 Find the app you want to install.
The most recommended app appears on the left side of the screen. The... it or not.
- The red icon displays the price or "Free" if the app is free of charge. - The green "Installed" icon means the app is installed on your computer. Step 2 Click on the app icon to...
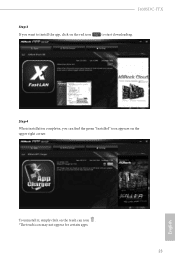
User Manual - Page 28
J4005DC-ITX
Step 3 If you want to install the app, click on the red icon
to start downloading.
Step 4
When installation completes, you can find the green "Installed" icon appears on the upper right corner.
English
To uninstall it, simply click on the trash can icon . *The trash icon may not appear for certain apps.
23
User Manual - Page 29
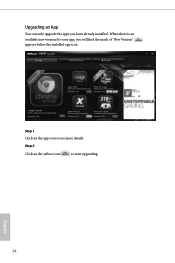
Upgrading an App
You can only upgrade the apps you have already installed. When there is an available new version for your app, you will find the mark of "New Version" appears below the installed app icon.
Step 1 Click on the app icon to see more details.
Step 2
Click on the yellow icon
to start upgrading.
English
24
User Manual - Page 30
J4005DC-ITX
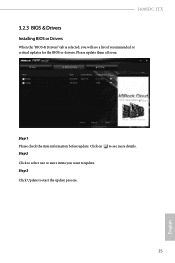
3.2.3 BIOS & Drivers
Installing BIOS or Drivers
When the "BIOS & Drivers" tab is selected, you will see a list of recommended or critical updates for the BIOS or drivers. Please update them all soon.
Step 1 Please check the item information before update. Click on Step 2
to see more details.
Click to select one or more items you want to update. Step 3
Click Update to start the ...
User Manual - Page 31
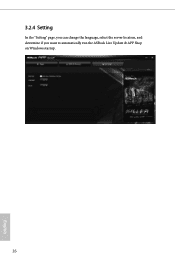
3.2.4 Setting
In the "Setting" page, you can change the language, select the server location, and determine if you want to automatically run the ASRock Live Update & APP Shop on Windows startup.
26
English
User Manual - Page 32
J4005DC-ITX
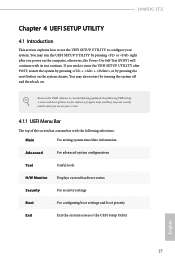
Chapter 4 UEFI SETUP UTILITY
4.1 Introduction
This section explains how to use the UEFI SETUP UTILITY to configure your system. You may run the UEFI SETUP UTILITY by pressing or right after you power on the computer, otherwise, the Power-On-Self-Test (POST) will continue with its test routines. If you wish to enter the UEFI SETUP UTILITY...
User Manual - Page 46
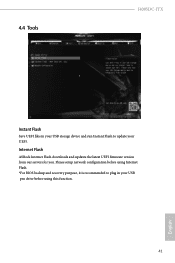
4.4 Tools
J4005DC-ITX
Instant Flash
Save UEFI files in your USB storage device and run Instant Flash to update your UEFI.
Internet Flash
ASRock Internet Flash downloads and updates the latest UEFI firmware version from our servers for you. Please setup network configuration before using Internet Flash. *For BIOS backup and recovery purpose, it is recommended to plug in your USB pen drive before ...
User Manual - Page 47
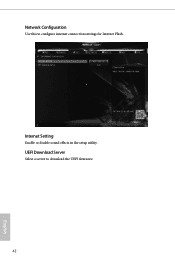
Network Configuration
Use this to configure internet connection settings for Internet Flash.
Internet Setting
Enable or disable sound effects in the setup utility.
UEFI Download Server
Select a server to download the UEFI firmware.
42
English