ASRock N68-GS4 FX R2.0 driver and firmware
Drivers and firmware downloads for this ASRock item

Related ASRock N68-GS4 FX R2.0 Manual Pages
Download the free PDF manual for ASRock N68-GS4 FX R2.0 and other ASRock manuals at ManualOwl.com
User Manual - Page 3
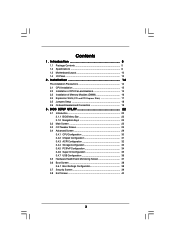
... 6 1.3 Motherboard Layout 10 1.4 I/O Panel 12
2 . Installation 14
Pre-installation Precautions 14 2.1 CPU Installation 15 2.2 Installation of CPU Fan and Heatsink 15 2.3 Installation of Memory Modules (DIMM 16 2.4 Expansion Slots (PCI and PCI Express Slots 17 2.5 Jumpers Setup 18 2.6 Onboard Headers and Connectors 19
3 . BIOS SETUP UTILITY 22
3.1 Introduction 22 3.1.1 BIOS Menu Bar...
User Manual - Page 4
4 . Software Support 41
4.1 Install Operating System 41 4.2 Support CD Information 41
4.2.1 Running Support CD 41 4.2.2 Drivers Menu 41 4.2.3 Utilities Menu 41 4.2.4 Contact Information 41
4
User Manual - Page 5
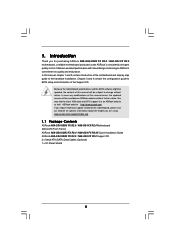
...our website for specific information about the model you are using. www.asrock.com/support/index.asp
1.1 Package Contents
ASRock N68-GS4/USB3 FX R2.0 / N68-GS4 FX R2.0 Motherboard (Micro ATX Form Factor) ASRock N68-GS4/USB3 FX R2.0 / N68-GS4 FX R2.0X Quick Installation Guide ASRock N68-GS4/USB3 FX R2.0 / N68-GS4 FX R2.0 Support CD 2 x Serial ATA (SATA) Data Cables (Optional) 1 x I/O Panel Shield
5
User Manual - Page 6
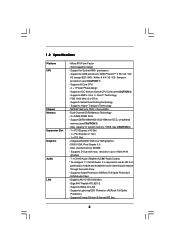
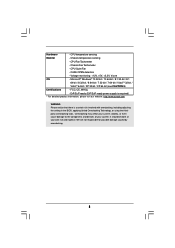
... Specifications
Platform CPU
Chipset Memory Expansion Slot Graphics Audio
LAN
- Micro ATX Form Factor - Solid Capacitor design - Support for Socket AM3+ processors - Support for AM3 processors: AMD PhenomTM II X6 / X4 / X3 / X2 (except 920 / 940) / Athlon II X4 / X3 / X2 / Sempron processors (see CAUTION 1) - Supports 8-Core CPU - 4 + 1 Power Phase design - Supports UCC feature (Unlock CPU Core...
User Manual - Page 8
... CPU Fan Tachometer
- Chassis Fan Tachometer
- CPU Quiet Fan
- CASE OPEN detection
- Voltage monitoring: +12V, +5V, +3.3V, Vcore
OS
- Microsoft® Windows&#...power supply is required)
* For detailed product information, please visit our website: http://www.asrock.com
WARNING Please realize that there is a certain risk involved with overclocking, including adjusting the setting in the BIOS...
User Manual - Page 9
... the compatible memory modules. ASRock website http://www.asrock.com
4. Due to the operating system limitation, the actual memory size may be less than 4GB for the reservation for system usage under Windows® 10 / 8.1 / 8 / 7 / VistaTM / XP. For Windows® OS with 64-bit CPU, there is no such limitation.
5. This motherboard does not support RAID mode under Windows® 10...
User Manual - Page 13
...
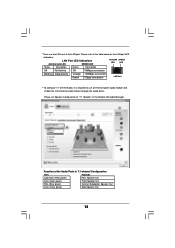
Orange 100Mbps connection Green 1Gbps connection
LAN Port
** To configure 7.1 CH HD Audio, it is required to use an HD front panel audio module and enable the multi-channel audio feature through the audio driver.
Please set Speaker Configuration to "7.1 Speaker" in the Realtek HD Audio Manager.
Function of the Audio Ports in 7.1-channel Configuration
Port
Function
Light Blue (Rear panel...
User Manual - Page 14
...This is a Micro ATX form factor motherboard. Before you install the motherboard, study the configuration of your chassis to ensure that the motherboard fits into it.
Pre-installation Precautions
Take note of the following precautions before you install motherboard components or change any motherboard settings.
Before you install or remove any component, ensure that the power is switched off or the...
User Manual - Page 15
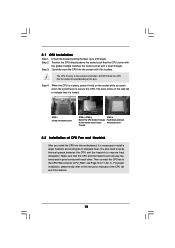
... to improve heat dissipation. Make sure that the CPU and the heatsink are securely fastened and in good contact with each other. Then connect the CPU fan to the CPU FAN connector (CPU_FAN1, see Page 10 or 11, No. 1). For proper installation, please kindly refer to the instruction manuals of the CPU fan and the heatsink.
15
User Manual - Page 16
....
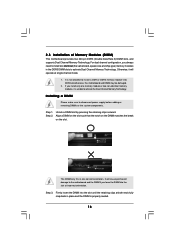
1. It is not allowed to install a DDR or DDR2 memory module into DDR3 slot;otherwise, this motherboard and DIMM may be damaged.
2. If you install only one memory module or two non-identical memory modules, it is unable to activate the Dual Channel Memory Technology.
Installing a DIMM
Please make sure to disconnect power supply before adding or removing DIMMs...
User Manual - Page 17
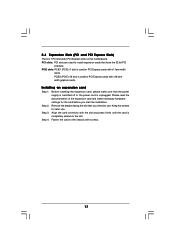
... motherboard. PCI slots: PCI slots are used to install expansion cards that have the 32-bit PCI
interface. PCIE slots: PCIE1 (PCIE x1 slot) is used for PCI Express cards with x1 lane width
cards. PCIE2 (PCIE x16 slot) is used for PCI Express cards with x16 lane width graphics cards.
Installing an expansion card
Step 1. Before installing the expansion card, please make sure that the power supply...
User Manual - Page 18

... reset the system parameters to default setup, please turn off the computer and unplug the power cord from the power supply. After waiting for 15 seconds, use a jumper cap to short pin2 and pin3 on CLRCMOS1 for 5 seconds. However, please do not clear the CMOS right after you update the BIOS. If you need to clear...
User Manual - Page 20
... the front panel audio cable that allows convenient connection and control of audio devices.
1. High Definition Audio supports Jack Sensing, but the panel wire on the chassis must support HDA to function correctly. Please follow the instruction in our manual and chassis manual to install your system.
2. If you use AC'97 audio panel, please install it to the front panel audio header as below...
User Manual - Page 21
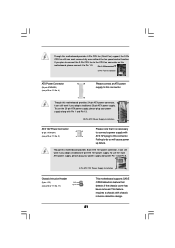
Though this motherboard provides 4-Pin CPU fan (Quiet Fan) support, the 3-Pin
CPU fan still can work successfully even without the fan speed control function.
If you plan to connect the 3-Pin CPU fan to the CPU fan connector on this
motherboard, please connect it to Pin 1-3.
Pin 1-3 Connected
3-Pin Fan Installation
ATX Power Connector
(24-pin ATXPWR1) (see p.10 or...
User Manual - Page 22
...
This section explains how to use the BIOS SETUP UTILITY to configure your system. The SPI Memory on the motherboard stores the BIOS SETUP UTILITY. You may run the BIOS SETUP UTILITY when you start up the computer. Please press or during the Power-On-Self-Test (POST) to enter the BIOS SETUP UTILITY, otherwise, POST will continue with its test routines...
User Manual - Page 23
....
N68-GS4/USB3 FX R2.0:
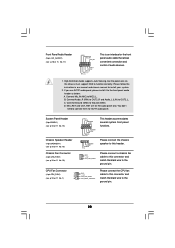
BIOS SETUP UTILITY Main OC Tweaker Advanced H/W Monitor Boot Security Exit
System Overview
System Time System Date
[17:00:09] [Thu 08/10/2015]
BIOS Version : N68-GS4/USB3 FX R2.0 P1.00 Processor Type : AMD Athlon (tm) II X3 440
Processor (64bit) Processor Speed : 3000MHz Microcode Update : 100F52/1000086 L1 Cache Size : 384KB L2 Cache Size : 1536KB
Total Memory...
User Manual - Page 29
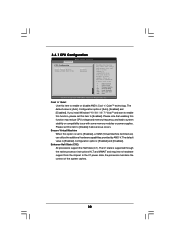
... USB Configuration.
BIOS SETUP UTILITY Main OC Tweaker Advanced H/W Monitor Boot Security Exit
Advanced Settings
Options for CPU
WARNING : Setting wrong values in below sections may cause system to malfunction.
CPU Configuration Chipset Configuration ACPI Configuration Storage Configuration PCIPnP Configuration SuperIO Configuration USB Configuration
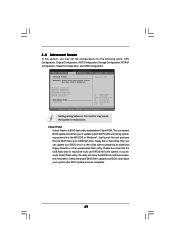
BIOS Update Utility
Instant Flash
Select...
User Manual - Page 30
...], [Enabled] and [Disabled]. If you install Windows® 10 / 8.1 / 8 / 7 / VistaTM and want to enable this function, please set this item to [Enabled]. Please note that enabling this function may reduce CPU voltage and memory frequency, and lead to system stability or compatibility issue with some memory modules or power supplies. Please set this item to [Disable] if above...
User Manual - Page 33
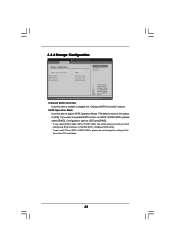
3.4.4 Storage Configuration
BIOS SETUP UTILITY Advanced
Storage Configuration
Onboard SATA Controller SATA Operation Mode
SATAII_1 SATAII_2 SATAII_3 SATAII_4
[Enabled] [IDE]
[Not Detected] [Not Detected] [Not Detected] [Not Detected]
Options
Disabled Enabled
+F1 F9 F10 ESC
Select Screen Select Item Change Option General Help Load Defaults Save and Exit Exit
v02.54 (C) Copyright 1985-2003, ...
User Manual - Page 41
...-ROM drive. The CD automatically displays the Main Menu if "AUTORUN" is enabled in your computer. If the Main Menu did not appear automatically, locate and double click on the file "ASRSETUP.EXE" from the BIN folder in the Support CD to display the menus.
4.2.2 Drivers Menu
The Drivers Menu shows the available devices drivers if the system detects the installed devices...