ASRock T48EM1 driver and firmware

Related ASRock T48EM1 Manual Pages
Download the free PDF manual for ASRock T48EM1 and other ASRock manuals at ManualOwl.com
User Manual - Page 3
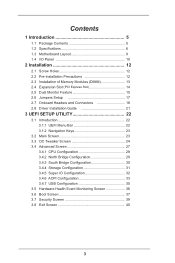
...1.1 Package Contents 5 1.2 Specifications 6 1.3 Motherboard Layout 9 1.4 I/O Panel 10
2 Installation 12
2.1 Screw Holes 12 2.2 Pre-installation Precautions 12 2.3 Installation of Memory Modules (DIMM 13 2.4 Expansion Slot (PCI Express Slot 14 2.5 Dual Monitor Feature 15 2.6 Jumpers Setup 17 2.7 Onboard Headers and Connectors 18 2.8 Driver Installation Guide 21
3 UEFI SETUP UTILITY 22...
User Manual - Page 4
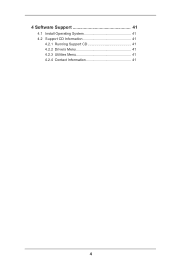
4 Software Support 41
4.1 Install Operating System 41 4.2 Support CD Information 41
4.2.1 Running Support CD 41 4.2.2 Drivers Menu 41 4.2.3 Utilities Menu 41 4.2.4 Contact Information 41
4
User Manual - Page 5
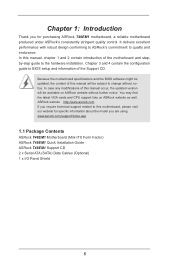
... guide to BIOS setup and information of the Support CD.
Because the motherboard specifications and the BIOS software might be updated, the content of this manual will be subject to change without notice. In case any modifications of this manual occur, the updated version will be available on ASRock website without further notice. You may find the latest VGA cards and CPU support lists on ASRock...
User Manual - Page 7
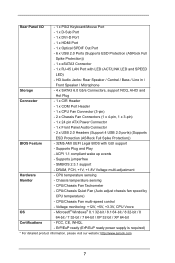
...I/O
- 1 x PS/2 Keyboard/Mouse Port
- 1 x D-Sub Port
- 1 x DVI-D Port
- 1 x HDMI Port
- 1 x Optical SPDIF Out Port
- 6 x USB 2.0 Ports (Supports ESD Protection (ASRock Full
Spike Protection))
- 1 x eSATA3 Connector
- 1 x RJ-45 LAN Port with LED (ACT/LINK LED and SPEED
LED)
- HD Audio Jacks: Rear Speaker / Central / Bass / Line in /
Front Speaker / Microphone
Storage
- 4 x SATA3 6.0 Gb...
User Manual - Page 8

... setting in the BIOS, applying Untied Overclocking Technology, or using the third-party overclocking tools. Overclocking may affect your system stability, or even cause damage to the components and devices ... system limitation, the actual memory size may be less than 4GB for the reservation for system usage under Windows® 8.1 / 8 / 7 / XP. For Windows® OS with 64-bit CPU, there is no such ...
User Manual - Page 12
... screws into the holes indicated by circles to secure the motherboard to the chassis.
Do not over-tighten the screws! Doing so may damage the motherboard.
2.2 Pre-installation Precautions
Take note of the following precautions before you install motherboard components or change any motherboard settings.
1. Unplug the power cord from the wall socket before touching any component. 2. To...
User Manual - Page 13

2.3 Installation of Memory Modules (DIMM)
T48EM1 motherboard provides two 240-pin DDR3 (Double Data Rate 3) DIMM slots.
It is not allowed to install a DDR or DDR2 memory module into DDR3 slot; otherwise, this motherboard and DIMM may be damaged.
Installing a DIMM
Please make sure to disconnect power supply before adding or removing DIMMs or the system components.
Step 1. Step 2.
Unlock...
User Manual - Page 14
... 1 PCI Express slot on this motherboard. PCIE slot:
PCIE1 (PCIE x16 slot) is used for PCI Express x4 lane width graphics cards.
Installing an expansion card
Step 1. Before installing the expansion card, please make sure that the power supply is switched off or the power cord is unplugged. Please read the documentation of the expansion card and make necessary hardware settings for the card before...
User Manual - Page 15
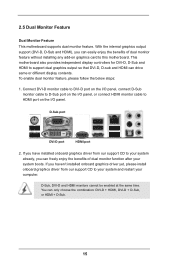
... feature without installing any add-on graphics card to this motherboard. This motherboard also provides independent display controllers for DVI-D, D-Sub and HDMI to support dual graphics output so that DVI-D, D-sub and HDMI can drive same or different display contents. To enable dual monitor feature, please follow the below steps:
1. Connect DVI-D monitor cable to DVI-D port on the I/O panel...
User Manual - Page 17
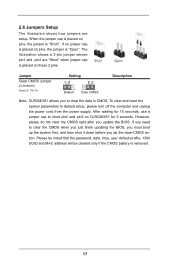
... reset the
system parameters to default setup, please turn off the computer and unplug
the power cord from the power supply. After waiting for 15 seconds, use a
jumper cap to short pin2 and pin3 on CLRCMOS1 for 5 seconds. However,
please do not clear the CMOS right after you update the BIOS. If you need
to clear...
User Manual - Page 19
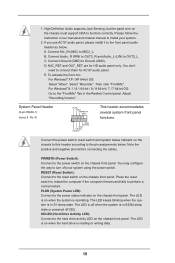
... Sensing, but the panel wire on the chassis must support HDA to function correctly. Please follow the instruction in our manual and chassis manual to install your system.
2. If you use AC'97 audio panel, please install it to the front panel audio header as below: A. Connect Mic_IN (MIC) to MIC2_L. B. Connect Audio_R (RIN) to OUT2_R and Audio_L...
User Manual - Page 20
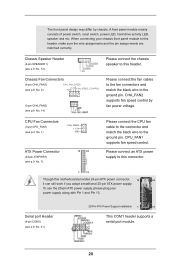
...-pin ATXPWR1)
(see p.9 No. 7)
12
24
Please connect the CPU fan cable to the connector and match the black wire to the ground pin. CPU_FAN1 supports fan speed control.
Please connect an ATX power supply to this connector.
1
13
Though this motherboard provides 24-pin ATX power connector, 12
24
it can still work if you adopt...
User Manual - Page 21
2.8 Driver Installation Guide
To install the drivers to your system, please insert the support CD to your optical drive first. Then, the drivers compatible to your system can be auto-detected and listed on the support CD driver page. Please follow the order from up to bottom side to install those required drivers. Therefore, the drivers you install can work properly.
21
User Manual - Page 22
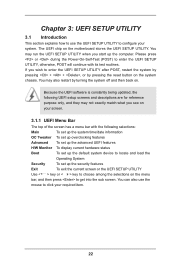
...Because the UEFI software is constantly being updated, the following UEFI setup screens and ...set up overclocking features
Advanced To set up the advanced UEFI features
H/W Monitor To display current hardware status
Boot
To set up the default system device to locate and load the
Operating System
Security
To set up the security features
Exit
To exit the current screen or the UEFI SETUP...
User Manual - Page 25
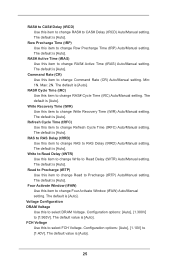
... RAS# Cycle Time (tRC) Auto/Manual setting. The default is [Auto].
Write Recovery Time (tWR) Use this item to change Write Recovery Time (tWR) Auto/Manual setting. The default is [Auto].
Refresh ... Read to Precharge (tRTP) Auto/Manual setting. The default is [Auto].
Four Activate Window (tFAW) Use this item to change Four Activate Window (tFAW) Auto/Manual setting. The default is [Auto].
Voltage...
User Manual - Page 27
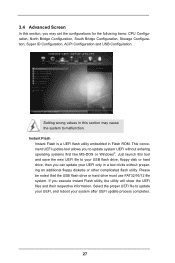
... Configuration, Storage Configuration, Super IO Configuration, ACPI Configuration and USB Configuration.
Setting wrong values in this section may cause the system to malfunction. Instant Flash Instant Flash is a UEFI flash utility embedded in Flash ROM. This convenient UEFI update tool allows you to update system UEFI without entering operating systems first like MS-DOS or Windows®. Just...
User Manual - Page 28

...: [Auto], [Enabled] and [Disabled]. If you install Windows® 8.1 / 8 / 7 / XP and want to enable this function, please set this item to [Enabled]. Please note that enabling this function may reduce CPU voltage and memory frequency, and lead to system stability or compatibility issue with some memory modules or power supplies. Please set this item to [Disable] if above...
User Manual - Page 30
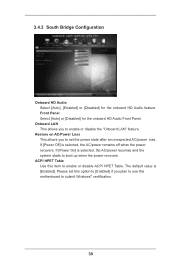
... the onboard HD Audio Front Panel.
Onboard LAN This allows you to enable or disable the "Onboard LAN" feature.
Restore on AC/Power Loss This allows you to set the power state after an unexpected AC/power loss. If [Power Off] is selected, the AC/power remains off when the power recovers. If [Power On] is selected, the AC/power resumes and the...
User Manual - Page 41
... for more information.
4.2 Support CD Information The Support CD that came with the motherboard contains necessary drivers and useful utilities that enhance the motherboard features.
4.2.1 Running The Support CD To begin using the support CD, insert the CD into your CD-ROM drive. The CD automatically displays the Main Menu if "AUTORUN" is enabled in your computer. If the Main Menu...
User Manual - Page 42
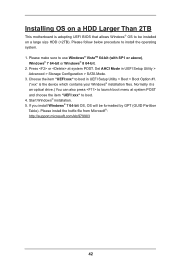
...; 8 64-bit. 2. Press or at system POST. Set AHCI Mode in UEFI Setup Utility >
Advanced > Storage Configuration > SATA Mode. 3. Choose the item "UEFI:xxx" to boot in UEFI Setup Utility > Boot > Boot Option #1.
("xxx" is the device which contains your Windows® installation files. Normally it is an optical drive.) You can also press to launch boot menu at system...