ASRock TRX50 WS driver and firmware

Related ASRock TRX50 WS Manual Pages
Download the free PDF manual for ASRock TRX50 WS and other ASRock manuals at ManualOwl.com
User Manual - Page 3
...2 Installation
14
2.1 Installing the CPU
15
2.2 Installing the CPU Liquid Cooler
19
2.3 Installing Memory Modules (DIMM)
21
2.4 Connecting the Front Panel Header
23
2.5 Installing the Motherboard
24
2.6 Installing SATA Drives
25
2.7 Installing a Graphics Card
27
2.8 Connecting Peripheral Devices
29
2.9 Connecting the Power Connectors
30
2.10 Power On
31
2.11 Jumpers Setup
32...
User Manual - Page 4
2.13 Smart Buttons
53
2.14 Dr. Debug
57
2.15 M.2 SSD Card Installation Guide (M2_1)
63
2.16 M.2 SSD Card Installation Guide (M2_2)
66
User Manual - Page 5
...may find the latest VGA cards and CPU support list on ASRock's website as well. ASRock website http://www.asrock.com.
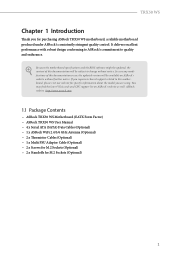
1.1 Package Contents
• ASRock TRX50 WS Motherboard (EATX Form Factor) • ASRock TRX50 WS User Manual • 4 x Serial ATA (SATA) Data Cables (Optional) • 1 x ASRock WiFi 2.4/5/6 GHz Antenna (Optional) • 2 x Thermistor Cables (Optional) • 1 x Multi PSU...
User Manual - Page 7
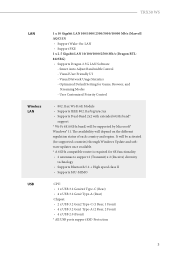
TRX50 WS
LAN
Wireless LAN
USB
1 x 10 Gigabit LAN 100/1000/2500/5000/10000 Mb/s (Marvell AQC113) • Support Wake-On-LAN • Support PXE 1 x 2.5 Gigabit LAN 10/100/1000/2500 Mb/s (Dragon RTL8125BG) • Supports Dragon 2.5G LAN Software
- Smart Auto Adjust Bandwidth Control - Visual User Friendly UI - Visual Network Usage Statistics - Optimized Default Setting for Game, Browser, and
...
User Manual - Page 10
...
• Microsoft® Windows® 11 64-bit
• FCC, CE • ErP/EuP ready (ErP/EuP ready power supply is required)
* For detailed product information, please visit our website: http://www.asrock.com
Please realize that there is a certain risk involved with overclocking, including adjusting the setting in the BIOS, applying Untied Overclocking Technology...
User Manual - Page 17
TRX50 WS
1.6 802.11ax Wi-Fi 6E Module and ASRock WiFi 2.4/5/6 GHz Antenna
802.11ax Wi-Fi 6E + BT Module
This motherboard comes with an exclusive 802.11 a/b/g/n/ac/ax Wi-Fi 6E + BT v5.2 module that offers support for 802.11 a/b/g/n/ac/ax Wi-Fi 6E connectivity standards and Bluetooth v5.2. Wi-Fi 6E + BT module...
User Manual - Page 18
..., study the configuration of your chassis to ensure that the motherboard fits into it.
Pre-installation Precautions
Take note of the following precautions before you install motherboard components or change any motherboard settings. • Make sure to unplug the power cord before installing or removing the motherboard
components. Failure to do so may cause physical injuries and damages...
User Manual - Page 19
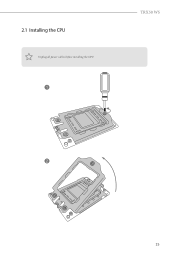
2.1 Installing the CPU
Unplug all power cables before installing the CPU.
1
TRX50 WS
2
15
User Manual - Page 21
TRX50 WS
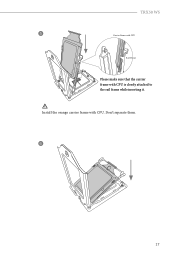
5
Carr ier Frame with CPU
Rail Frame
Please make sure that the carrier frame with CPU is closely attached to the rail frame while inserting it.
Install the orange carrier frame with CPU. Don't separate them.
6
17
User Manual - Page 23
TRX50 WS
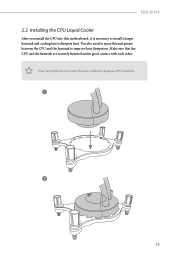
2.2 Installing the CPU Liquid Cooler
After you install the CPU into this motherboard, it is necessary to install a larger heatsink and cooling fan to dissipate heat. You also need to spray thermal grease between the CPU and the heatsink to improve heat dissipation. Make sure that the CPU and the heatsink are securely fastened and in good contact with...
User Manual - Page 25
TRX50 WS
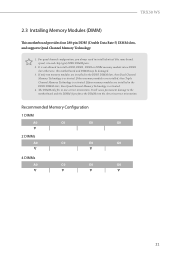
2.3 Installing Memory Modules (DIMM)
This motherboard provides four 288-pin DDR5 (Double Data Rate 5) DIMM slots, and supports Quad Channel Memory Technology.
1. For quad channel configuration, you always need to install identical (the same brand, speed, size and chip-type) DDR5 DIMM pairs.
2. It is not allowed to install a DDR, DDR2 , DDR3 or DDR4 memory module into a DDR5 slot...
User Manual - Page 28
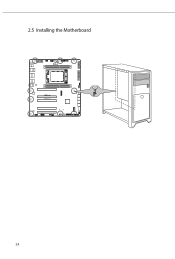
2.5 Installing the Motherboard
24
User Manual - Page 60
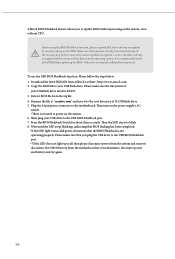
.... 1. Download the latest BIOS file from ASRock's website : http://www.asrock.com. 2. Copy the BIOS file to your USB flash drive. Please make sure the file system of
your USB flash drive must be FAT32. 3. Extract BIOS file from the zip file. 4. Rename the file to "creative.rom" and save it to the root directory of X: USB flash drive. 5. Plug the 24 pin power connector to the motherboard. Then...
RAID Installation Guide - Page 1
AMD RAID Installation Guide
1. AMD BIOS RAID Installation Guide ...2 1.1 Introduction to RAID ...2 1.2 RAID Configurations Precautions 4 1.3 UEFI RAID Configuration ...6
2. AMD Windows RAID Installation Guide 19 2.1 Create a RAID volume under Windows 19 2.2 Delete a RAID array under Windows 26
1
RAID Installation Guide - Page 2
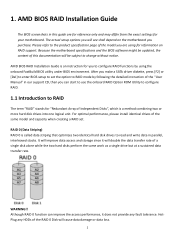
... support. Because the motherboard specifications and the BIOS software might be updated, the content of this documentation will be subject to change without notice.
AMD BIOS RAID Installation Guide is an instruction for you to configure RAID functions by using the onboard FastBuild BIOS utility under BIOS environment. After you make a SATA driver diskette, press [F2] or [Del] to enter BIOS setup...
RAID Installation Guide - Page 6
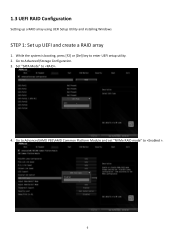
1.3 UEFI RAID Configuration
Setting up a RAID array using UEFI Setup Utility and installing Windows
STEP 1: Set up UEFI and create a RAID array
1. While the system is booting, press [F2] or [Del] key to enter UEFI setup utility. 2. Go to Advanced\Storage Configuration. 3. Set "SATA Mode" to .
4. Go to Advanced\AMD PBS\AMD Common Platform Module and set "NVMe RAID mode" to .
6
RAID Installation Guide - Page 12
... in this installation guide are for reference only. Please refer to ASRock's website for details about each model. https://www.asrock.com/index.asp
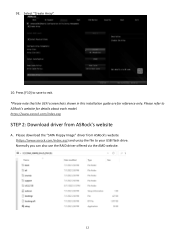
STEP 2: Download driver from ASRock's website
A. Please download the "SATA Floppy Image" driver from ASRock's website (https://www.asrock.com/index.asp) and unzip the file to your USB flash drive. Normally you can also use the RAID driver offered via...
RAID Installation Guide - Page 13
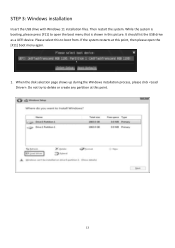
... that is shown in this picture. It should list the USB drive as a UEFI device. Please select this to boot from. If the system restarts at this point, then please open the [F11] boot menu again.
1. When the disk selection page shows up during the Windows installation process, please click . Do not try to delete or...
RAID Installation Guide - Page 18
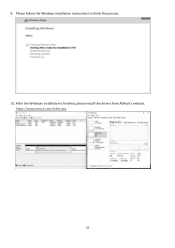
9. Please follow the Windows installation instructions to finish the process.
10. After the Windows installation is finished, please install the drivers from ASRock's website. https://www.asrock.com/index.asp
18
RAID Installation Guide - Page 19
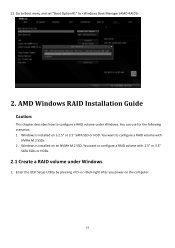
... use for the following scenarios: 1. Windows is installed on a 2.5" or 3.5" SATA SSD or HDD. You want to configure a RAID volume with
NVMe M.2 SSDs. 2. Windows is installed on an NVMe M.2 SSD. You want to configure a RAID volume with 2.5" or 3.5"
SATA SSDs or HDDs.
2.1 Create a RAID volume under Windows
1. Enter the UEFI Setup Utility by pressing or right after you power on the computer.
19