Acer AL1717 driver and firmware


Related Acer AL1717 Manual Pages
Download the free PDF manual for Acer AL1717 and other Acer manuals at ManualOwl.com
AL1717 Service Guide - Page 1
Acer AL1717 Service Guide
Service guide files and updates are available on the CSD web: for more information, Please refer to http://csd.acer.com.tw/
- 1 -
AL1717 Service Guide - Page 2
... in a retrieval system, or translated into any language or computer language, in any form or by any means, electronic, mechanical, magnetic, optical, chemical, manual or otherwise, without the prior written permission of Acer Incorporated.
Disclaimer
The information in this guide is subject to change without notice. Acer Incorporated makes no representations or warranties, either expresses or...
AL1717 Service Guide - Page 3
... to the BASICCONFIGURATION decided for Acer's "global" product offering. To better fit local market requirements and enhance product competitiveness, your regional office MAY have decided to extend the functionality of a machine (e.g. add-on card, modem, or extra memory capability). These LOCALIZED FEATURES will NOT be covered in this generic service guide. In such cases, please contact...
AL1717 Service Guide - Page 4
...installed and used in accordance with the instructions, may cause harmful interference to radio communications. However, there is no guarantee that interference will not occur in a particular installation. If this equipment does cause harmful interference to radio or television...an experienced radio/TV technician for help.
Warning
Use only shielded signal cables to connect I/O devices to this ...
AL1717 Service Guide - Page 5
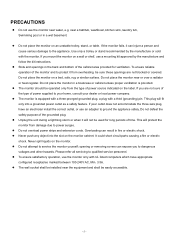
... plug, a plug with a third (grounding) pin. This plug will fit only into a grounded power outlet as a safety feature. If your outlet does not accommodate the three-wire plug, have an electrician install the correct outlet, or use an adapter to ground the appliance safely. Do not defeat the safety purpose of the grounded...
AL1717 Service Guide - Page 18
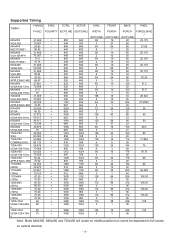
Supported Timing
TIMING
640x350 VGA-350 640x400 NEC PC9801 640x400 VGA-GRAPH 640x400 NEC PC9821 640X480 VESA-PAL 640x480 VGA-480 640x480 APPLE MAC-480 640x480 VESA-480-72Hz 640x480 VESA-480-75Hz 720x400 VGA-400-TEXT 832x624 APPLE MAC-800 800x600 SVGA 800x600 VESA-600-60Hz 800x600 VESA-600-72Hz 800x600 VESA-600-75Hz 1024x768 XGA 1024x768...
AL1717 Service Guide - Page 24
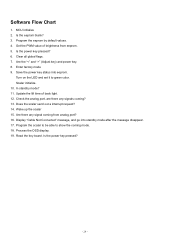
... and set it to green color. Scalar initialize. 10. In standby mode? 11. Update the lift time of back light. 12. Check the analog port, are there any signals coming? 13. Does the scalar send out a interrupt request? 14. Wake up the scalar 15. Are there any signal coming from analog port? 16. Display "Cable Not...
AL1717 Service Guide - Page 26
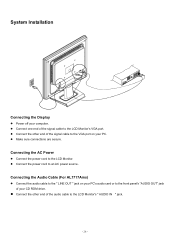
... Installation
Connecting the Display
z Power off your computer. z Connect one end of the signal cable to the LCD Monitor's VGA port. z Connect the other end of the signal cable to the VGA port on your PC. z Make sure connections are secure.
Connecting the AC Power
z Connect the power cord to the LCD Monitor. z Connect the power cord to an AC power source.
Connecting the Audio Cable...
AL1717 Service Guide - Page 33
... state
‹The stand-by, suspend and off mode recover to on mode about 3 seconds.
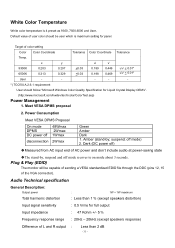
Plug & Play (EDID)
The monitor will be capable of sending a VESA standardized EDID file through the DDC (pins 12, 15 of the VGA connector).
Audio Technical specification
General Description:
Output power
Total harmonic distortion
:
1W + 1W maximum
: Less than...
AL1717 User's Guide - Page 1
TABLE OF CONTENTS
Special notes on LCD monitors 1 Introduction 2 Features 2 Unpacking 3 Attaching/Removing the base 4 Screen position adjustment 4 Connecting the power cord 5 Safety precaution 5 Cleaning your monitor 5 Preset modes 6 Power saving 7 DDC ...7 Installation 8 User controls 9 Troubleshooting 13 Specification 14
AL1717 User's Guide - Page 3
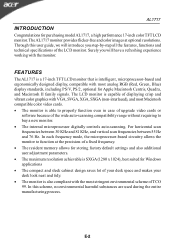
... of displaying crisp and vibrant color graphics with VGA, SVGA, XGA, SXGA (non-interlaced), and most Macintosh compatible color video cards. · The monitor is able to properly function even in case of upgrade video cards or
software because of the wide auto-scanning compatibility range without requiring to buy a new monitor. · The internal microprocessor digitally controls auto-scanning...
AL1717 User's Guide - Page 5
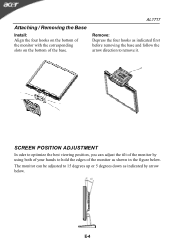
Attaching / Removing the Base
Install: Align the four hooks on the bottom of the monitor with the corresponding slots on the bottom of the base.
AL1717
Remove: Depress the four hooks as indicated first before removing the base and follow the arrow direction to remove it.
SCREEN POSITION ADJUSTMENT
In oder ...
AL1717 User's Guide - Page 6
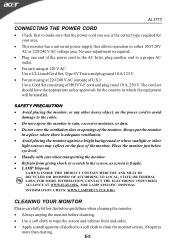
... and plug rated 10 A, 250 V. The cord set should have the appropriate safety approvals for the country in which the equipment will be installed.
SAFETY PRECAUTION · Avoid placing the monitor, or any other heavy object, on the power cord to avoid
damage to the cable. · Do not expose the monitor to rain...
AL1717 User's Guide - Page 7
AL1717
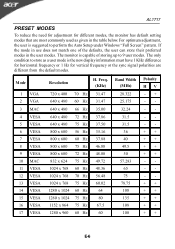
PRESET MODES
To reduce the need for adjustment for different modes, the monitor has default setting modes that are most commonly used as given in the table below. For optimum adjustment, the user is suggested to perform the Auto Setup under Windows... VGA 2 VGA
Resolution
720 x 400 640 x 480
70 Hz 60 Hz
H. Freq. (KHz)
31.47 31.47
Band Width (MHz)
28.322 25.175
Polarity HV -+ --
3 MAC
...
AL1717 User's Guide - Page 8
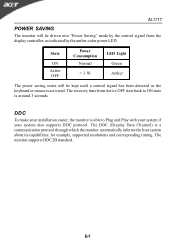
... until a control signal has been detected or the keyboard or mouse is activated. The recovery time from Active OFF state back to ON state is around 3 seconds.
DDC
To make your installation easier, the monitor is able to Plug and Play with your system if your system also supports DDC protocol. The DDC (Display Data...
AL1717 User's Guide - Page 9
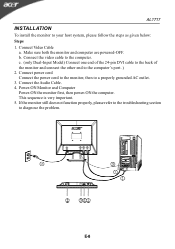
... one end of the 24-pin DVI cable to the back of the monitor and connect the other end to the computer's port. ) 2. Connect power cord Connect the power cord to the monitor, then to a properly grounded AC outlet. 3. Connect the Audio Cable. 4. Power-ON Monitor and Computer Power-ON the monitor first, then power-ON the computer. This sequence is very important...
AL1717 User's Guide - Page 11
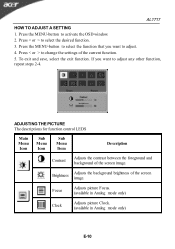
AL1717
HOW TO ADJUST A SETTING 1. Press the MENU-button to activate the OSD window. 2. Press < or > to select the desired function. 3. Press the MENU-button to select the function that you want to adjust. 4. Press < or > to change the settings of the current function. 5. To exit and save, select the exit function. If you want...