Acer AR160 F1 driver and firmware
Drivers and firmware downloads for this Acer Computers item


Related Acer AR160 F1 Manual Pages
Download the free PDF manual for Acer AR160 F1 and other Acer manuals at ManualOwl.com
User Manual - Page 7

...• avoid tensing your muscles or shrugging your shoulders • install the external display, keyboard and mouse properly and within
comfortable reach • if you view your ...graphics clarity. • Eliminate glare and reflections by:
• placing your display in such a way that the side faces the window or any light source
• minimizing room light by using drapes, shades ...
User Manual - Page 13

...21
3 System upgrades
23
Installation precautions
24
ESD precautions
24
Pre-installation instructions
24
Post-installation instructions
25
Configuring the storage devices
26
Accessing the drive bays
26
Hard disk drive configuration guidelines
26
Removing and installing a hard disk drive
27
Removing and installing an optical drive
29
Installing and removing the power supply
30...
User Manual - Page 14

... system memory
44
Installing an expansion card
52
Installing a PCI Express card
52
Installing the right riser card and the Gigabit dual
port server adapter
54
4 System BIOS
57
Introduction
58
The BIOS setup utility
58
Changing configuration data
58
Main setup
59
System Overview
59
Advanced Settings
61
Boot Features
61
Processor & Clock Options
62
Advanced Chipset Control...
User Manual - Page 15

... External SATA RAID Creation
Appendix B Rack mount configuration
Rack installation information System rack installation Vertical mounting hole pattern
Installing the system into the rack
Appendix C: Acer Smart Console
Using Acer Smart Console Software requirements
Accessing Acer Smart Console Acer Smart Console user interface
System Information Server Health Configuration Remote Control Launch...
User Manual - Page 36

... tray. Improper insertion may damage both the disc and the CD-ROM drive.
5 Gently press the drive Stop/Eject button again to close the disc tray.
6 On the Acer Smart Setup window, select OS Installation. 7 Follow all onscreen instructions.
For more information, refer to the Smart Setup Help file.
Note: The Windows or Linux OS disc is needed when you...
User Manual - Page 37

.... 2 Select Shut Down. 3 Select Shut down from the drop-down window then click on OK.
To turn off the system via hardware: If you cannot shut down the server using the software, press and hold the power button for at least four seconds. Quickly pressing the button may put the server in a Suspend...
User Manual - Page 40

24
3 System upgrades
Installation precautions
Before you install any server component, we recommend that you read the following sections. These sections contain important ESD precautions along with pre-installation and post-installation instructions.
ESD precautions
Electrostatic discharge (ESD) can damage the processor, disk drives, expansion boards, mainboard, memory modules and other server ...
User Manual - Page 42

... upgrades
Configuring the storage devices
The system supports up to four 3.5-inch hot-plug SAS/SATA hard disk drives. An optional optical drive can also be added to the server.
Accessing the drive bays
Since SAS/SATA drives have hot-plug capability, you do not need to access the inside of the chassis or power down the system to install or replace SAS/SATA drives. Proceed...
User Manual - Page 44

28
3 System upgrades
(3) Pull the lever and slide the carrier from the chassis.
4 Observe the post-installation instructions described on page 25.
Installing a hard disk drive with carrier
1 Slide the HDD carrier all the way into the drive bay. 2 Use the lever to push the HDD carrier until it locks into place, then
close the HDD carrier lever...
User Manual - Page 46

... damage the system components.
Caution! The power supply is only hot-pluggable if you have a redundant system with two power supplies installed. If you only have one power supply installed, before removing or replacing the power supply, you must first take the server out of service, turn off all peripheral devices connected to the system, turn off the...
User Manual - Page 50

...System upgrades
Installing the top cover
1 Perform the pre-installation instructions described on page 24. 2 Install ...installed to ensure reliable and continued operation.
You need to remove the air duct to perform the following procedures: • Removing and installing a processor • Removing and installing a memory module
Removing the air duct
1 Perform the pre-installation instructions...
User Manual - Page 52

36
3 Remove the fan module. (1) Disconnect the fan cable.
3 System upgrades
(2) Pull the fan up and away from the chassis. 4 Install the new fan module.
(1) Insert the new fan into the chassis.
(2) Connect the fan cable. Check the routing of all cables for obstructions.
User Manual - Page 54

.... Use caution so that you do not damage the TIM. If a protective film is installed on the TIM, remove it.
1 Remove power from the system and unplug the AC power cord from the power supply.
2 Do not apply any thermal grease to the heatsink or the CPU die; the required amount has already been applied.
User Manual - Page 56
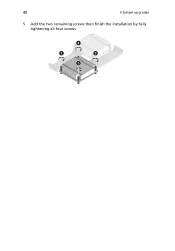
40
3 System upgrades
5 Add the two remaining screws then finish the installation by fully tightening all four screws.
User Manual - Page 109

... came with the device.
There is problem with the application software. Do the following: • Verify that the software is properly configured for the system.
Refer to the software installation and operation documentation for instructions on setting up and using the software. • Try a different version of the software to see if the problem is with the copy you are using...
User Manual - Page 114

... Acer Smart Server Manager User Guide.
Acer Smart Setup
Allows you to install your choice of operating system for the server, clone system to set up multiple identical servers, update the system BIOS and firmware, set up BMC, and configure RAID for the system hard drivers. For detailed instructions on this utility, please refer to the Acer Smart Setup Help file.
Note: BIOS and firmware updates...
User Manual - Page 116

... Adaptec onboard SATA RAID.
Enabling the Adaptec onboard SATA RAID controller 1 Turn on the server and the display monitor. If the server is already
turned on, please close all open applications and then restart the server. 2 During POST, press to access the BIOS Setup Utility. 3 Select the Advanced > IDE/SATA Configuration submenu. 4 Change the setting of the Configure SATA#1 as field...
User Manual - Page 132

... fully control the system. You can remotely power on, off, reset system through Acer Smart Console in-band or out-of-band. Acer Smart Console implements media redirection for the CD/DVD ROM drive and floppy drive. This feature enables remote installation of the operating system or applications.
Notification: Via SNMP trap and email to inform a person or management software when...
User Manual - Page 152

... information).
Upgrading firmware 1 On the Maintenance page click Enter Update Mode. The Firmware
Upload page appears. 2 Click Browse to locate the firmware image file. 3 Click Upload to upload the image file to the server.
Unite reset
Unite reset allows you to reboot the BMC (IPMI) Controller.
IP reset
IP reset allows you to reset the settings for...
User Manual - Page 162

... 33
troubleshooting 85 confirming loading of the OS 90 display problems 94 DVD/CD problems 92 DVD-ROM drive problems 92 hardware diagnostics 89 HDD indicator problem 91 HDD problem 92 initial checklist 88 initial system installation problems 86 memory problem 93 network problem 93 power indicator problem 91 processor problem 94 resetting the system 86 software program problem 93...