Acer AW2000ht-AW170htq F1 driver and firmware
Drivers and firmware downloads for this Acer Computers item


Related Acer AW2000ht-AW170htq F1 Manual Pages
Download the free PDF manual for Acer AW2000ht-AW170htq F1 and other Acer manuals at ManualOwl.com
Acer AW2000ht w AW170htx F1 Server Service Guide - Page 2

... the updates made on Acer AW2000ht service guide.
Date
Chapter
Updates
Copyright
Copyright © 2010 by Acer Inc. All rights reserved. No part of this publication may be reproduced, transmitted, transcribed, stored in a retrieval system, or translated into any language or computer language, in any form or by any means, electronic, mechanical, magnetic, optical, chemical, manual or otherwise...
Acer AW2000ht w AW170htx F1 Server Service Guide - Page 3

... this manual:
Screen messages NOTE WARNING CAUTION IMPORTANT
Denotes actual messages that appear on screen.
Gives bits and pieces of additional information related to the current topic.
Alerts you to any damage that might result from doing or not doing specific actions.
Gives precautionary measures to avoid possible hardware or software problems...
Acer AW2000ht w AW170htx F1 Server Service Guide - Page 4

... electrostatic discharge
To prevent damaging the system, be aware of the precautions you need to follow when setting up the system or handling parts. A discharge of static electricity from a finger or other conductor may damage system boards or other static-sensitive devices. This type of damage may reduce the life expectancy of the...
Acer AW2000ht w AW170htx F1 Server Service Guide - Page 5

... 27 SATA ports 29
SATA backplane board
29
Front view 30 Rear View 31
Hardware removal and installation
33
Optional parts installation and removal 33 Hard disk drive removal and installation 34 Power supply removal and installation 36 Top cover removal and installation 37 Replacing a system fan 38 Fan holder removal and installation 40 Replacing a server node 41 PCI Express card...
Acer AW2000ht w AW170htx F1 Server Service Guide - Page 15
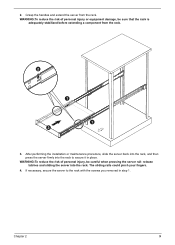
... the risk of personal injury or equipment damage, be sure that the rack is adequately stabilized before extending a component from the rack.
3. After performing the installation or maintenance procedure, slide the server back into the rack, and then press the server firmly into the rack to secure it in place.
WARNING...
Acer AW2000ht w AW170htx F1 Server Service Guide - Page 16

... to the equipment, remove the power cord to remove power from the server. The front panel Power On/Standby button does not completely shut off system power. Portions of the power supply and some internal circuitry remain active until AC power is removed.
IMPORTANT:If installing a hot-plug device, it is not necessary to power down the server.
1. Back...
Acer AW2000ht w AW170htx F1 Server Service Guide - Page 21

... board platform
Proprietary
System board dimensions Length Width
417 mm (16.4 in) 165 mm (6.5 in)
Server dimensions Height Width Depth
2U 88 mm (3.47 in) 438 mm (17.25 in) 724 mm (28.5 in)
Server weight Maximum (all processors, memory, hard disk drives, power supplies installed)
40 kg (90 lb)
Minimum (one processor, memory, 30.9 kg (68 lb) hard disk drive, power supply installed...
Acer AW2000ht w AW170htx F1 Server Service Guide - Page 36

... connector
JF6-B
Backplane to front panel connector
JPW1 JPW2 JPW3 JP70 JP70 JP69 JP36
Main power connector Secondary power connector Secondary power connector Upgrade connectors
SPI connector Power button settings
JP35
LED Test
Function Provides power to the SMBUS and power control signals. Supply power to the chassis cooling fans.
Connect the backplane to the front LED panels on the...
Acer AW2000ht w AW170htx F1 Server Service Guide - Page 39

... components vary in size. During the disassembly process, group the
screws with the corresponding components to avoid mismatch when putting back the components.
Optional parts installation and removal
The server supports the following optional parts: • External USB optical drive
External USB optical drive
Connect an external USB optical drive to an available USB port:
Chapter 7
33
Acer AW2000ht w AW170htx F1 Server Service Guide - Page 40

Hard disk drive removal and installation
The system has four drive bays. Follow these steps: 1. Remove the hard disk drive carrier.
a. Unlock ( ) the HDD carrier latch. b. Slide the HDD carrier latch ( ) to release the lever. c. Pull the lever and slide the carrier ( ) from the chassis.
2. Replace the hard disk drive in the carrier. a. Remove the four screws ( ) that secure...
Acer AW2000ht w AW170htx F1 Server Service Guide - Page 41

b. Install a new hard disk drive ( ) into the carrier and secure it with four screws ( ) .
3. Install the hard disk drive carrier. a. Slide the HDD carrier all the way ( ) into the drive bay. b. Use the lever to push the HDD carrier ( ) until it locks into place; then close the HDD carrier lever. c. Lock ( ) the HDD carrier.
Hardware removal and installation
35
Acer AW2000ht w AW170htx F1 Server Service Guide - Page 42

... operates at 100 to 140/180 to 240V. You can install a second power module for hot-plug and redundancy. Follow these steps: 1. Power down the server and unplug the power cord. 2. Remove the power supply module.
a. Press the power supply release latch ( ) to release the failed power supply module from the chassis.
b. Use the handle ( ) to pull...
Acer AW2000ht w AW170htx F1 Server Service Guide - Page 43

... cover to the chassis. 2. Lift the cover ( ) off the chassis.
3. Put the top cover aside for reinstallation later.
Installing the top cover
1. Align the top cover tabs with the slots on the chassis. 2. Install the top cover.
a. Align the top cover tabs with the slots on the chassis. b. Close the top cover...
Acer AW2000ht w AW170htx F1 Server Service Guide - Page 44

...Fan speed may be controlled by a setting in BIOS (see Chapter 4).
...Removing the fan module
Follow these steps: 1. Remove the top cover (see "Removing the top cover" on page 37) while the system is still running to
determine which of the fans has failed. 2. Remove the fan module.
a. Disconnect the fan cable ( ) . b. Release the fan cable ( ) from the cable guide...
Acer AW2000ht w AW170htx F1 Server Service Guide - Page 55

... the socket. • Do not tilt or slide the processor when lowering the processor into the socket.
Follow these steps: 1. Power down the server and unplug the power cord. 2. Remove the heatsink. See "Heatsink removal and installation" on page 47. 3. Remove the CPU.
a. Release then lift the load lever ( ). b. Open the retention plate ( ) to expose the socket...
Acer AW2000ht w AW170htx F1 Server Service Guide - Page 69
... you are using the latest firmware and files. Firmware upgrades include updates for BIOS, the baseboard management controller (BMC), and the hot-swap controller (HSC). In addition to the server firmware and files, also update any drivers used for components you have installed in your system, such as video drivers, network drivers, and SCSI drivers.
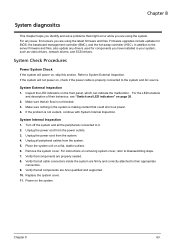
System Check Procedures
Power System Check If the...
Acer AW2000ht w AW170htx F1 Server Service Guide - Page 73

... 9
BIOS Setup
This chapter describes the BIOS Setup Utility for your server. The AMI ROM BIOS is stored in a Flash EEPROM and can be easily updated.
To enter the BIOS Setup Utility, press the key while the system is booting up.
Each main BIOS menu option is described in this manual. The Main BIOS setup menu screen has two main frames. The left frame displays...
Acer AW2000ht w AW170htx F1 Server Service Guide - Page 75

...: Sets the display mode for Option ROM.
Bootup Num-Lock: Selects the Power-on state for Numlock key.
Wait For 'F1' If Error: Forces the system to wait until the key is pressed if an error occurs.
Interrupt 19 Capture: Interrupt 19 is the software interrupt that handles the boot disk function. When this item is set to Enabled, the ROM BIOS...
Acer AW2000ht w AW170htx F1 Server Service Guide - Page 78

... Intel ICH South Bridge chipset.
USB Functions: This feature allows you to decide how many onboard USB ports to enable.
Legacy USB Support: Select Enabled to use Legacy USB devices. If set to Auto, legacy USB support will be automatically enabled if a legacy USB device is installed on the motherboard.
NOTE: Only available when USB Functions is set to Enabled.
USB 2.0 Controller: Select Enabled to...
Acer AW2000ht w AW170htx F1 Server Service Guide - Page 80

... PXE Option ROM to boot the computer using a network device.
Boots Graphic Adapter Boot Priority: This feature allows you to select the graphics adapter to be used as the primary boot device.
Super IO Device configuration
Serial Port1 Address/ Serial Port2 Address: This option specifies the base I/O port address and the Interrupt Request address of Serial Port 1 and Serial Port 2. Select Disabled...